Horizontal Timeline Particle Documentation
A simple, customizable Gantry5 timeline. Works great for showing off your past projects, presenting important events in the history of your organization or even spicing up your CV!
Installing the particle on your website is a really simple process. You just need to follow the below instructions depending on the platform you are on.
Version: 2.0.0 |
Changelog
| Download
Changelog details
-
Version 2.0.0
- Improve code base
- Performance improvements
-
Version 1.0.0
- Released the initial version
Joomla Installation
Step1 Unzip the package Horizontal Timeline.zip.
Step2 Copy all the contents inside folder Horizontal Timeline to custom folder which located at
root/templates/TEMPLATE_NAME/custom/Step 3 Add the following code below
@import "horizontaltimeline";custom.scss file located at
root/templates/TEMPLATE_NAME/custom/scss/custom.scss
Also, make sure your custom.scss file has the
@import "dependencies"; code at the very top. Basically, this step is the same as the one described in the Adding a Custom Style Sheet chapter in the Gantry 5 Documentation.
Video Tutorial
Still don’t know what to do? Watch the video below! It will show you all the steps in details. The video is installation for
flipster card particle in JOOMLA but the steps are the same. ( Remember to change the directory if you are
using WORDPRESS ).
WordPress Installation
Step1 Unzip the package Horizontal Timeline.zip.
Step2 Copy all the contents inside folder Horizontal Timeline to custom folder which located at
root/wp-content/themes/THEME_NAME/customStep 3 Add the following code below
@import "horizontaltimeline";custom.scss file located at
root/wp-content/themes/THEME_NAME/custom/scss/custom.scss
Also, make sure your custom.scss file has the
@import "dependencies"; code at the very top. Basically, this step is the same as the one described in the Adding a Custom Style Sheet chapter in the Gantry 5 Documentation.
Usage
All particles are very easy to use. All the options in partice have a tooltip text to show you what they do. You can watch the usage video below if you are confusing and don’t know what to do next.

| General Setting | Description |
|---|---|
| CSS Classes | CSS class name for the particle. |
| Distance | Set the distance between two events. |
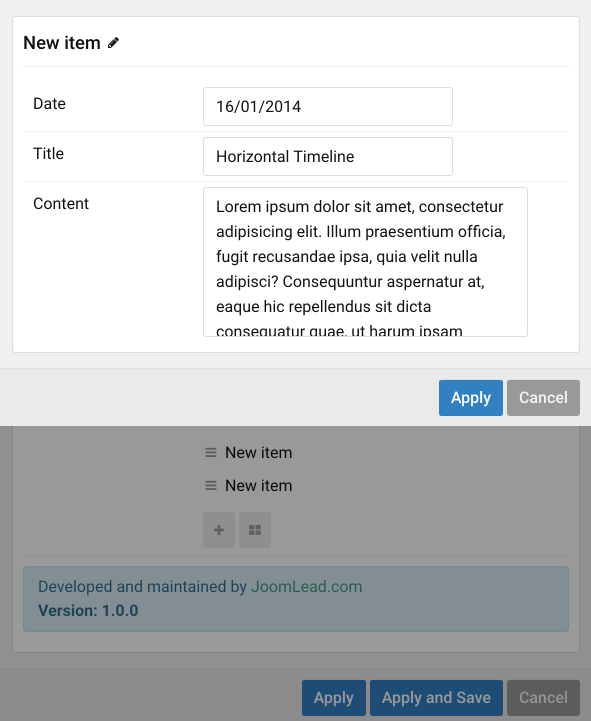
| Item Setting | Description |
|---|---|
| Date | Enter the date of event ( dd/MM/YYYY Example: 31/12/2015 ). |
| Title | Enter the title of event. |
| Content | Enter the content of event. |

Comments