Joomla 5 Quickstart Documentation
Introduction
This document covers Joomla 4 and Joomla 5 template installation, quickstart (demo packages), template/theme setup, and the use of Joomlead templates. It provides answers and solutions to many common problems. We encourage you to thoroughly read this document if you are experiencing any difficulties before contacting our support team.
For detailed documentation on Gantry 5, please visit the website at https://docs.joomlead.com/ (A Complete Guide to the Gantry 5 Framework).
If you have any questions that are beyond the scope of this document, feel free to ask via our ticket support system: Ticket System
Installation
This section provides steps to install a Joomlead Joomla 5 Template into your existing Joomla site or to start with one of our thematic demo websites. These are available as Joomla quickstart packages, which include a full Joomla 5 installation with the Gantry 5 framework, the template, and corresponding theme demo content.
Before installing your template/theme, you need to download it to your computer. Simply log into your purchase account and download the template.
You can download the Gantry 5 component for Joomla from here: https://gantry.org/downloads#joomla
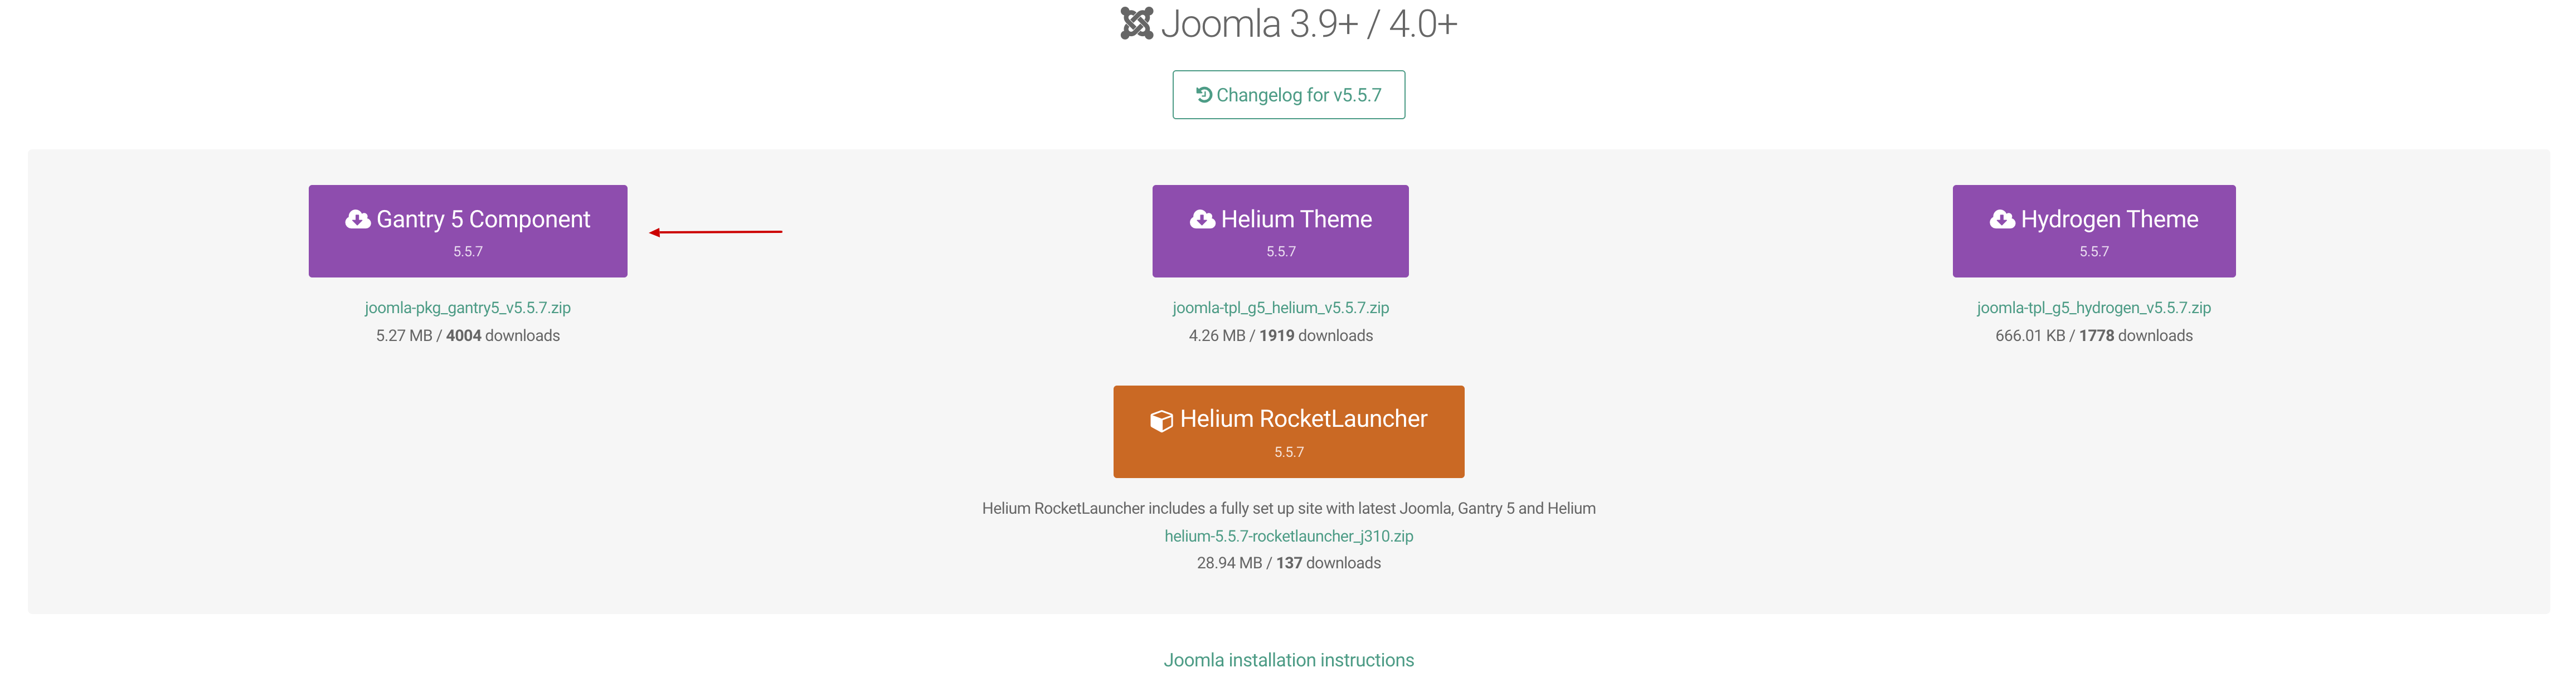
- Gantry 5: This contains the Gantry 5 framework and its associated bits and pieces (library, component, and plugins).
- Theme: This contains just the theme/template.
Installing the Gantry Framework
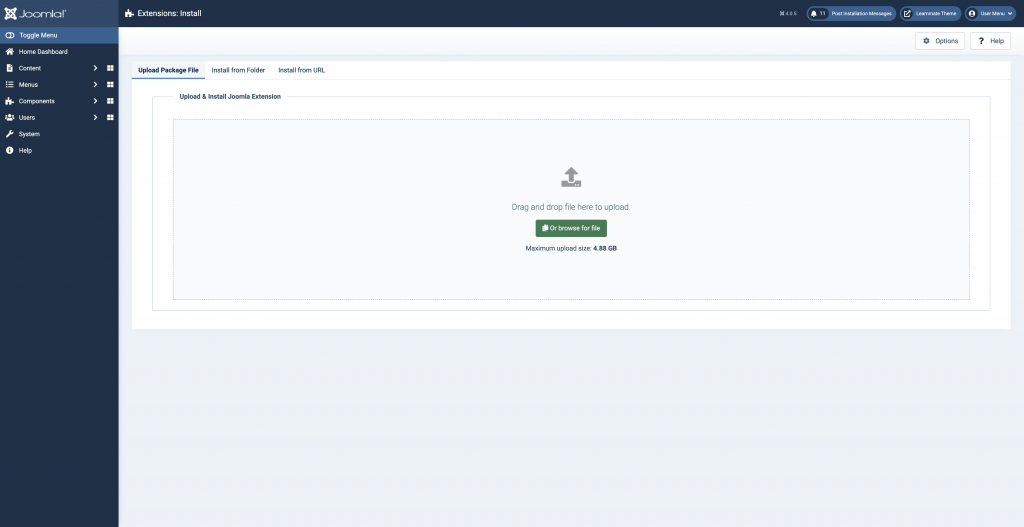
- Click the Upload Package File tab.
- Click the Drag and drop files to upload or the button Or browse for file button.
- Locate your component’s zip file (joomla-pkg_gantry5_v5.5.19.zip) on your computer.
For more information, take a look at the official Gantry5 documentation.
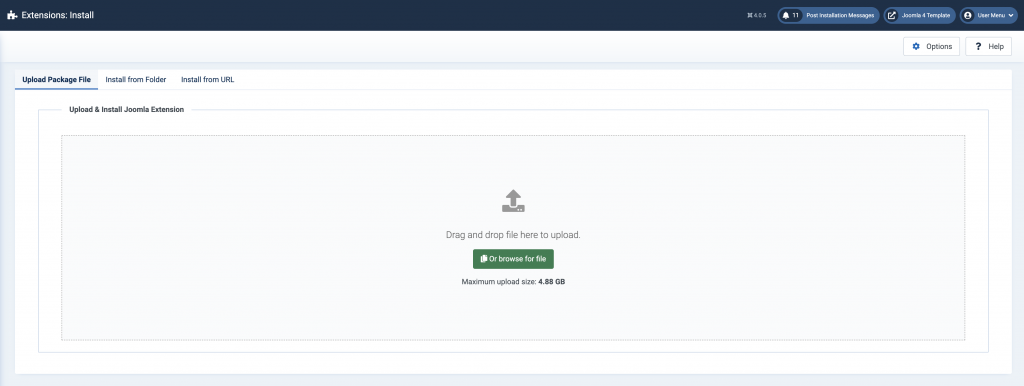
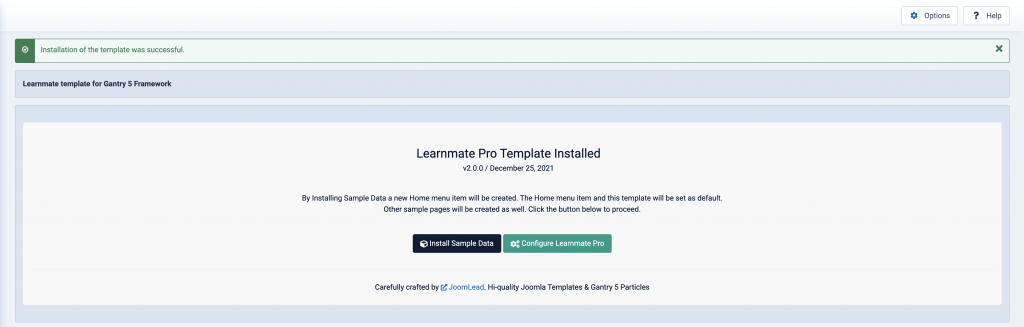
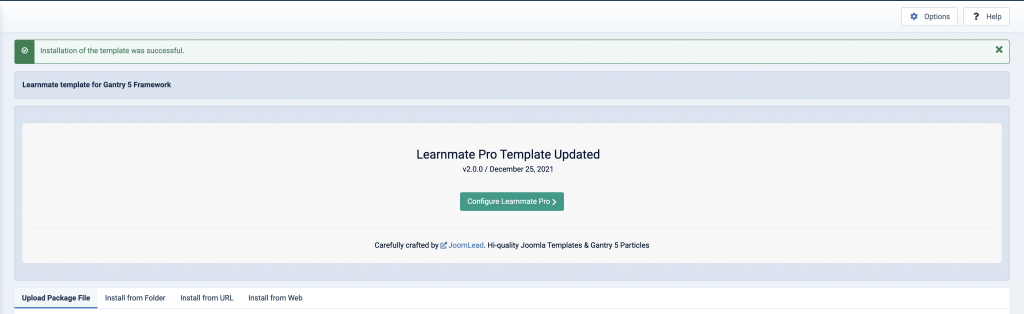
Installing the Joomla template (Gantry-powered template)
Template made with Gantry 5 install just like any other Joomla template. The difference here is that you really want to have the Gantry5 framework installed and activated first, otherwise, the theme itself won’t be of much use
To install the template on Joomla 5:
- Navigate to Administrator → System → Extensions.
- Select the template installation package (i.e: jl_learnmate_j4_2.0.0.zip) on your computer.
- Click Install Now.
Joomla Quickstart Installation
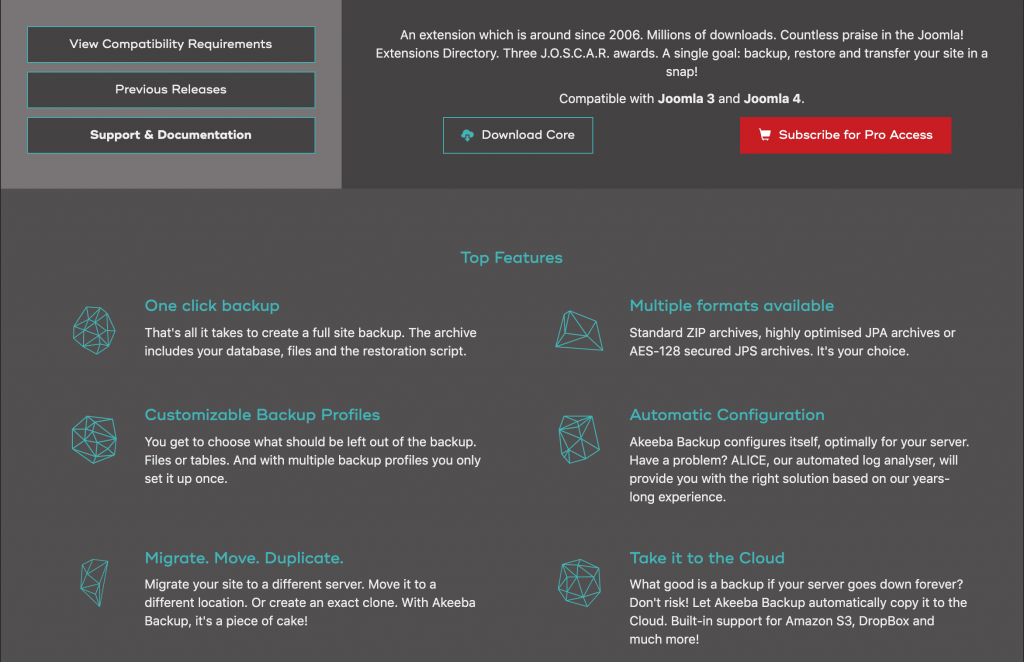
We are using Akeeba Backup Core component for Joomla! Migrations and Backups. Find more detail about Akeeba Backup here
To install the demo quickstart, follow these steps:
Download the demo Quickstart package: Simply log into your purchase account and download the demo Quickstart package (
NAME_joomla_quickstart_j4.zip).Unzip and upload the package to your server directory.
Install the Quickstart using Akeeba Backup.
For more information about quickstart installation, please take a look the tutorial link below.
Updating
Updating Gantry5 Framework
Upgrading the Gantry Framework component is a relatively straightforward and simple process. This can be done using the built-in Joomla updater.
Go to Admin Dashboard → System → Updates → Extensions. Then check the checkbox next to the Gantry plugin and click Update. Gantry will now be updated directly from the web.
For more information, take a look at the official Gantry update documentation.
Updating the Joomla templates
Method 1: Install Full Theme Over Existing Template
If you are confident that the only changes you have made to your site are stored in the template’s custom directory, you can copy that directory and place it somewhere safe and upload the new, updated version of the theme.
Method 2: Selective File Replacement
Your theme’s files are contained within the template directory. For example, the Learnmate theme’s files can be found in ROOT/templates/jl_learnmate/. Once you have downloaded the updated version, you can unpack it and begin replacing the existing files with the updated version, adding new files and/or directories, and deleting any files deleted in the updated version.
After you have done this, make sure you clear the Gantry5 cache completely and test your site.
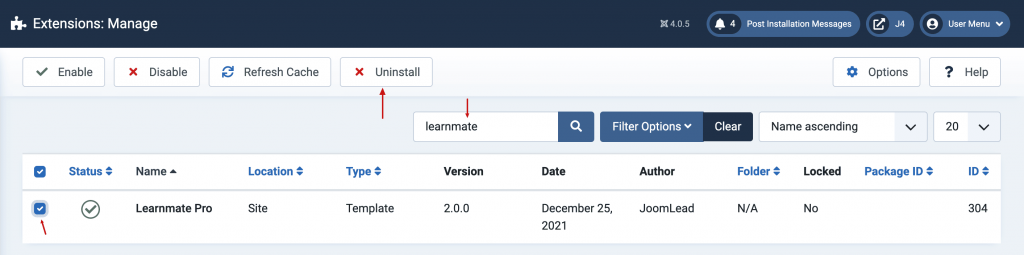
Uninstallation
There are two main parts to Gantry — the framework and the template. Therefore, there are two main parts to the uninstallation process. If you intend to uninstall only the template portion, then follow the instructions for removing the template only.
Keeping the Gantry library installed does not cause any harm or reduce performance, as it is only used by a Gantry-enabled template. If you wish to uninstall the library, you can follow those steps.
To uninstall the Joomla template, you will first have to ensure that it’s not assigned as the Default Joomla template. Go to System → Site template styles and set the default to any other template that is not Gantry. After that, you can simply go to System → Extensions, then search for the template name to uninstall.
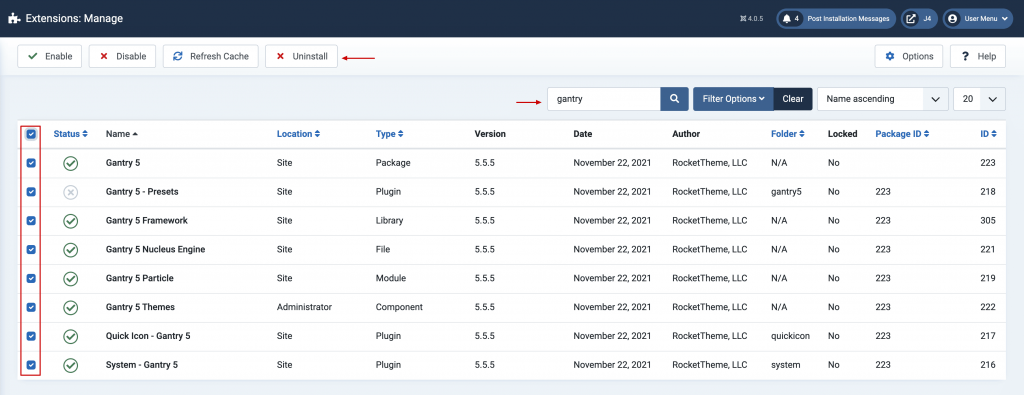
Uninstall the Gantry component, library, plugin and template(s) from System → Manage → Extensions. Insert gantry into the Filter and click Search. Select all Gantry 5 extensions, then click Uninstall in the button toolbar. Gantry will now be uninstalled.
Gantry 5 Documentation
If you are new to Gantry 5, a good place to start would be the dedicated Gantry documentation.
Gantry5 Particles
Gantry5 comes with a brand new Particle system which makes it easy to create, configure, and manage content blocks.
Basically, everything that you would create a Custom HTML module for is now coded in to a particle. You no longer need to copy/paste long HTML codes and edit them, you just need to click here and there and fill out fields in the Admin.
In this chapter we will show you the custom particles that we developed as well as some of the core Gantry 5 particles that we modified and enhanced, for example the “Social” particle.
Core Gantry5 Particles
- Logo
- Menu
- To Top
- Social
- Module Positions
- Spacer
- Mobile Menu
- Custom HTML
- Module Instance
- Page Content
- System Messages
Premium Gantry5 Particles by Joomlead
We offer 100+ (Free and PRO) Gantry 5 Particles. Joomlead particles and atoms work out-of-the-box with any Gantry 5 theme on Joomla, WordPress and Grav.
Joomlead pro templates already included all pro particles while free joomla templates included free particles with limited features.
Learn more about Gantry5 Particles
Layout Manager
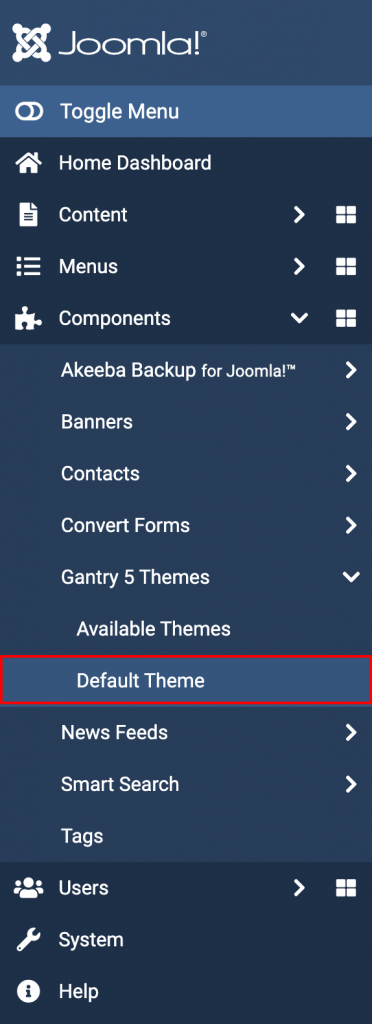
To access Layout from your Joomla administrator, go to Components → Gantry 5 Themes → Default Theme.
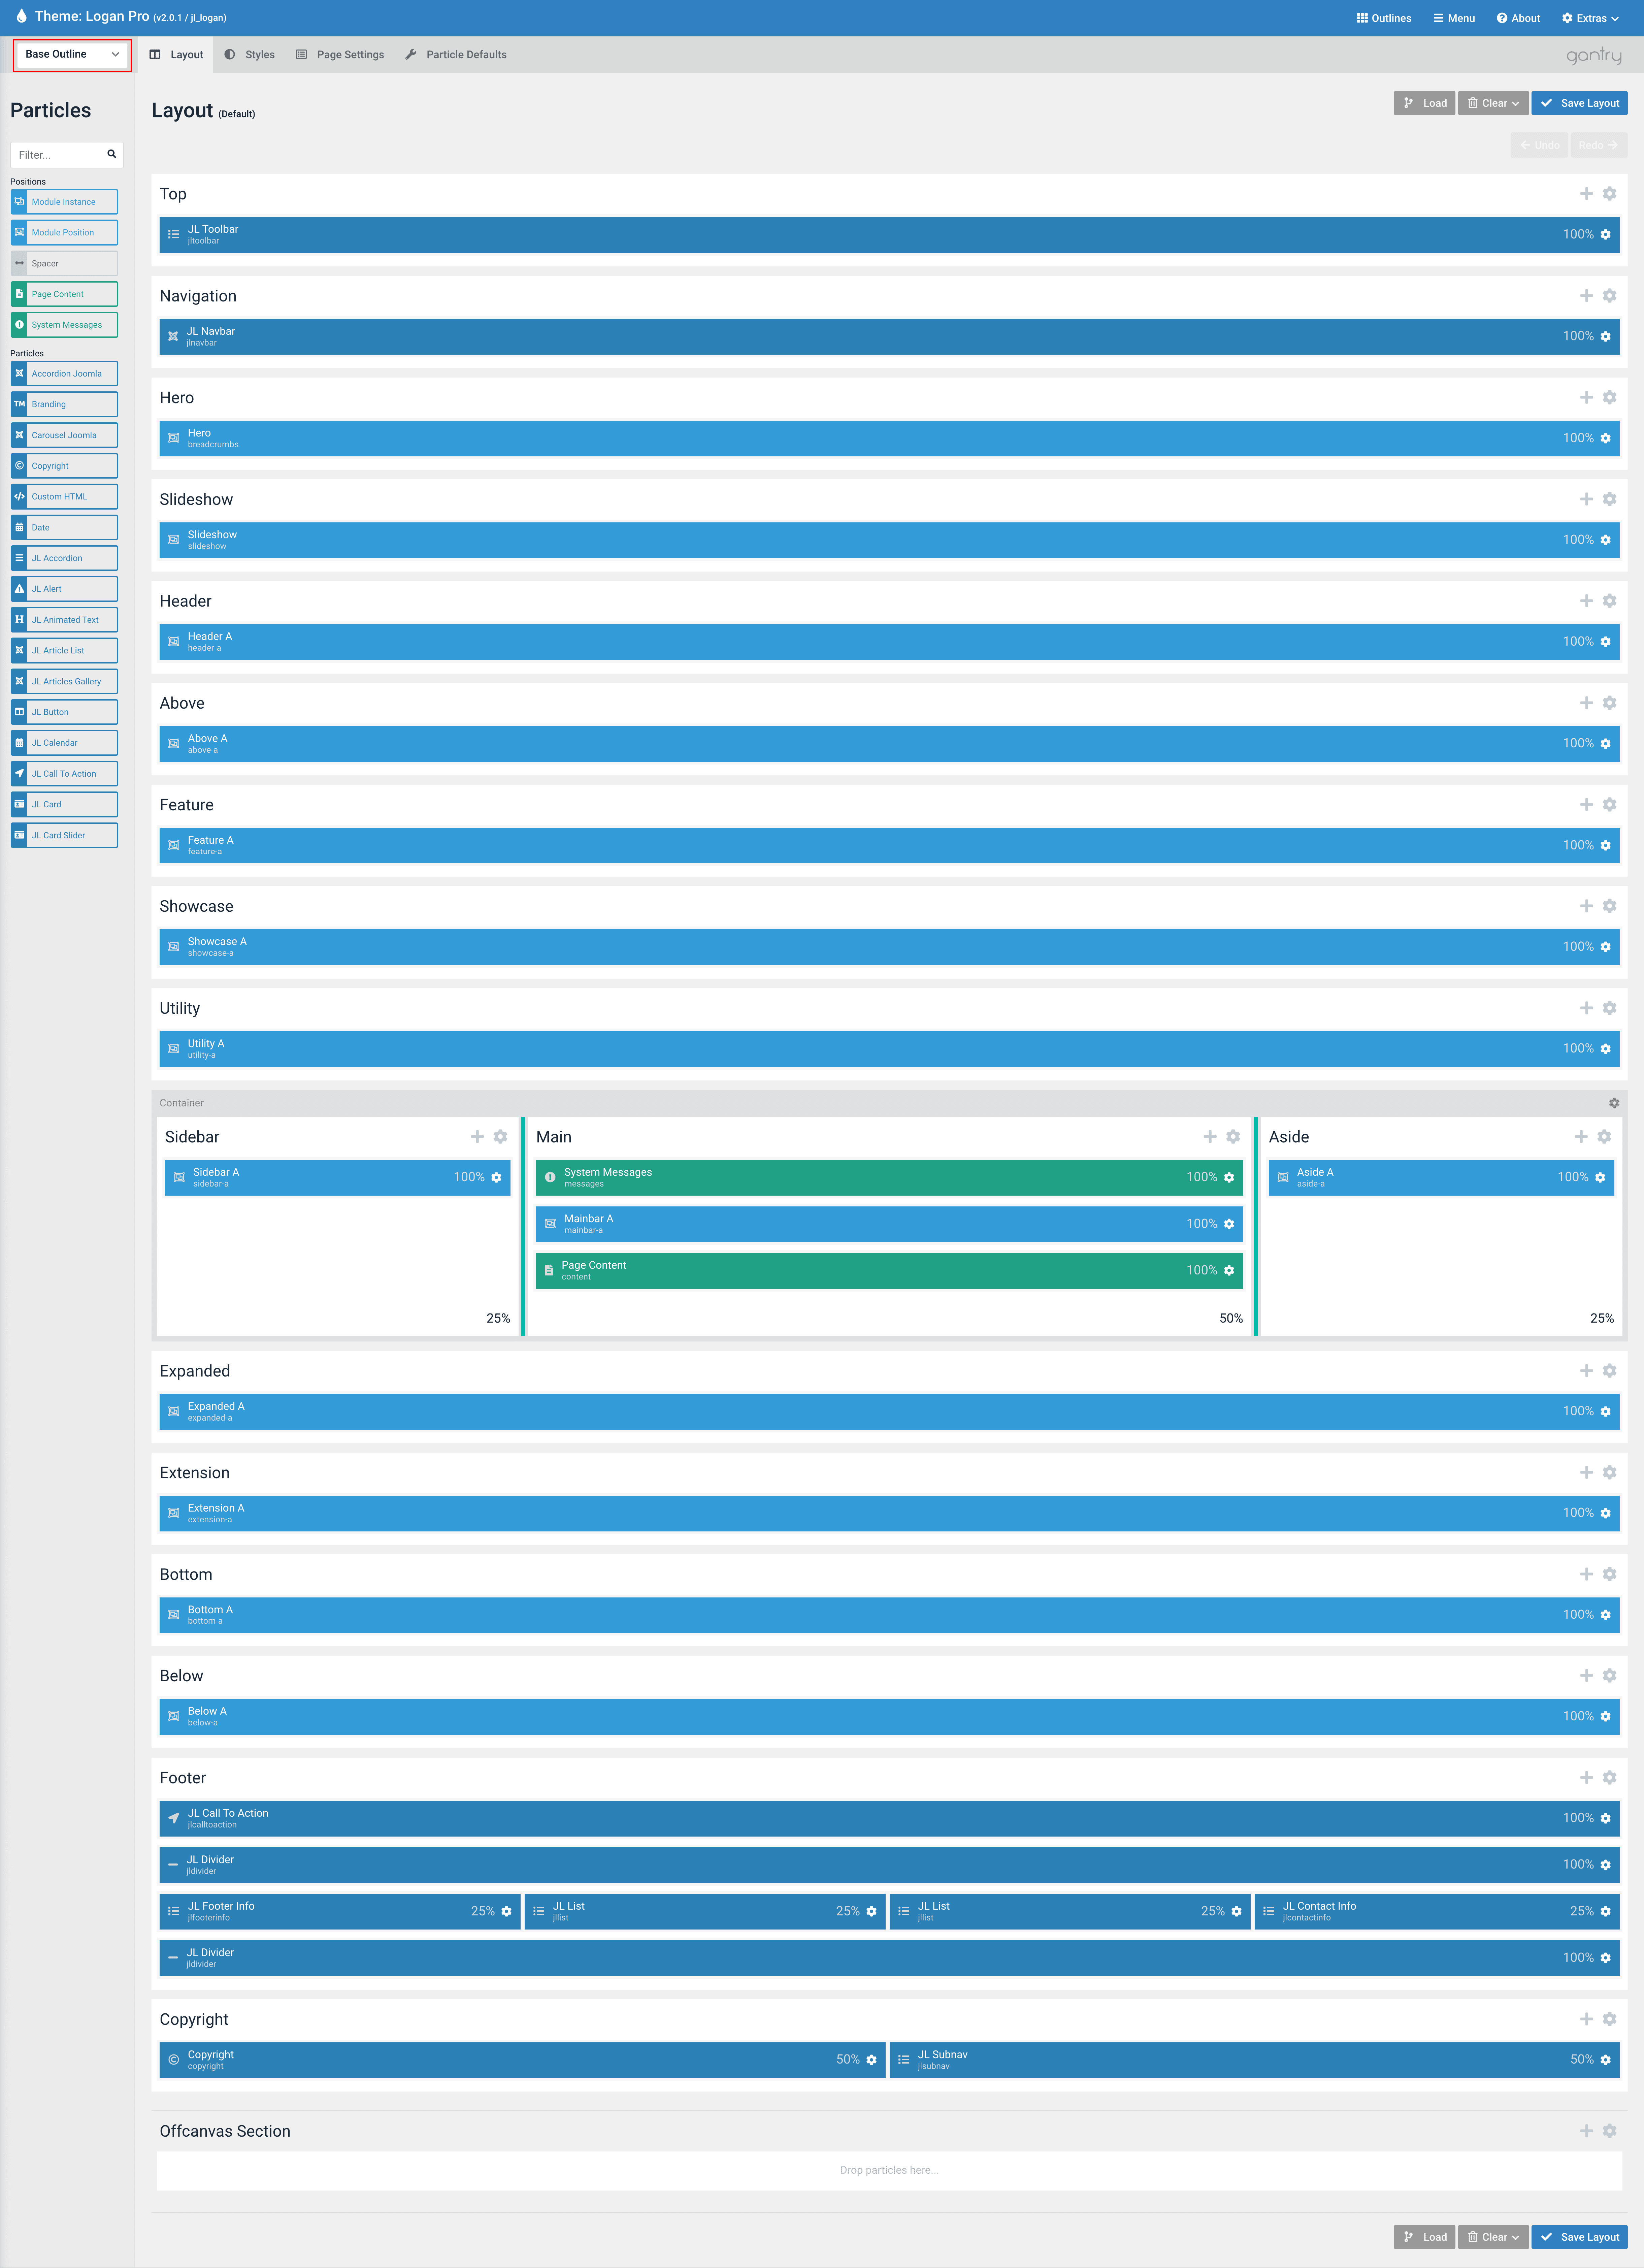
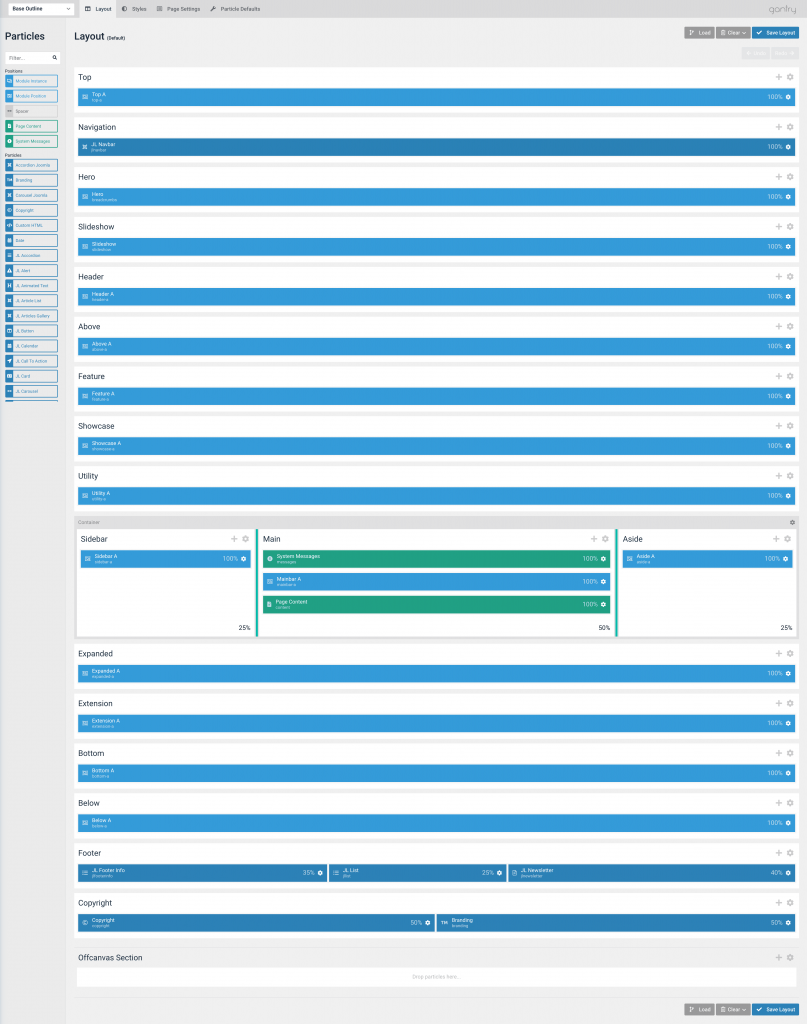
Base Outline
This outline will serve as the default layout for all Gantry pages. Here, you can set global styles, particle defaults (including the top contact information, menu navigation, footer information, and copyright info), page settings, and layout options. For more information, please refer to the Gantry 5 Inheritance documentation.
Theme Outlines
You can switch to an individual Outline in two ways:
Using the drop-down menu located on the left-hand side of the toolbar, which hosts the outline-specific administrative panels.
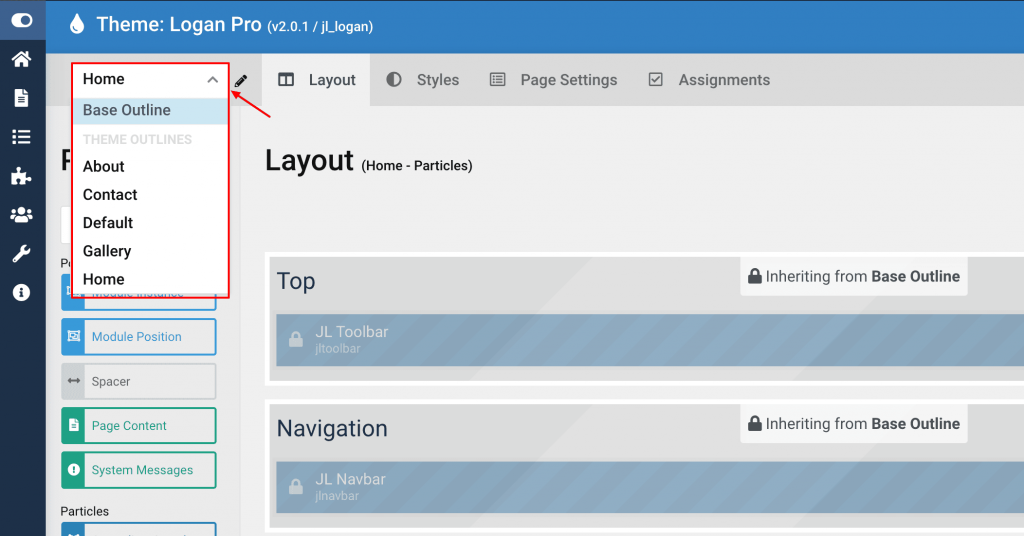
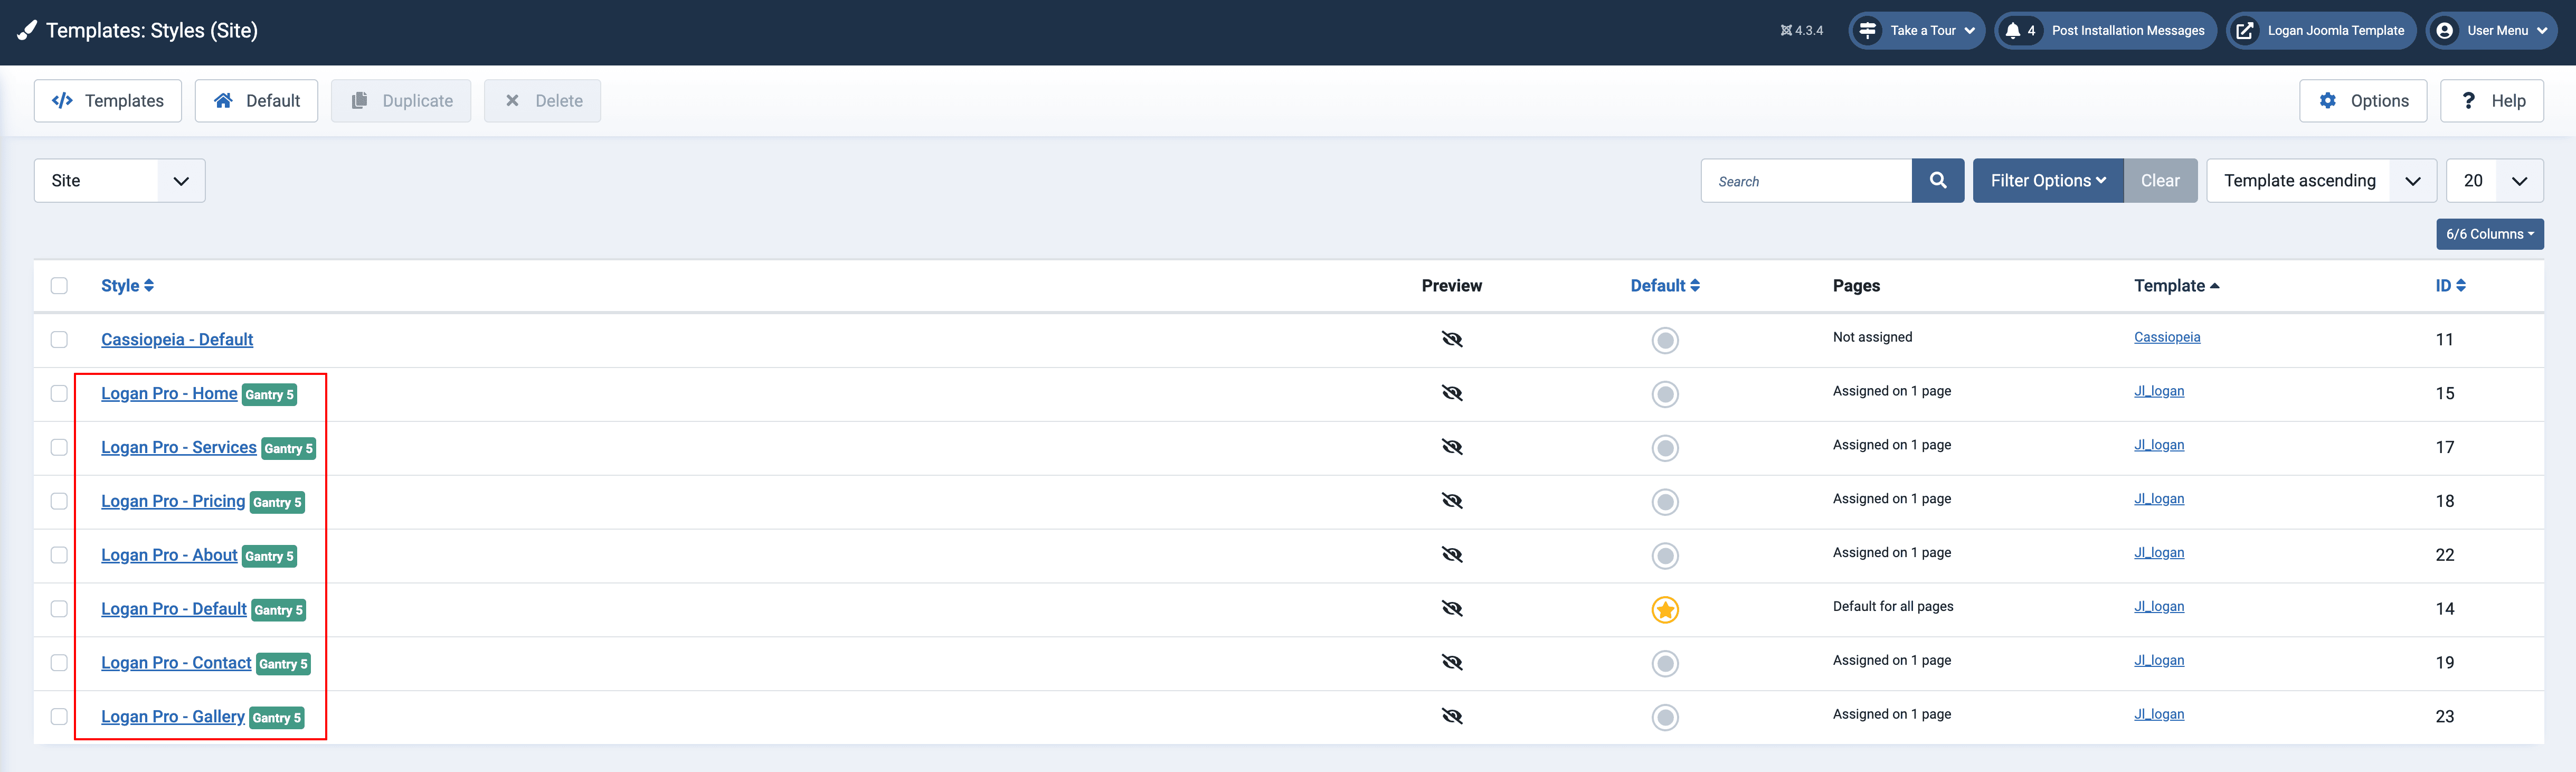
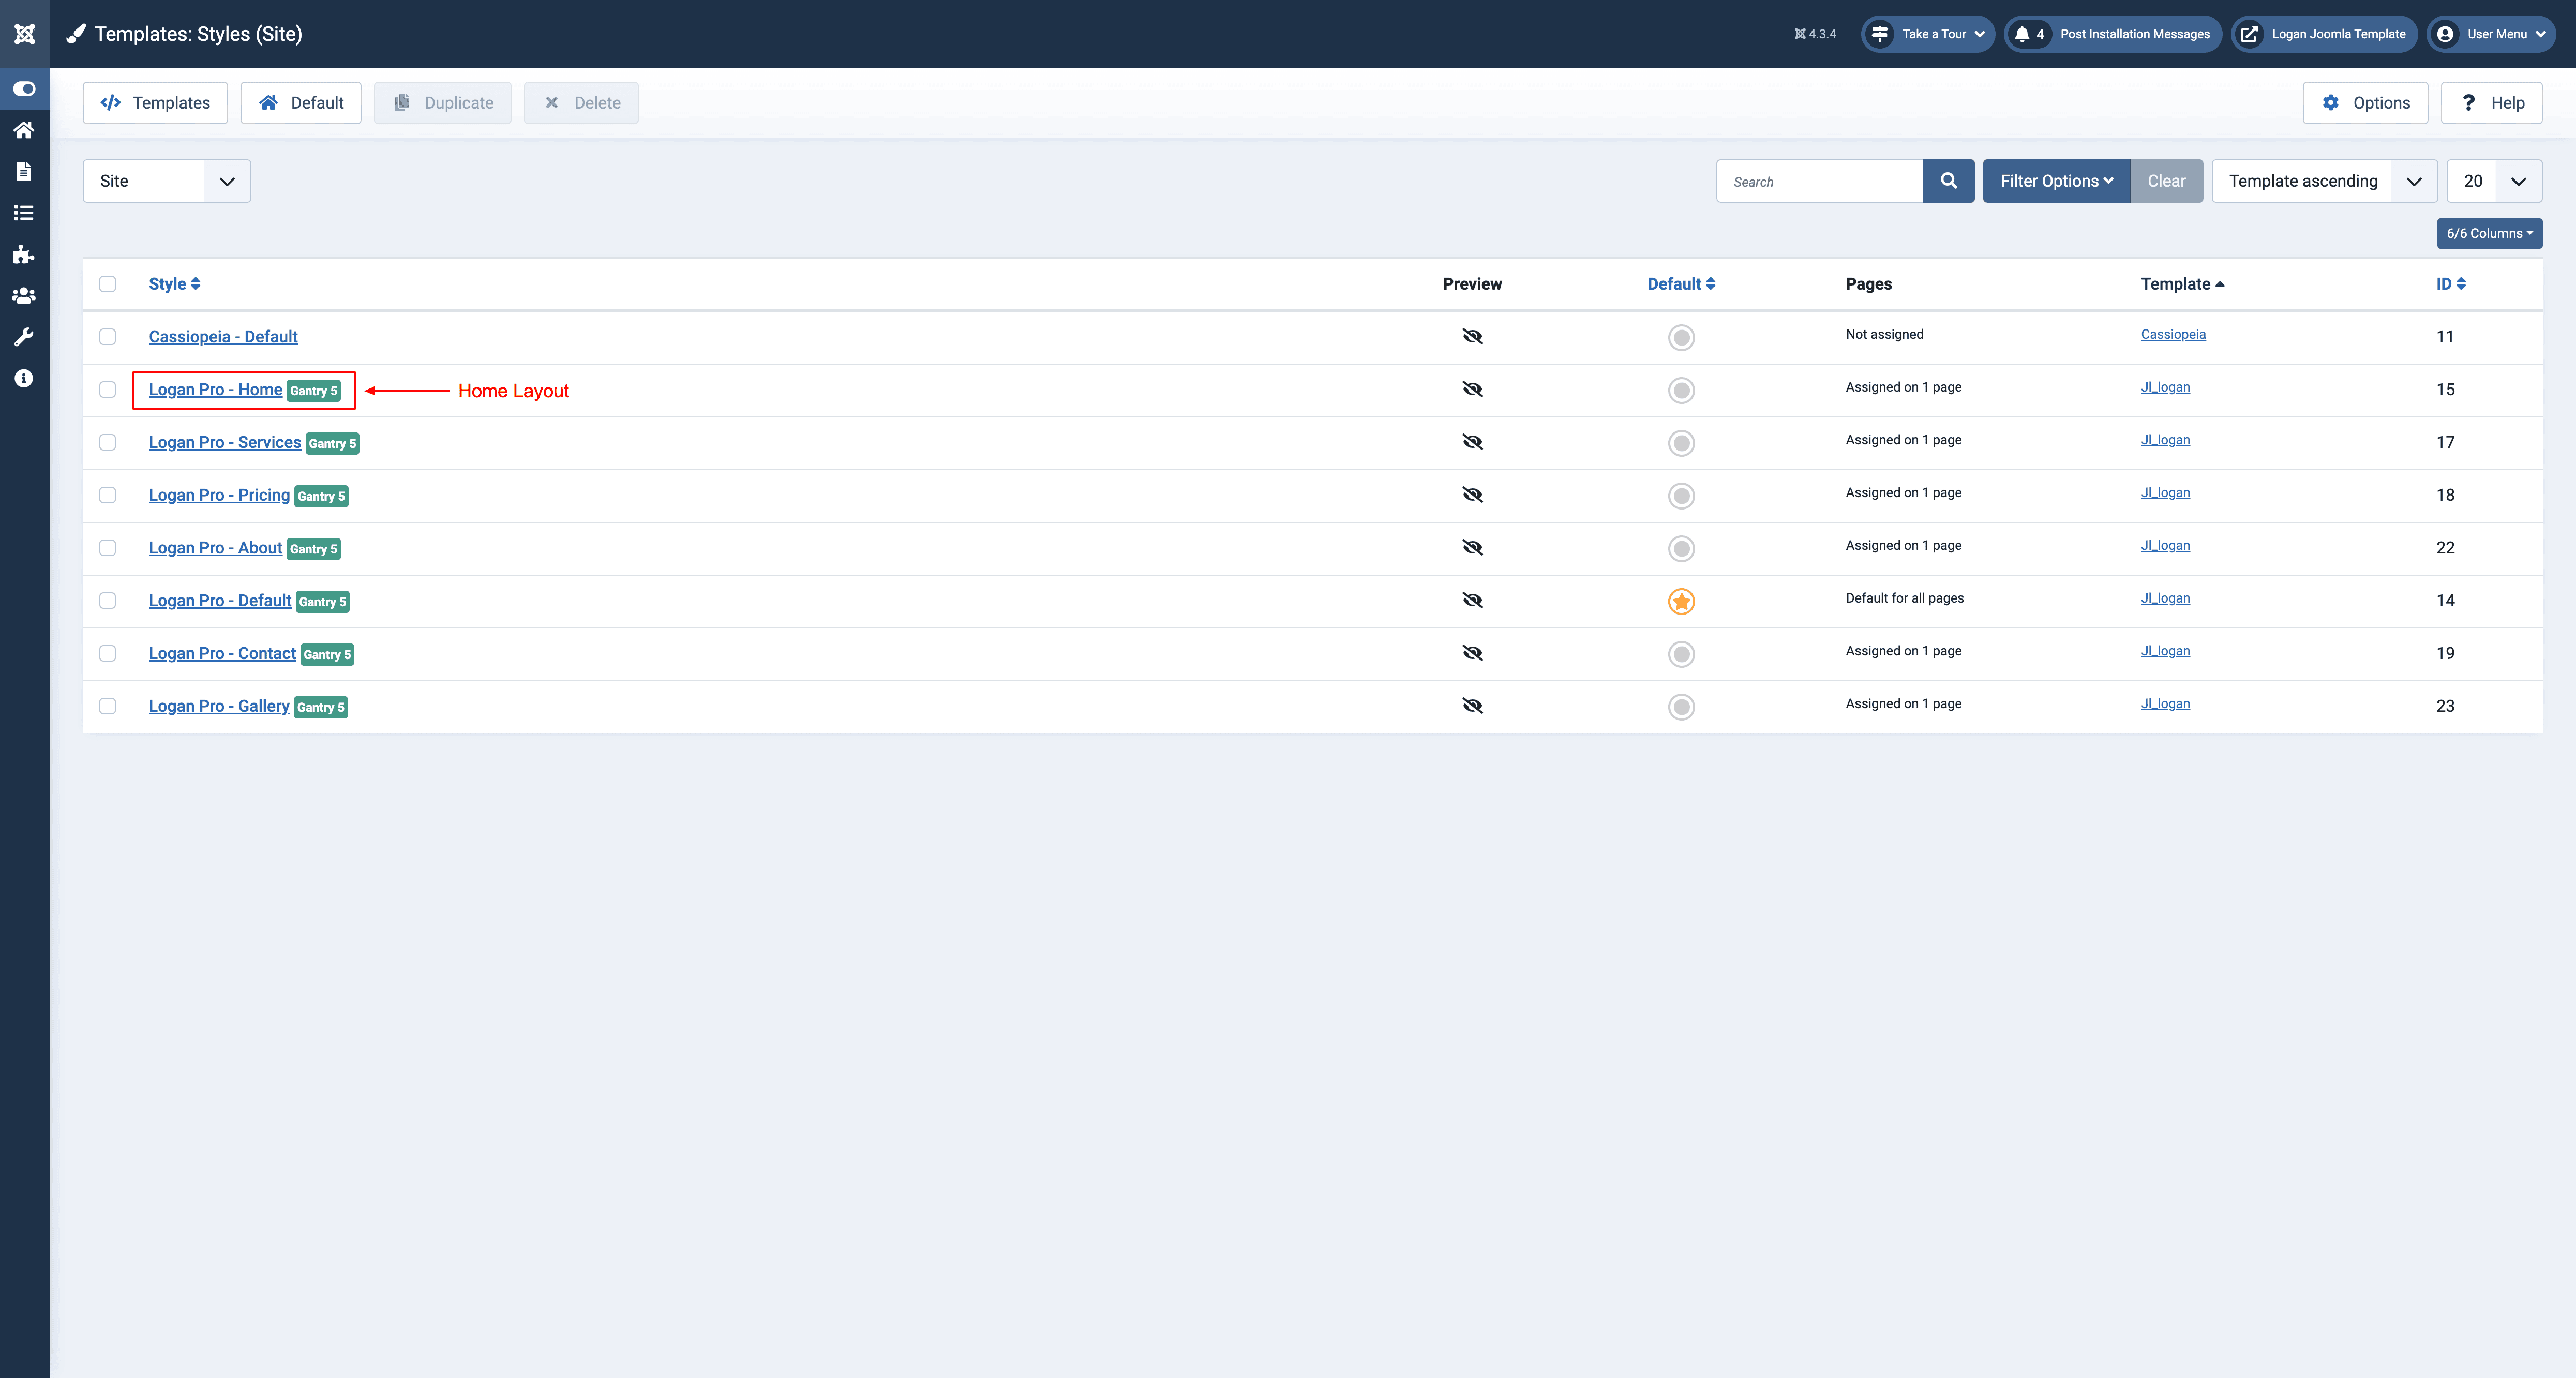
Or Going to System → Site Template Styles and then clicking the template name (we use the Logan template for this demonstration) to access the layout manager.
If you use the demo Quickstart package, you’ll see a list of predefined outline layouts such as Home, About, Blog, Contact, and more. These are predefined outlines for special pages, but there’s no limitation on creating, duplicating, or accessing your own outlines.
You can create a new Joomla Menu Item with Menu Item Type Gantry 5 Themes → Custom Page and then assign it to special outline, take a look the Outline section for more details.
# Inheritance
The template takes full advantage of Gantry’s new inheritance system, making it easier than ever to configure and manage your website through synced particles, atoms, sections, and layouts. Save time by using inheritance to avoid repetitive changes!
Find out more about inheritance in sections in the Inheritance Guide.
Section Settings
In the Layout, the most basic parts of the page are Sections. These named divisions of the page give you the ability to create sections of content, each with one or more horizontal grids on which you can place Blocks, including Particles and Positions.
You can add a new row in a section by clicking plus (+) icon, or click the cog icon to open the section settings.
Section Max Width
Set the maximum content width for the section using the Max Width setting. Choose between the Default, Small, Large, XLarge to set a fixed max width. The Expand option expands the content to the full width of the section keeping a small padding to the left and right.
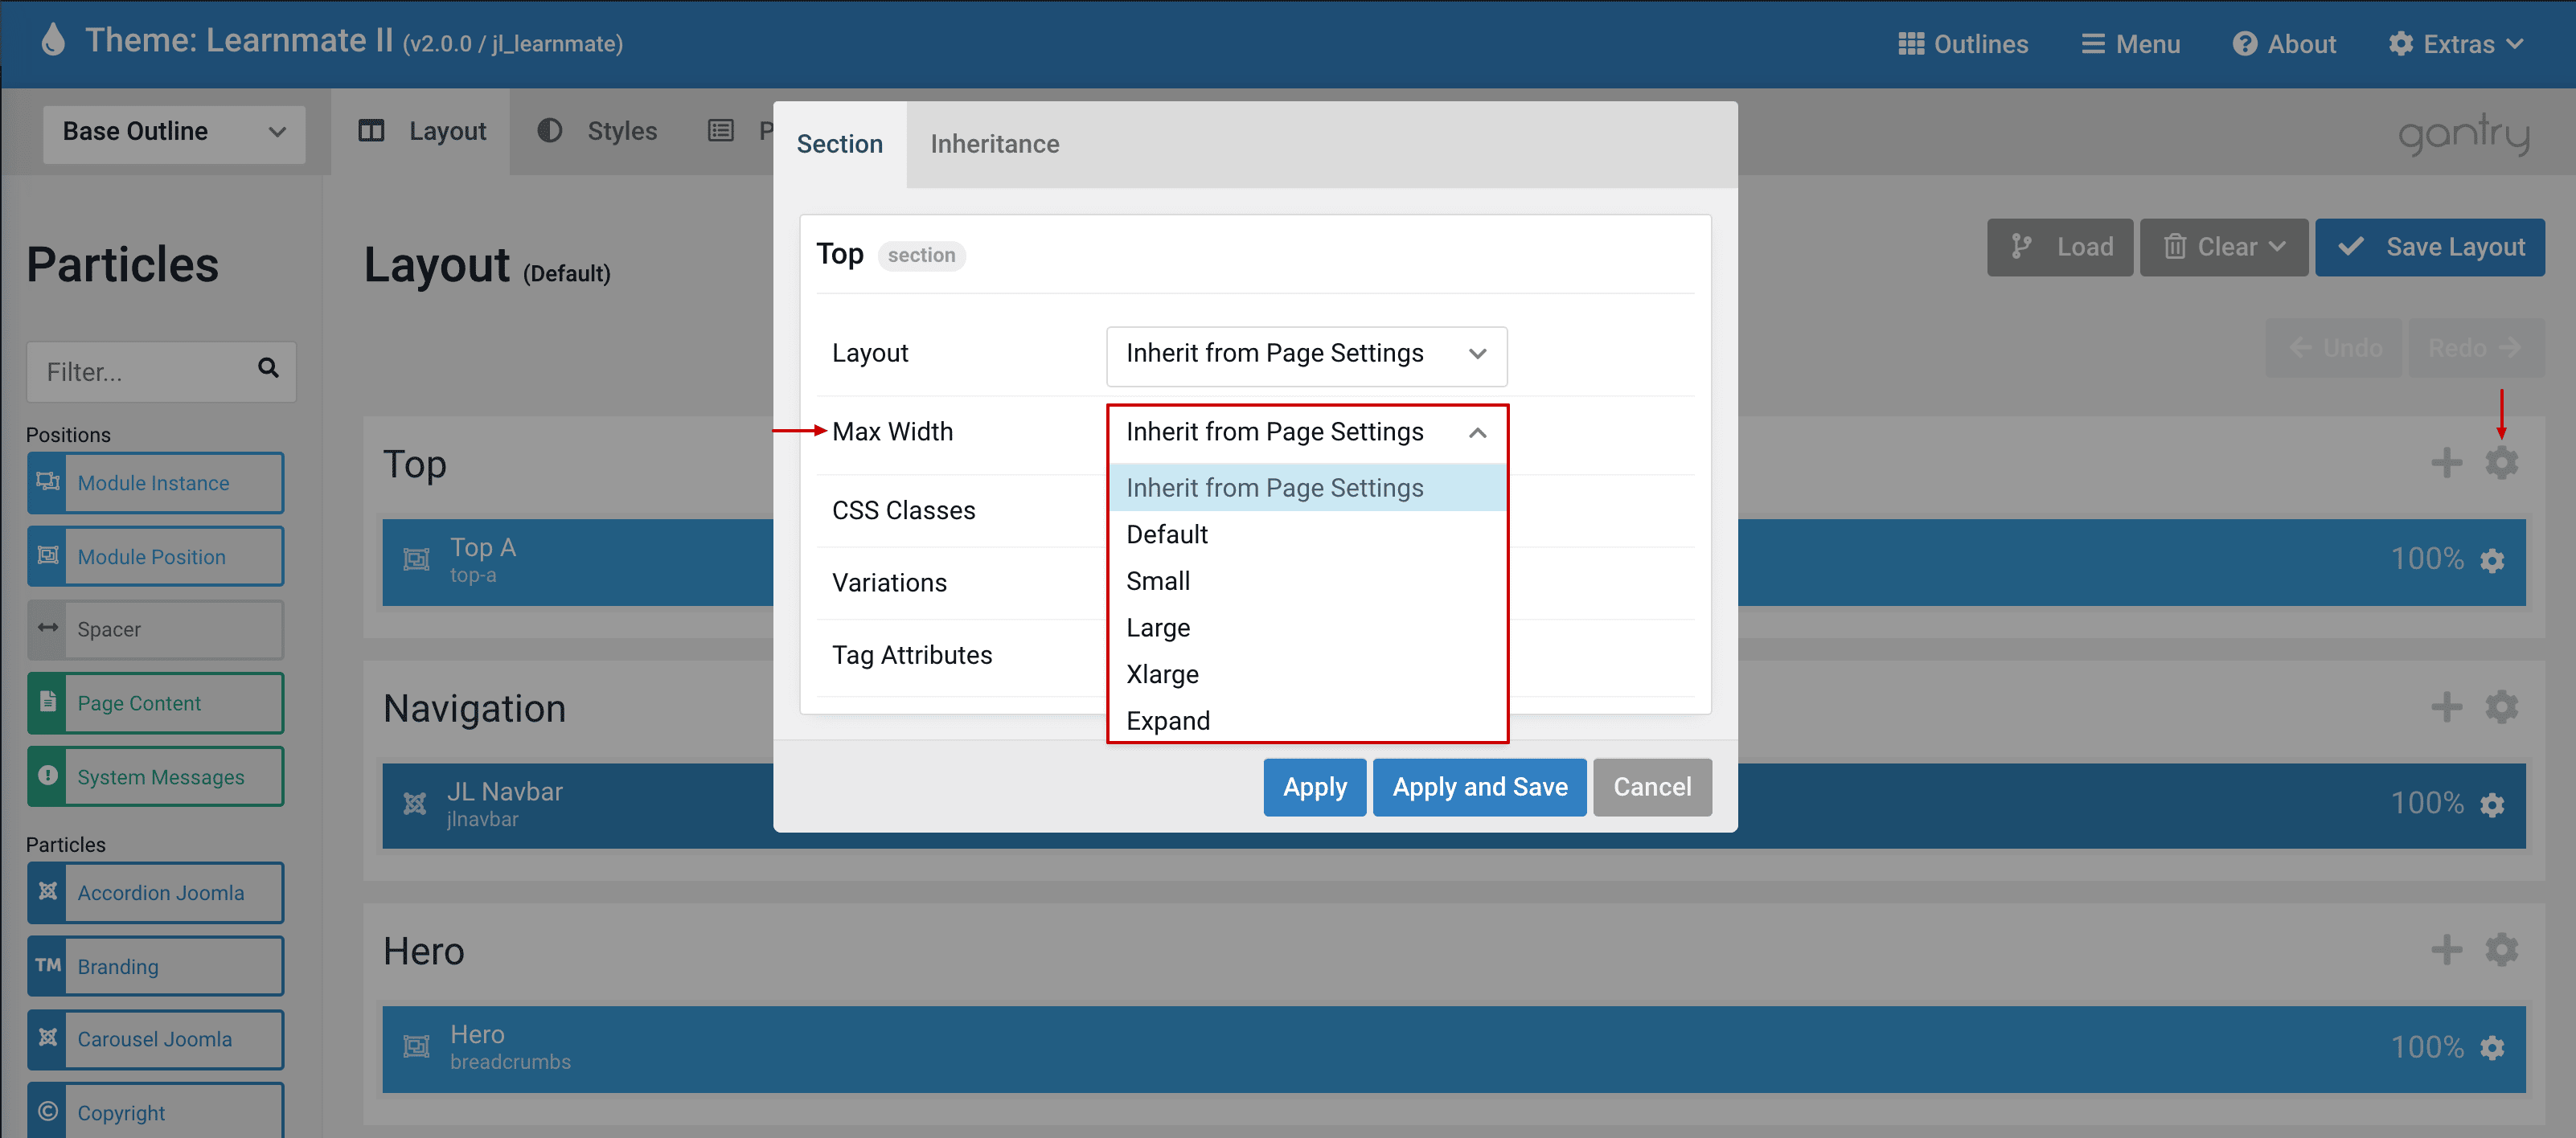
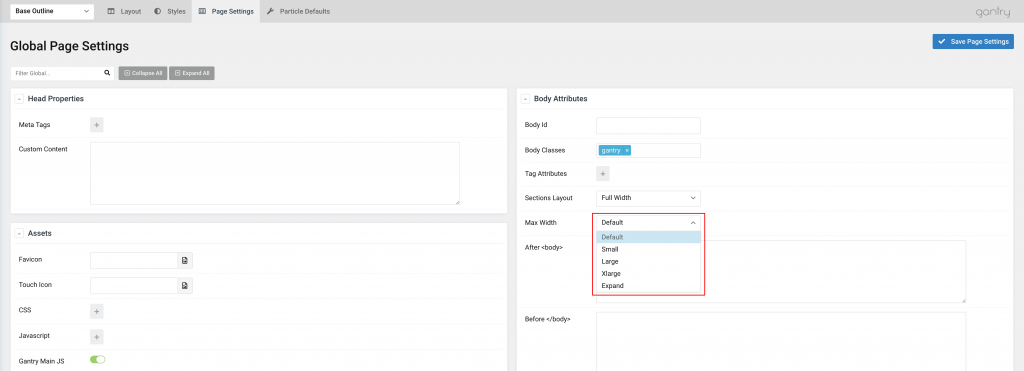
By default, all Sections Max Width is inherited from the Page Settings. You can change the global max width for all sections by going to Base Outline → Page Settings → Body Attributes → Max Width
Section Variations
Section Variations are its assortment of utility classes that make it easy to quickly set up elements and have them appear how you want and when you want them to.
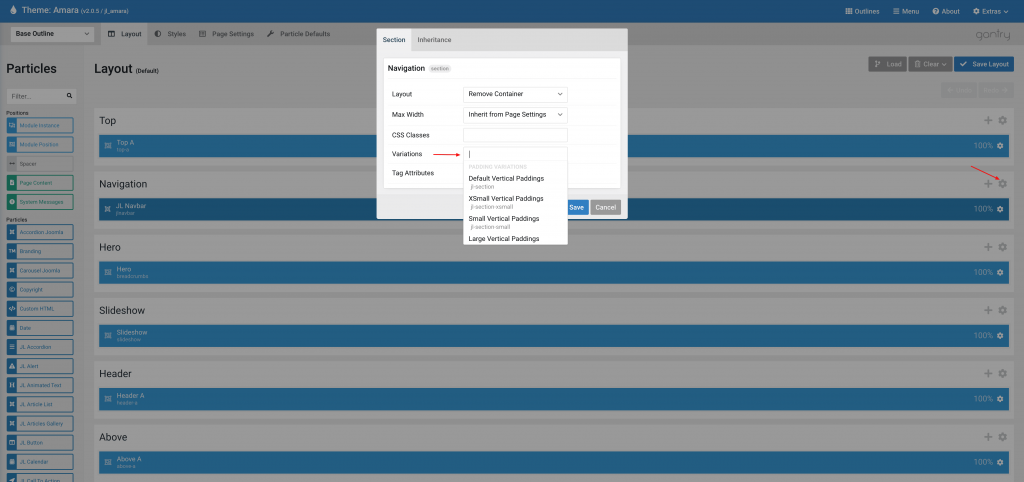
The theme supports all Gantry 5 core Utility Classes by default(Responsive Utility Classes, Padding and Margin, Utility Variations), you can see the full existing classes here
Set the vertical padding of the section. Choose between the Default, X-Small, Small, Large, X-Large. Additionally, there are some additional settings that allow you to remove the padding or margin.
Changing content via Layout Manager
You can find more detailed documentation for Gantry5 layout manager here
Editing Default Content
The default content is defined via the Base Outline layout. They are special particles that are placed in the top, navigation, footer, and copyright sections to present the site layout. Individual sections can be targeted for inheritance. For example, the default content includes:
Top, Navigation section: They contain the top contact information, site logo, main navigation, search and other typical header elements.
Footer, Copyright section: It usually contains copyright notices, links and contact information, but it may also include any kind of content.
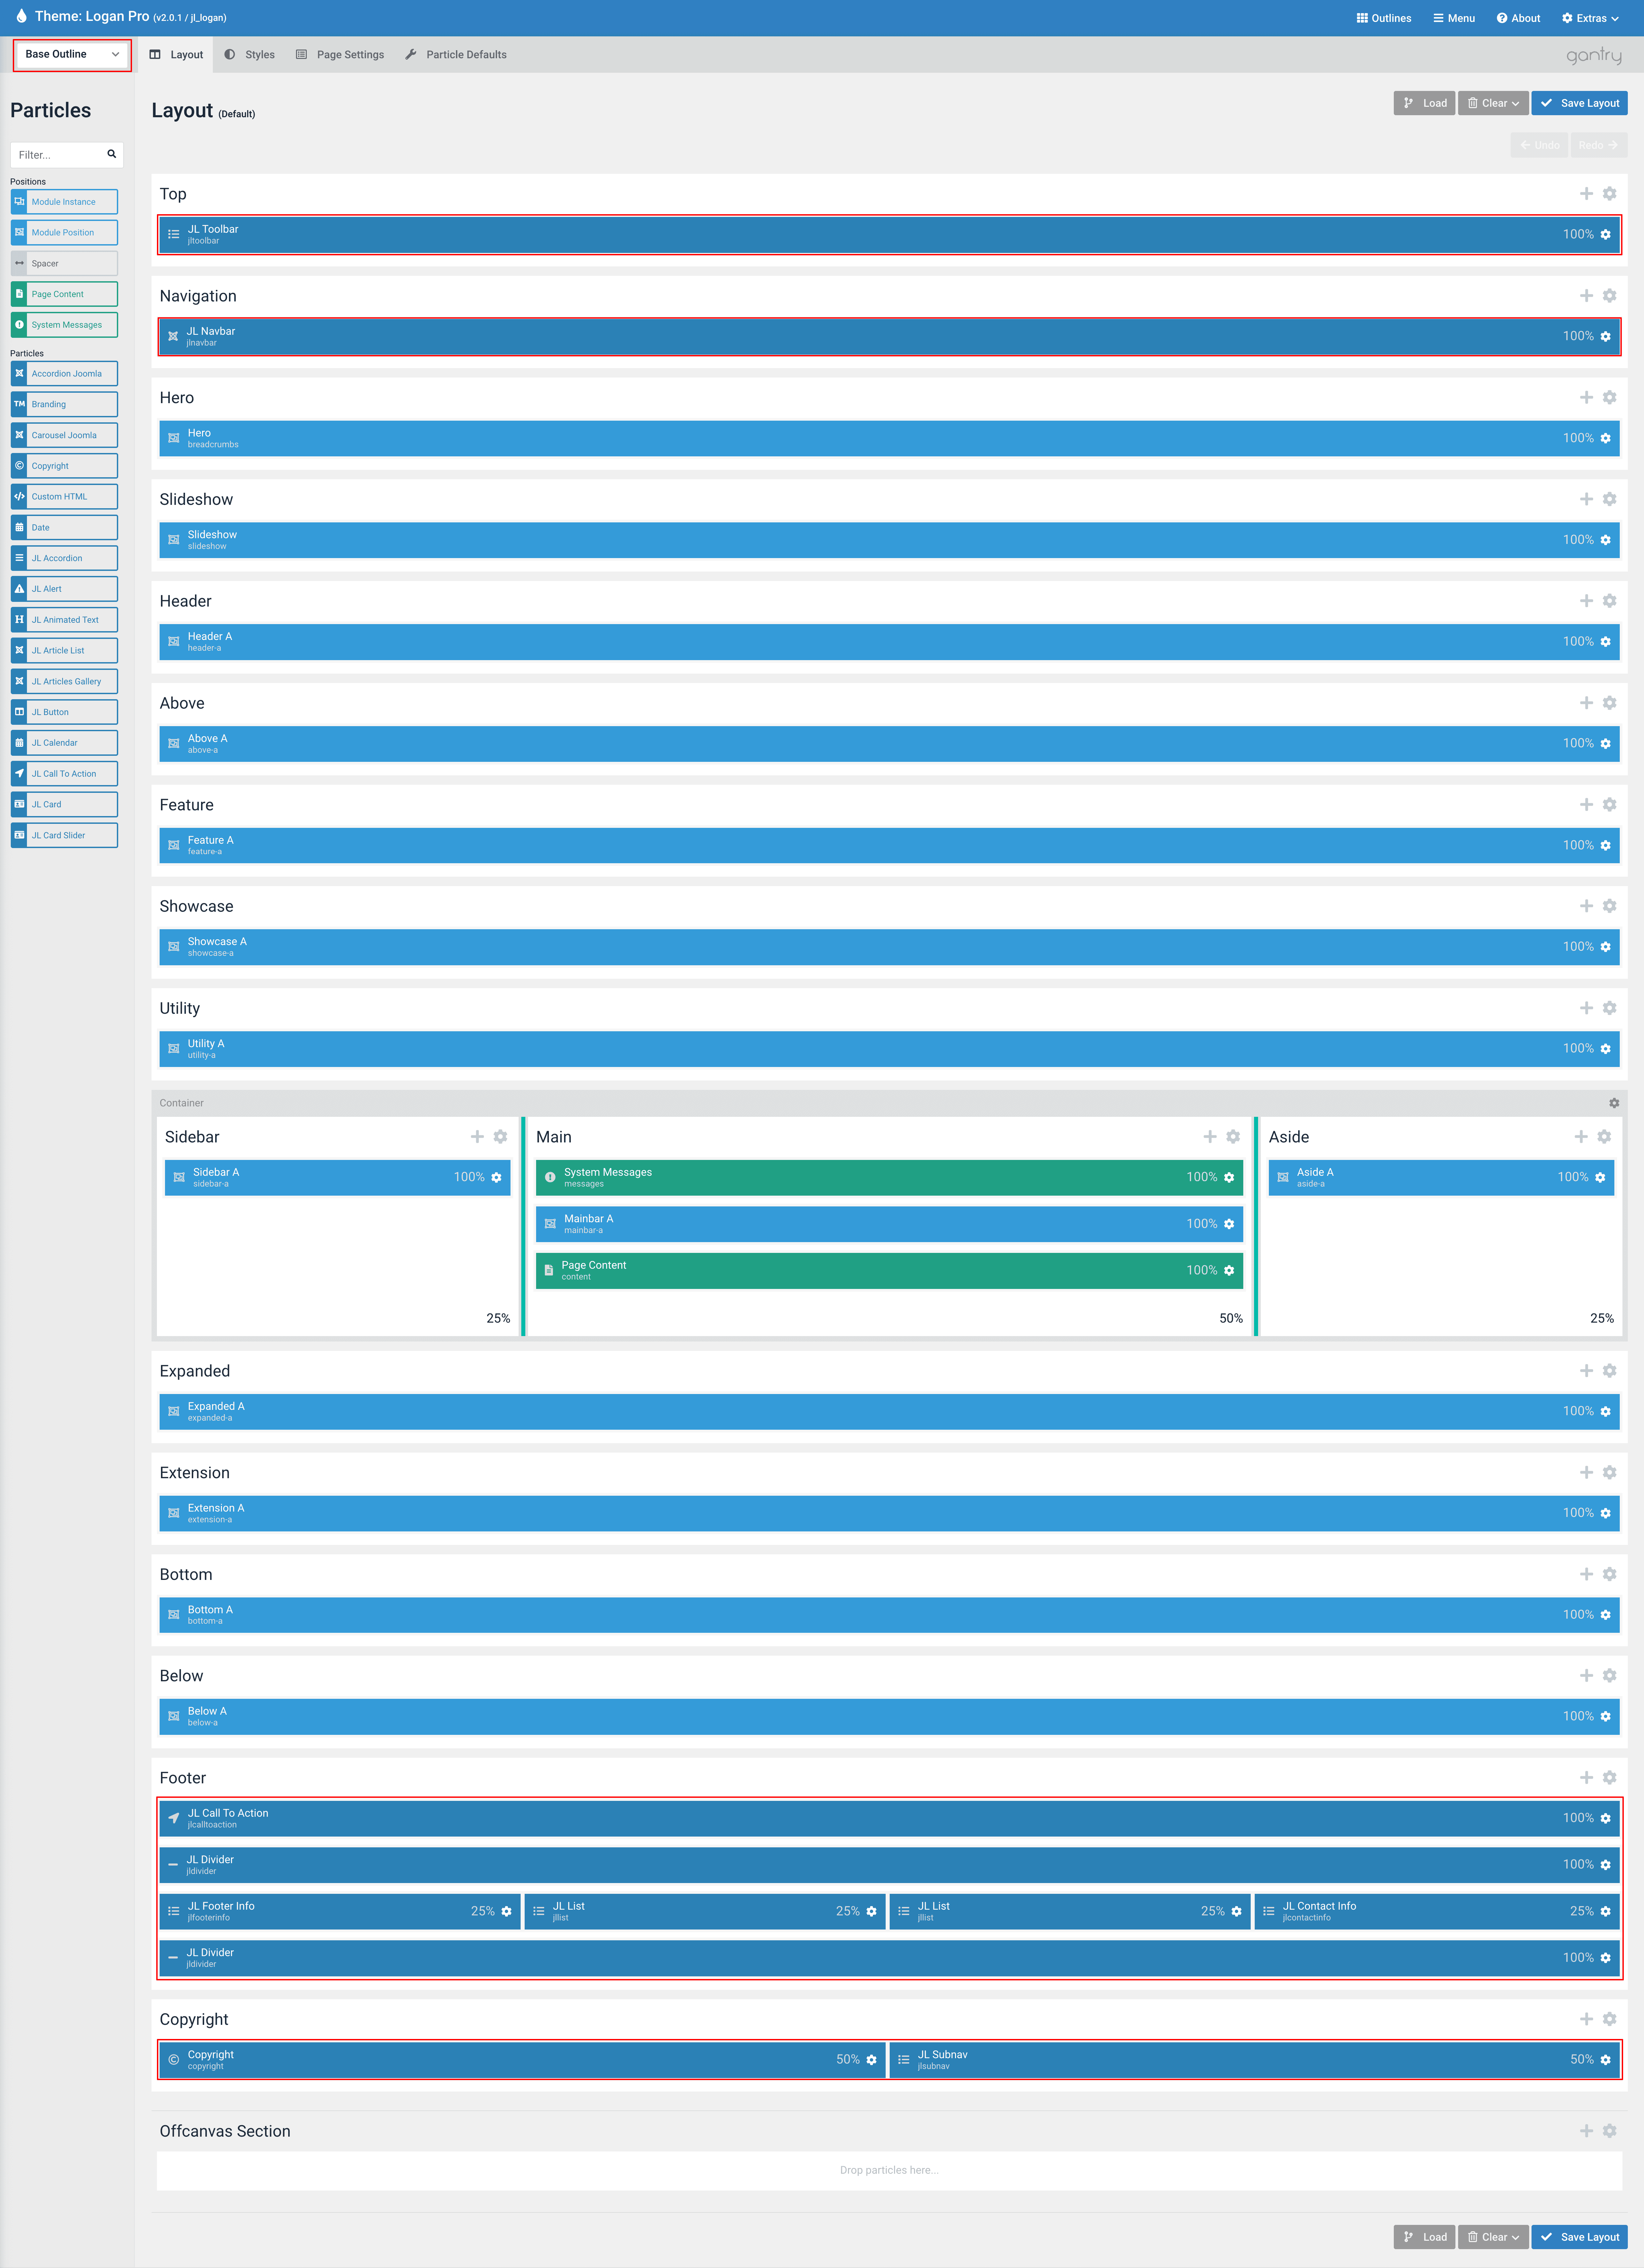
Changing the default content through the Base Outline will affect all outlines that are inherited by these sections.
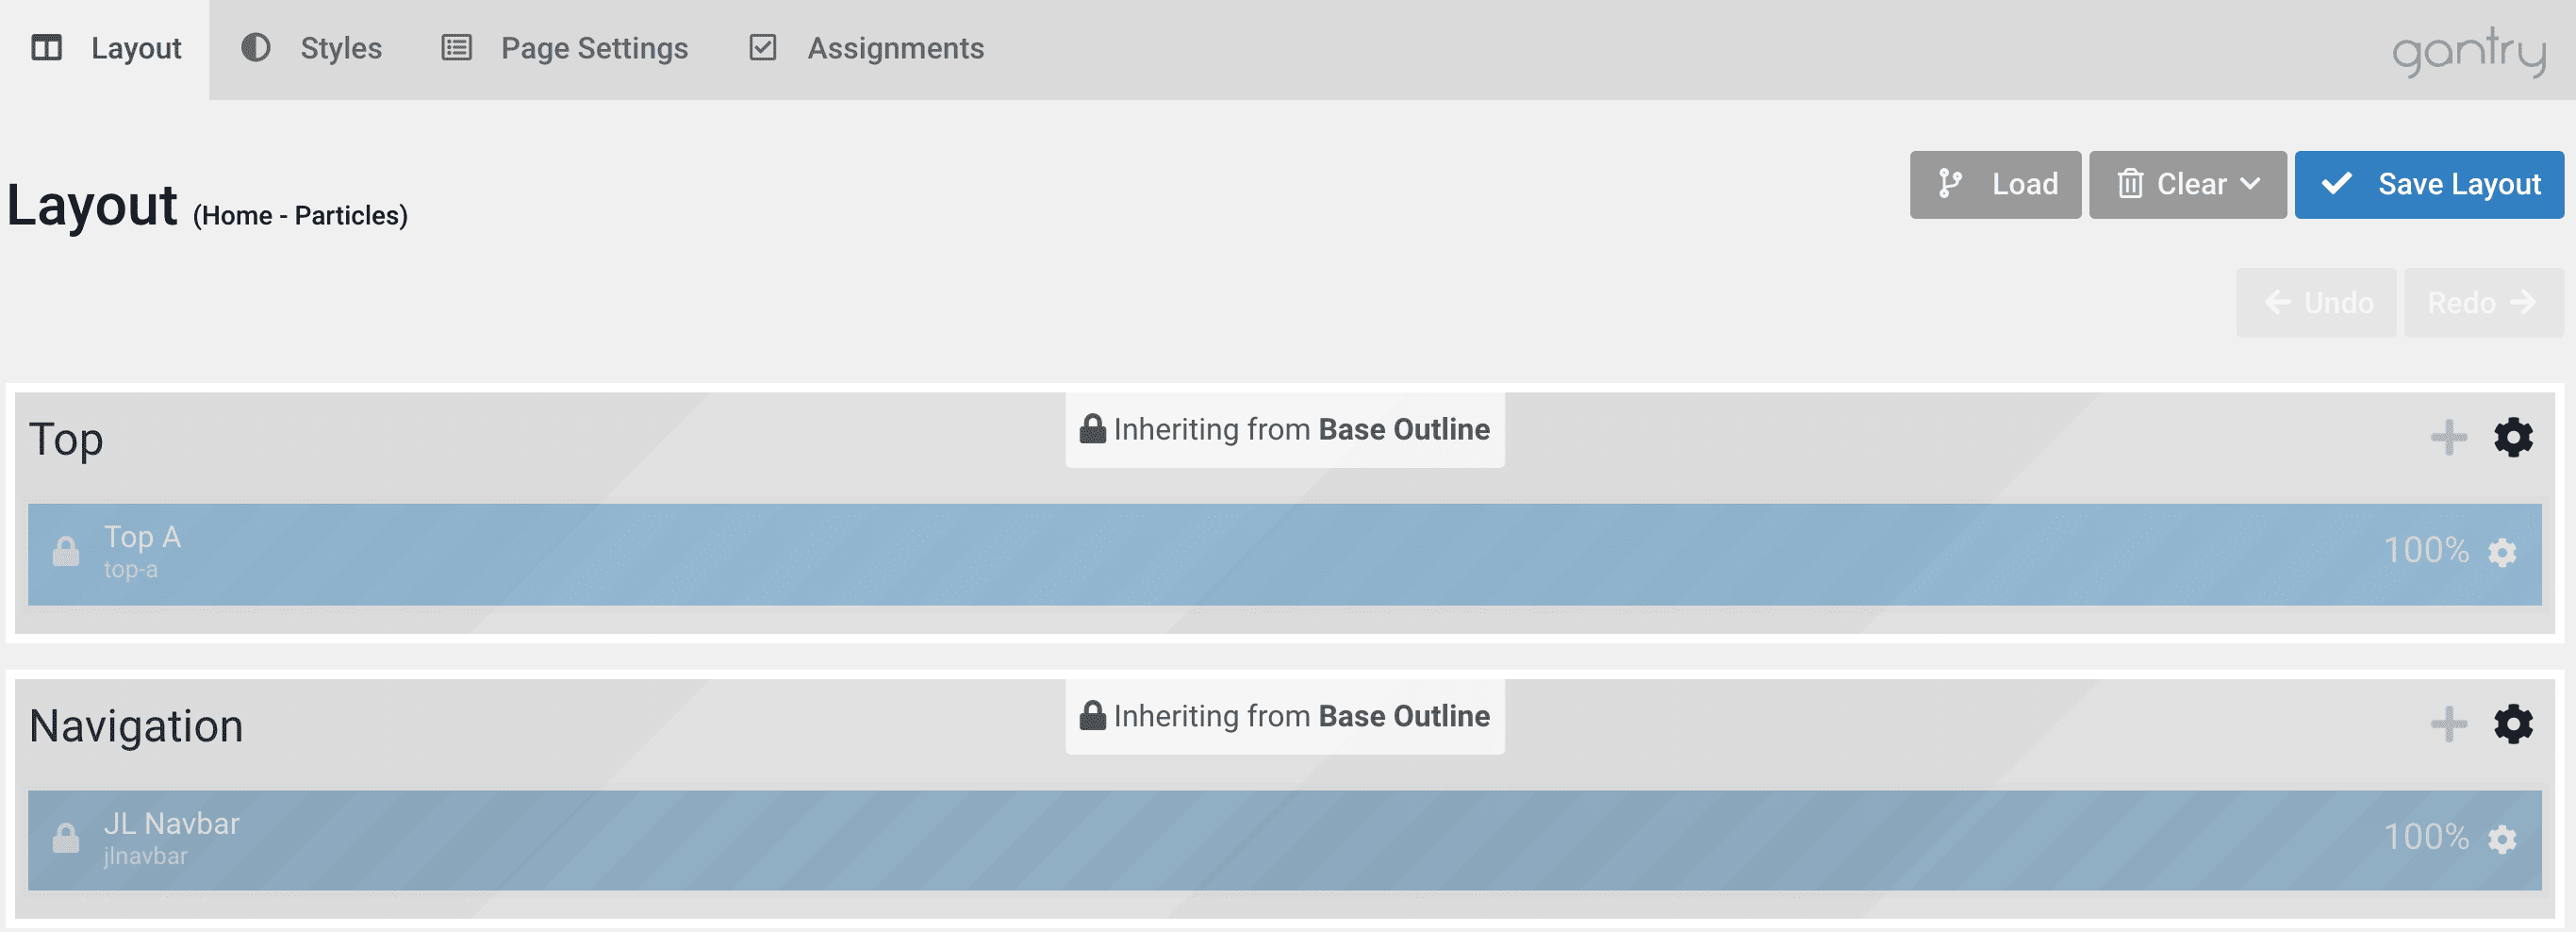
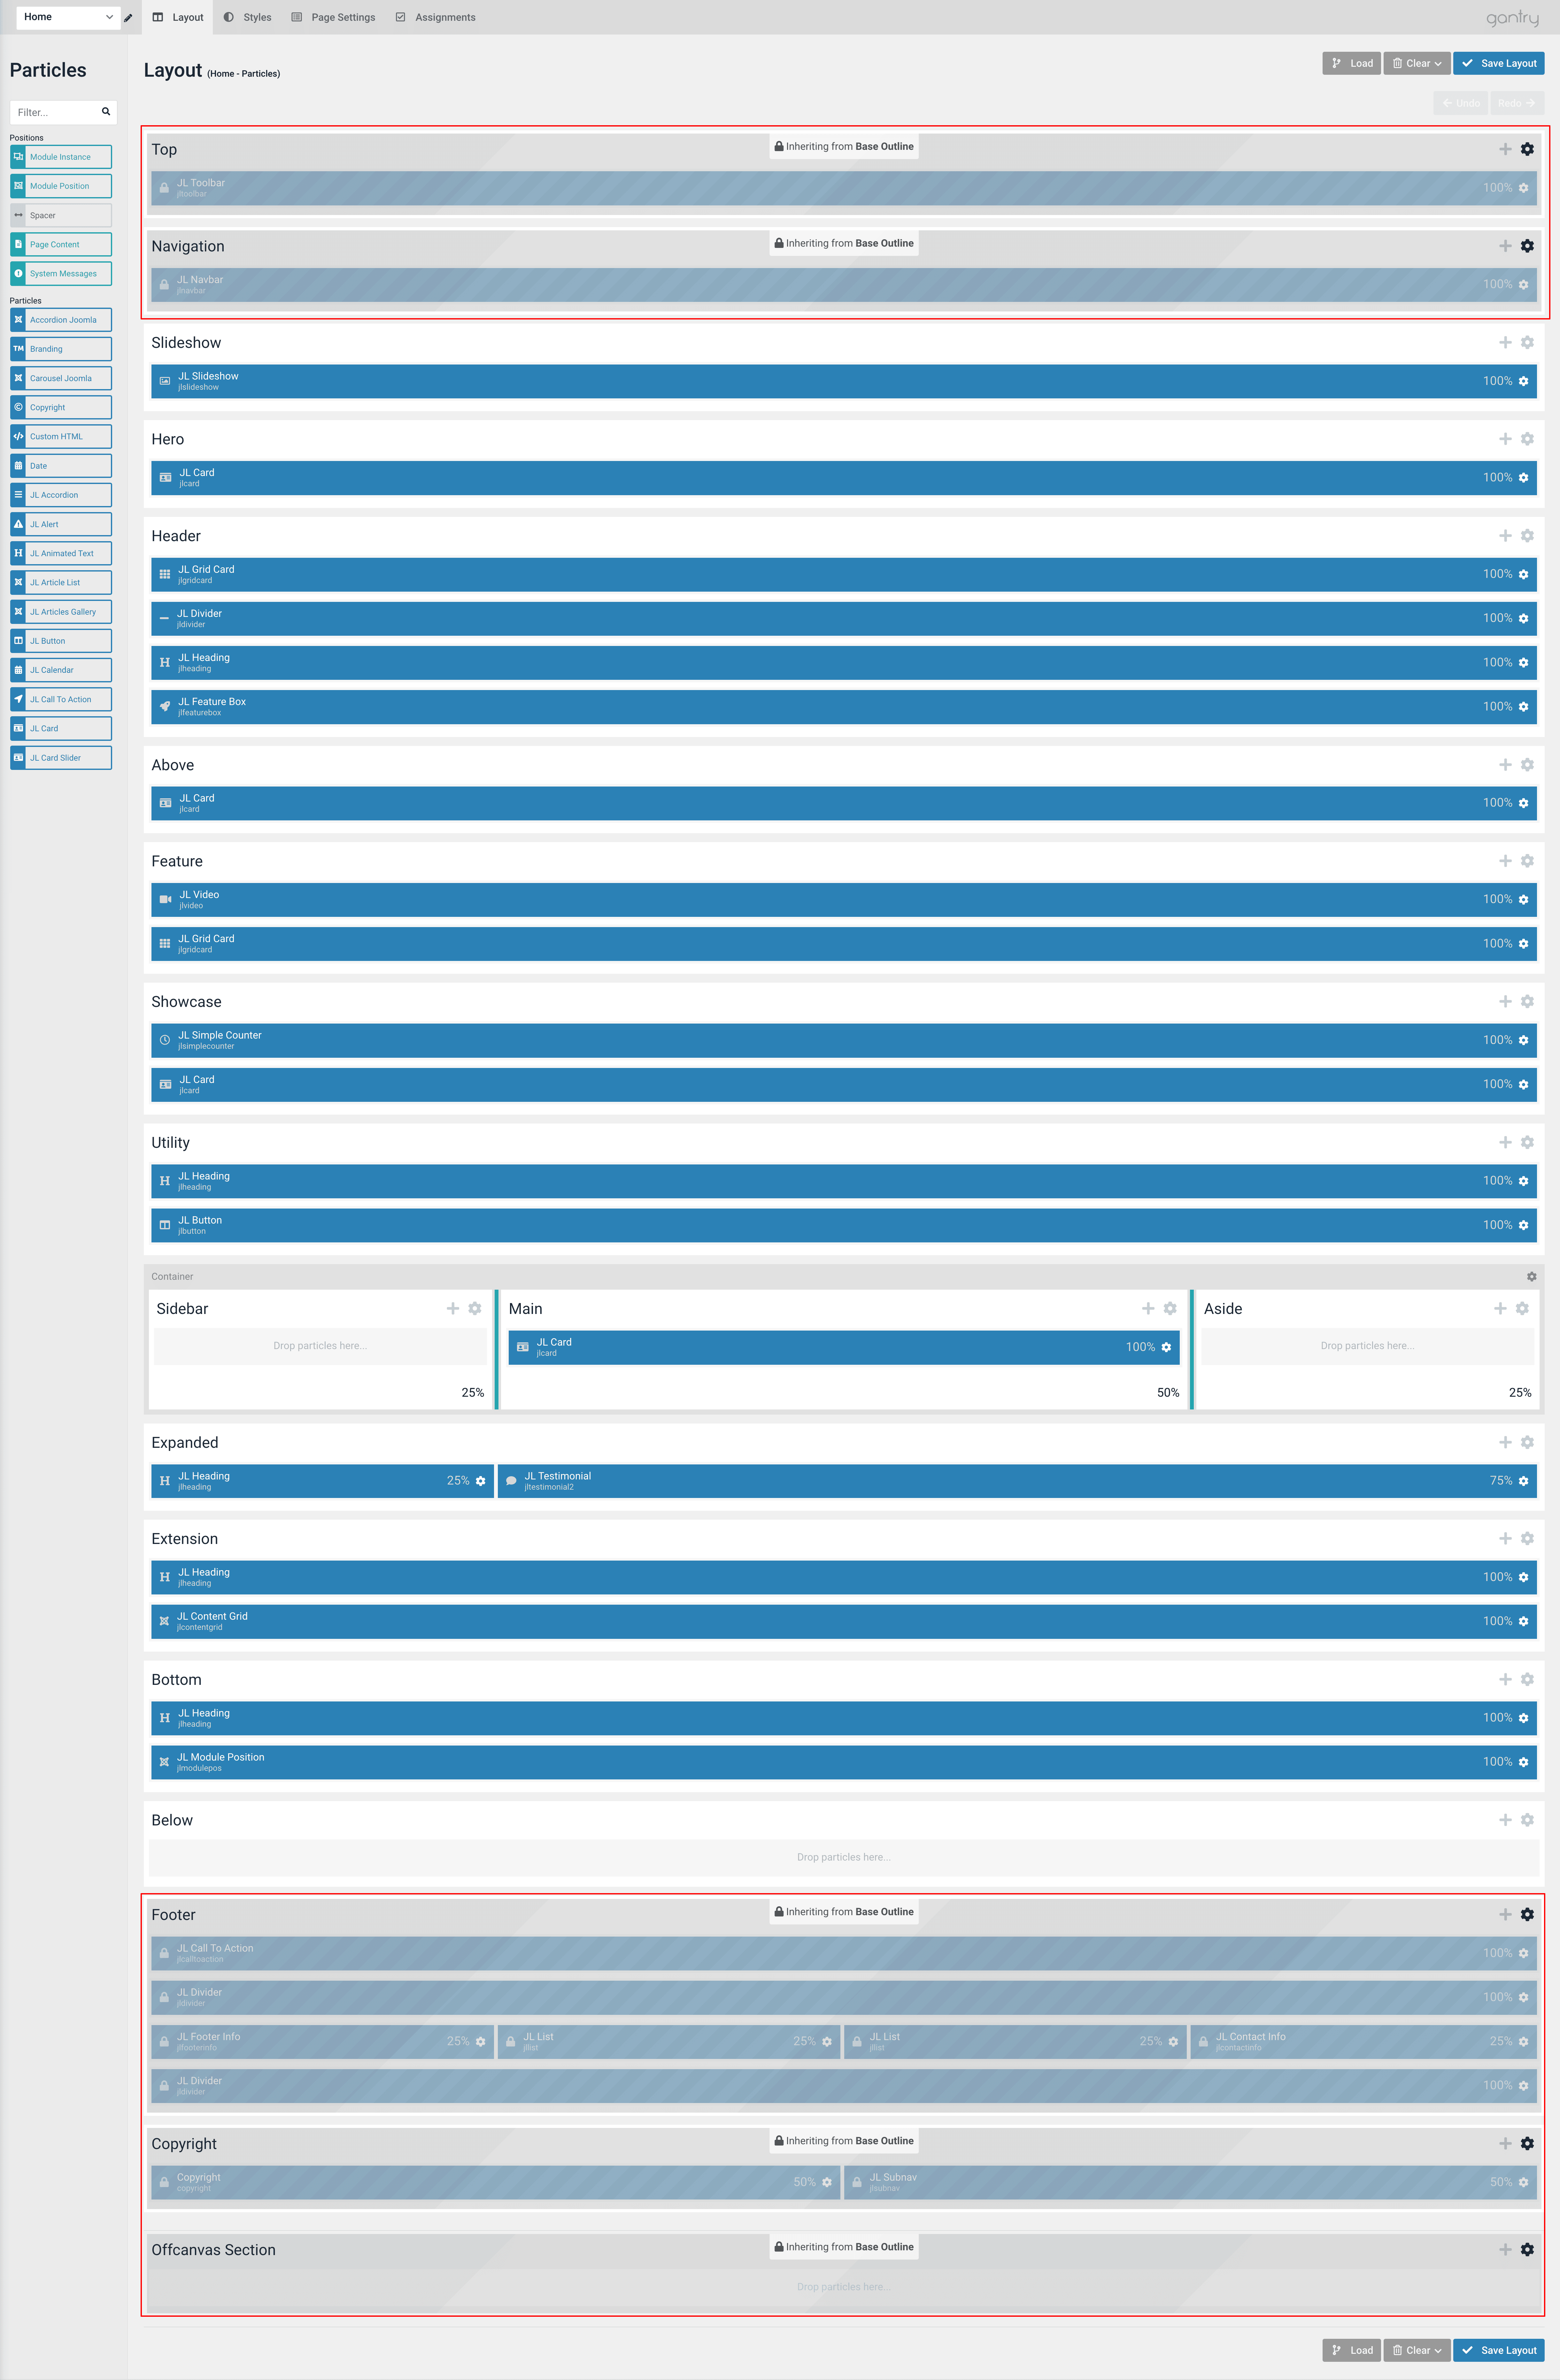
Example about the Home Section Inheritance
You might notice that the Home Layout below and its section like Top, Navigation, Footer, Copyright and Off-canvas section are inheriting from Base Outline. That means if you change the content, particles, section variations from the Base outline, it will automatically change the section’s content for the Home outline (settings are naturally inherited from the Base outline)
Editing Home Demo Content
This guide will cover how to edit the Home demo content in Quickstart packages. Switching between prebuilt layouts can be done by using the drop-down menu located on the left-hand side of the toolbar.

Select the Home outline from the drop-down menu to add, edit, or replace existing sample content, images, and settings for the various particles as they appear on the front page of our demo.
Or you can go to System → Site Template Styles and then click the template name (We use the Logan template for the demonstration) to access the Home layout manager.
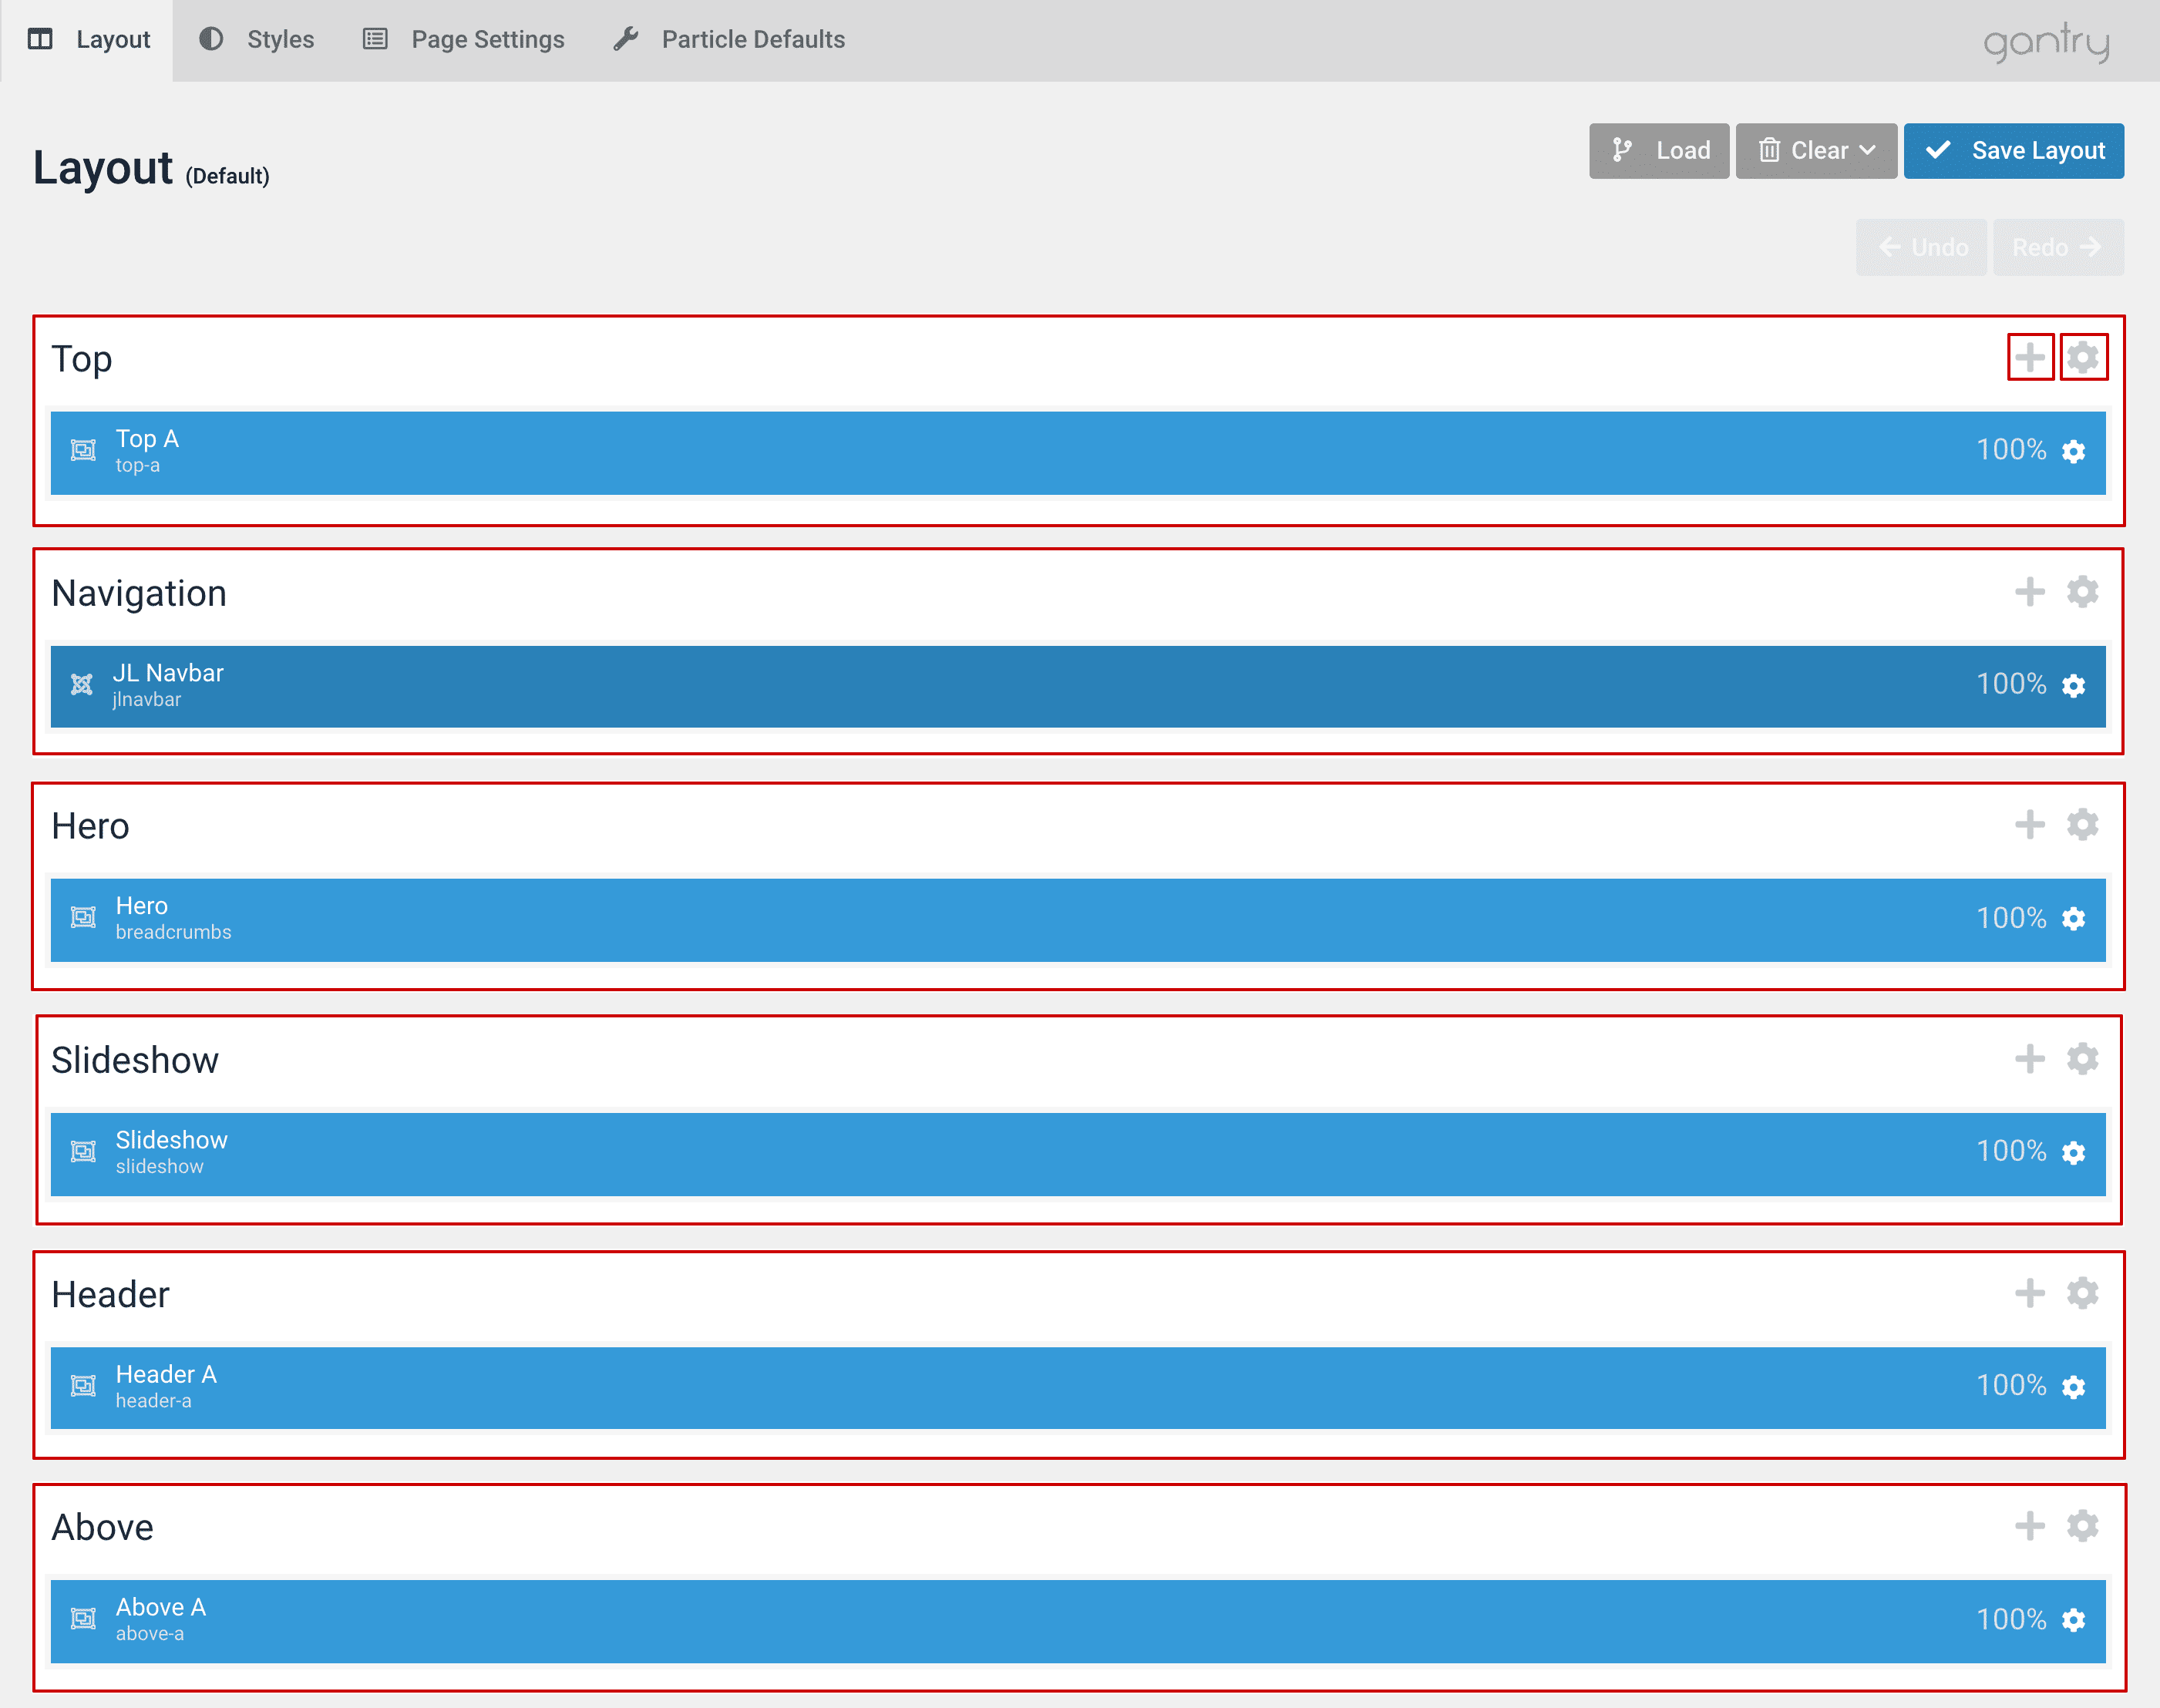
Below, you will find an example of the Home layout that includes all particles that present the content on the front page.
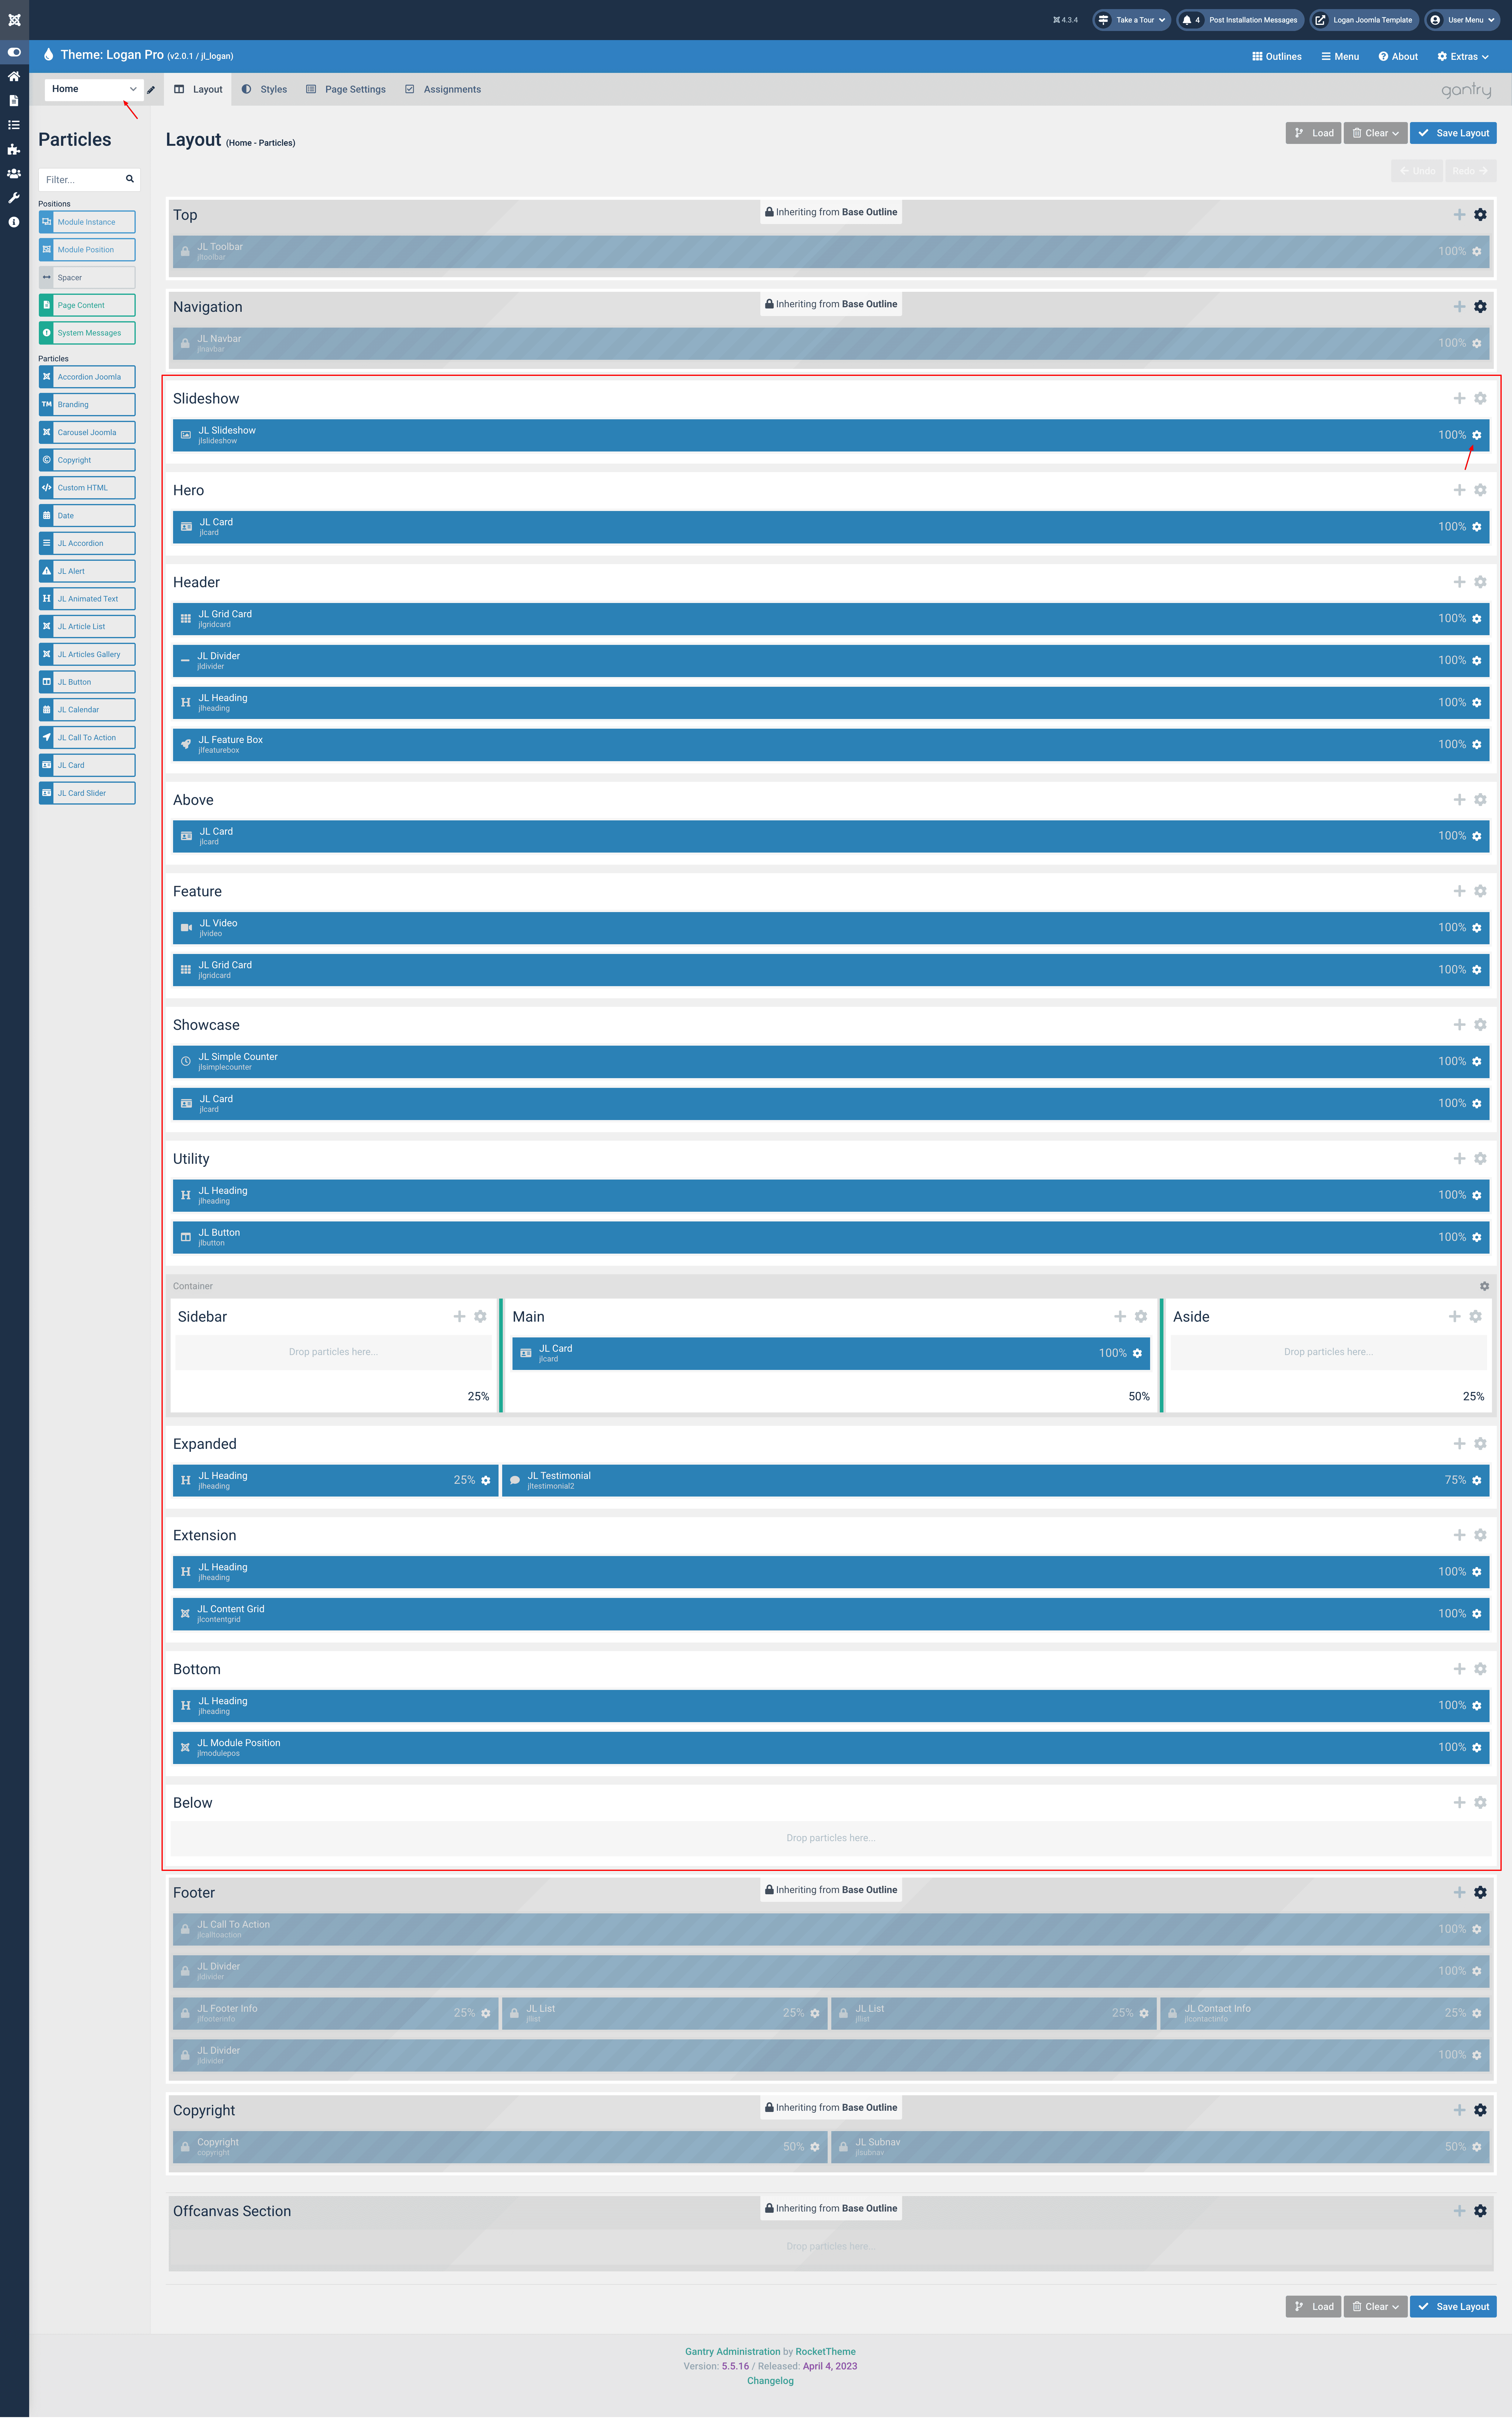
The Slideshow’s content can be edited by clicking on the cog icon () on the Slideshow particle to change its image, title, and link.
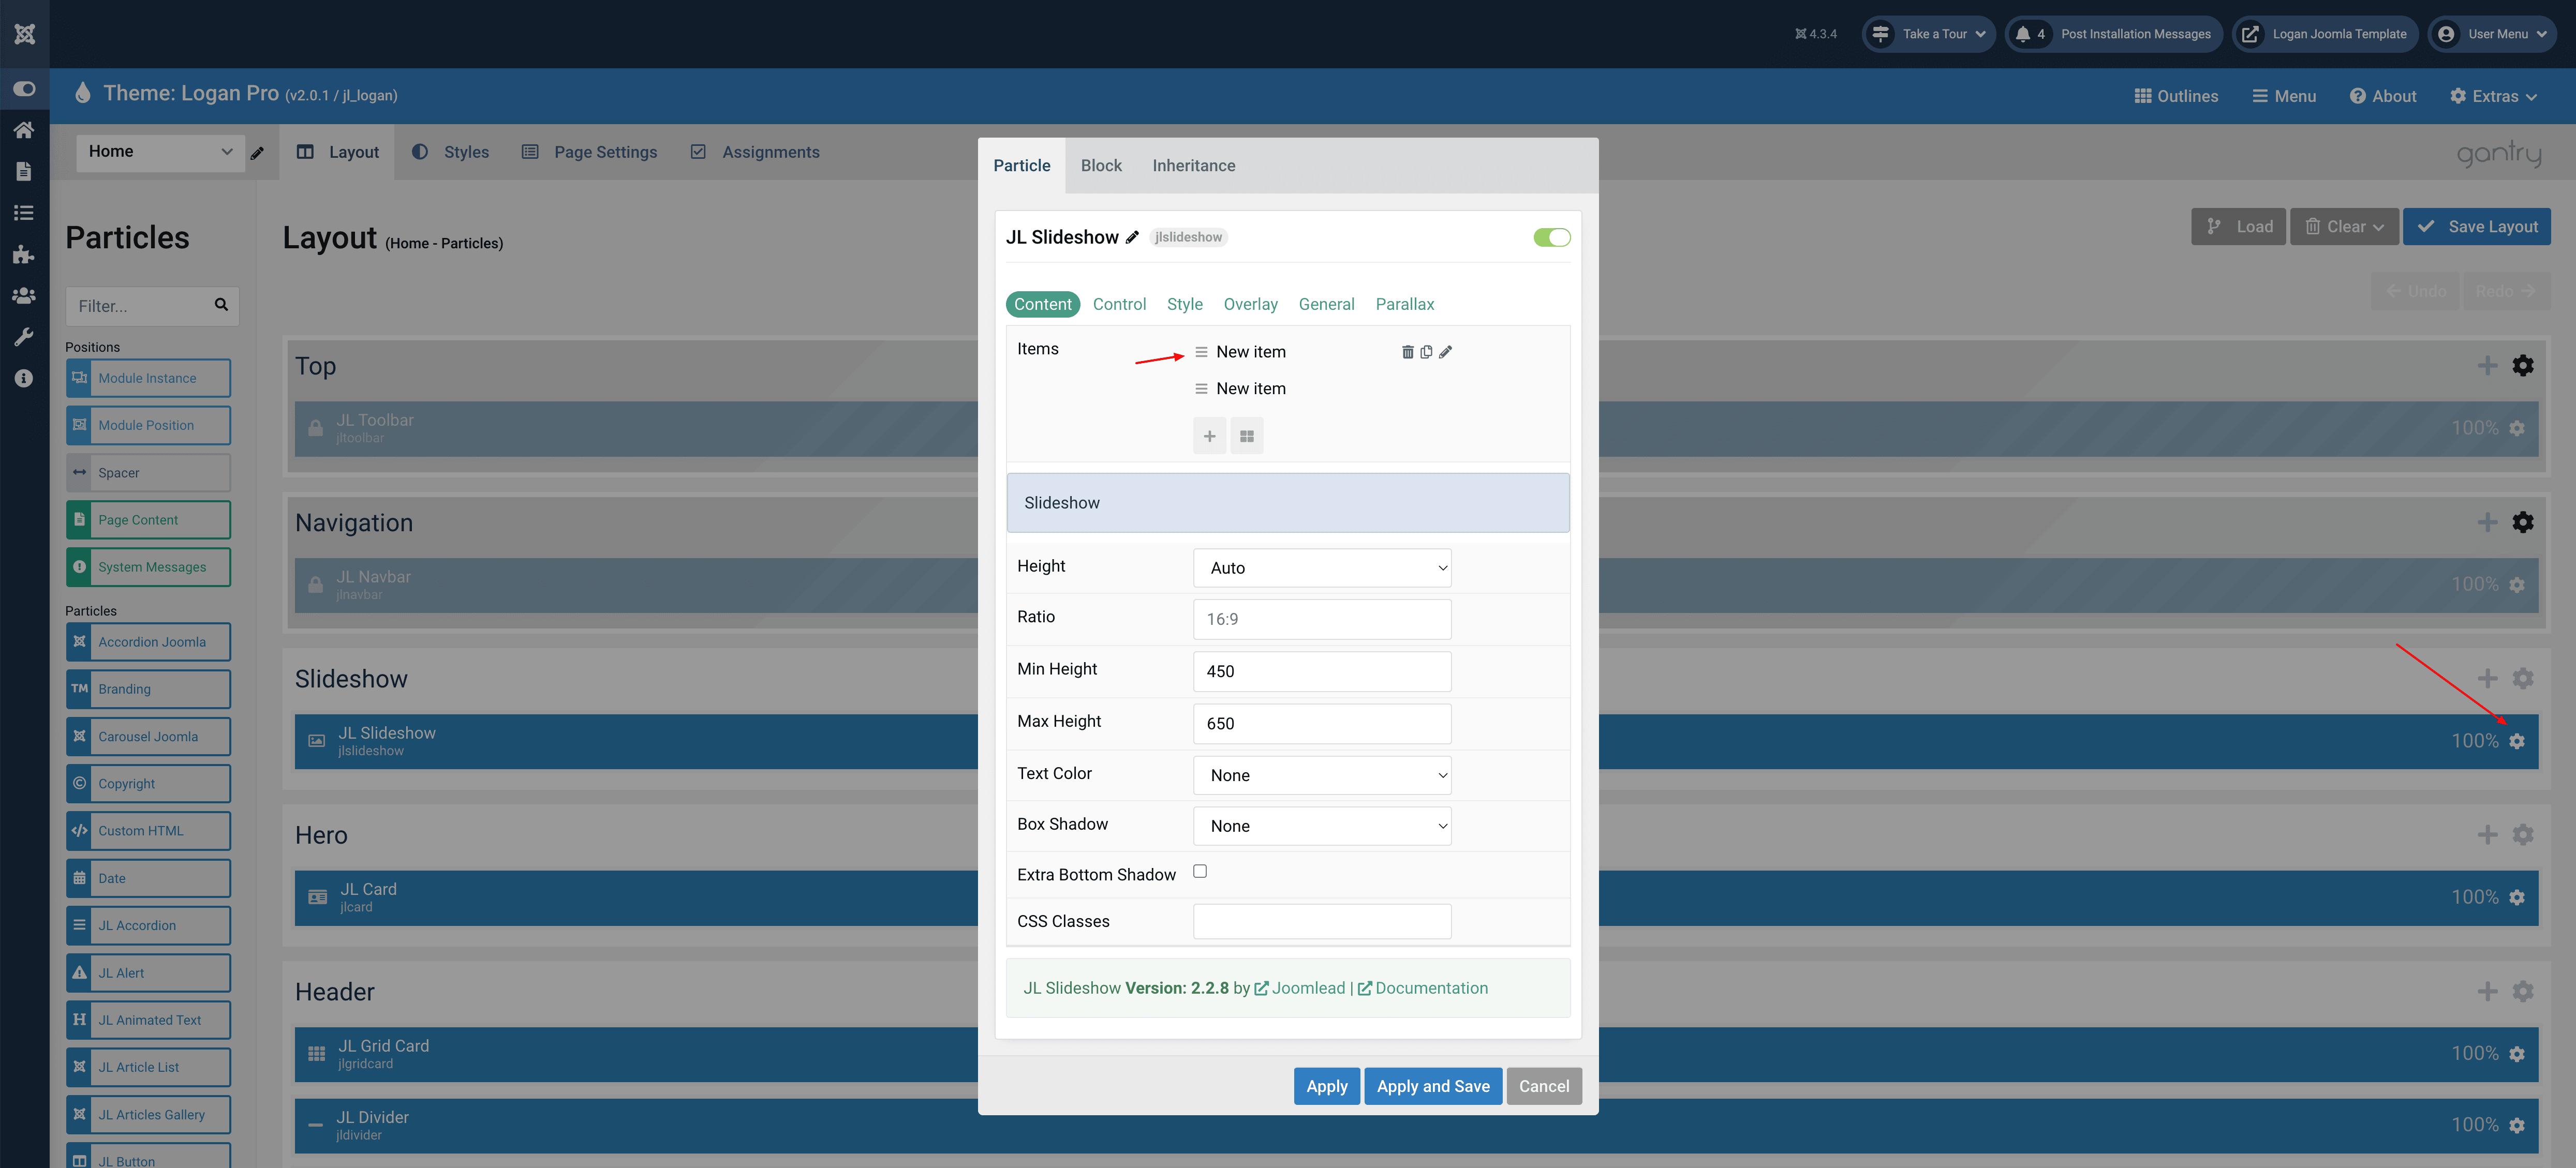
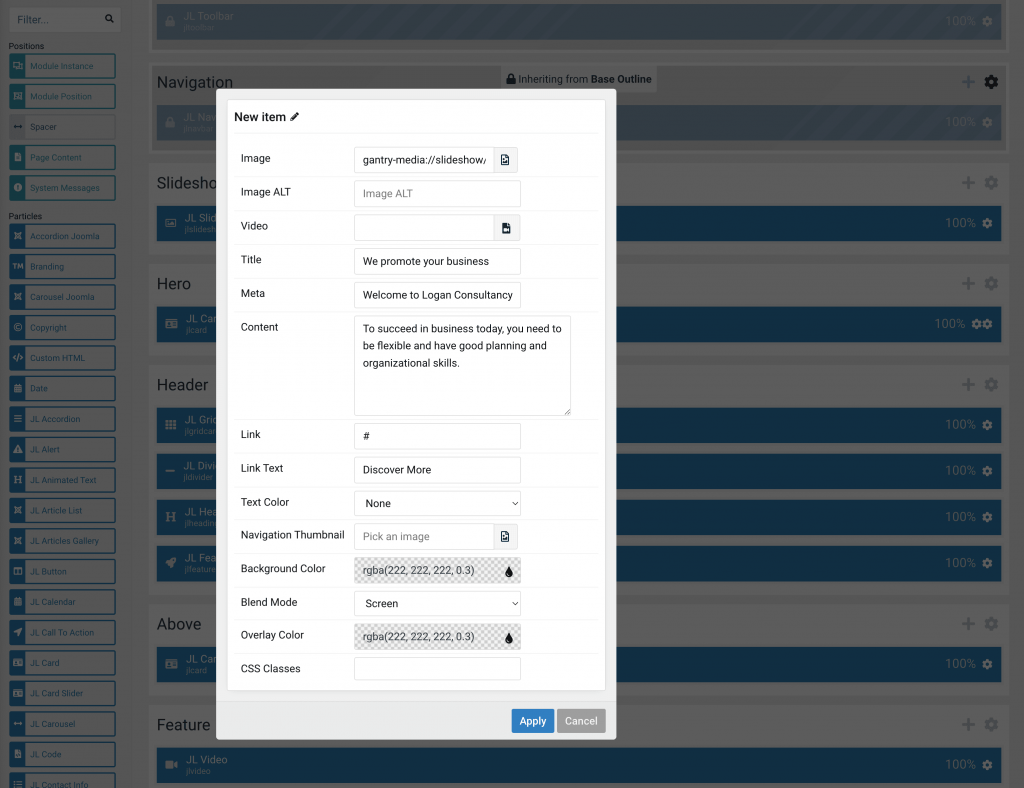
Editing all Home Particles can be done by clicking on the cog icon (), making changing the Home content simple.
Positions
Our Joomla templates come with unlimited positions. Thanks to the awesome Gantry 5 framework you can now easily create as many positions as you want.
Create new Position
You just need to go to the Layout Manager, drag and drop the “Module Position” particle wherever you want it to be and set the Position name.
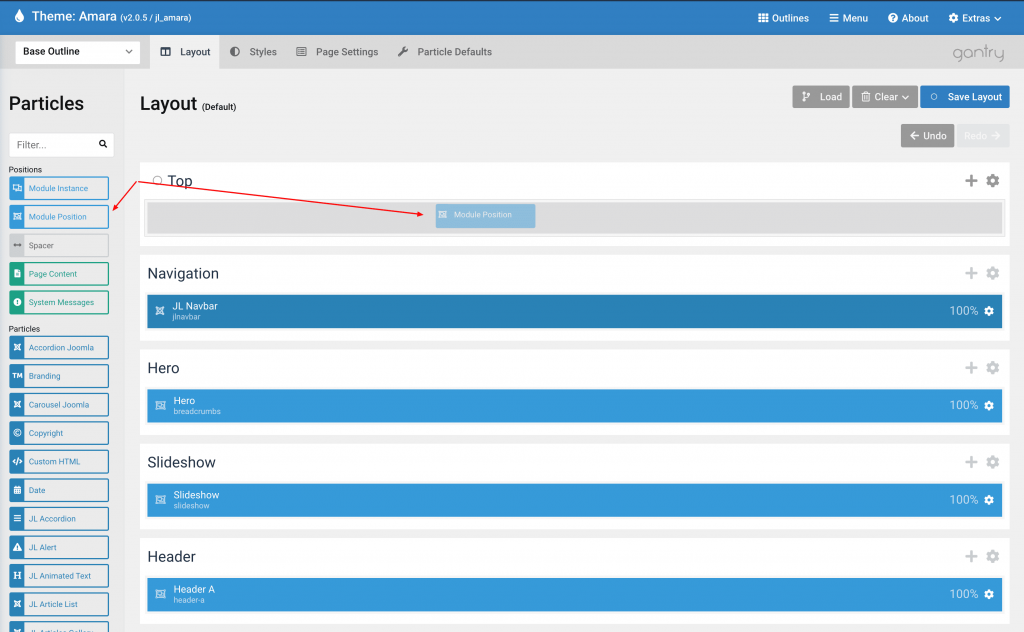
Set the Joomla position name, example: top-a
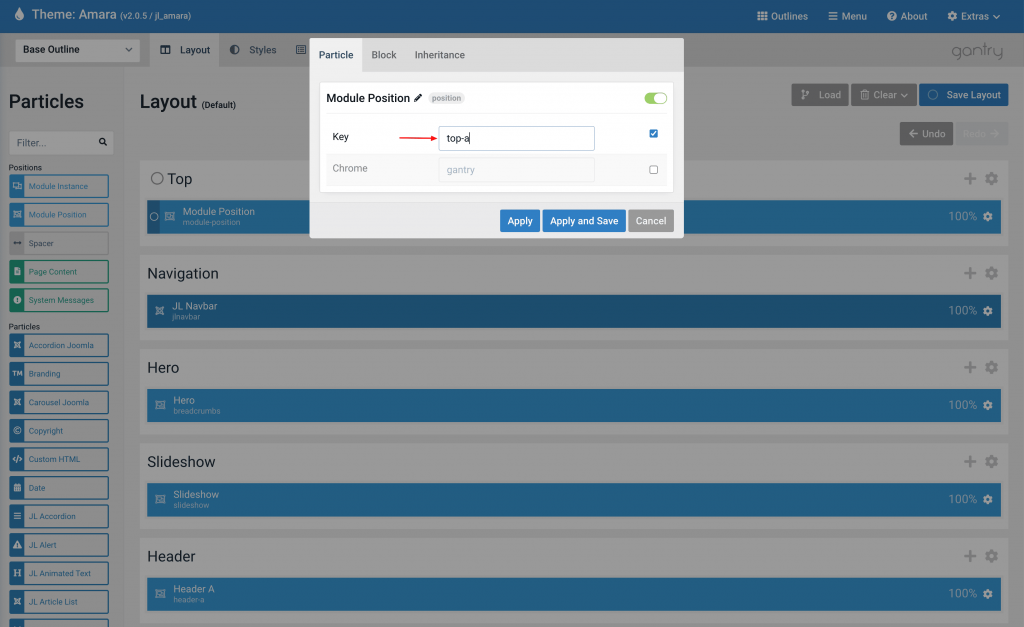
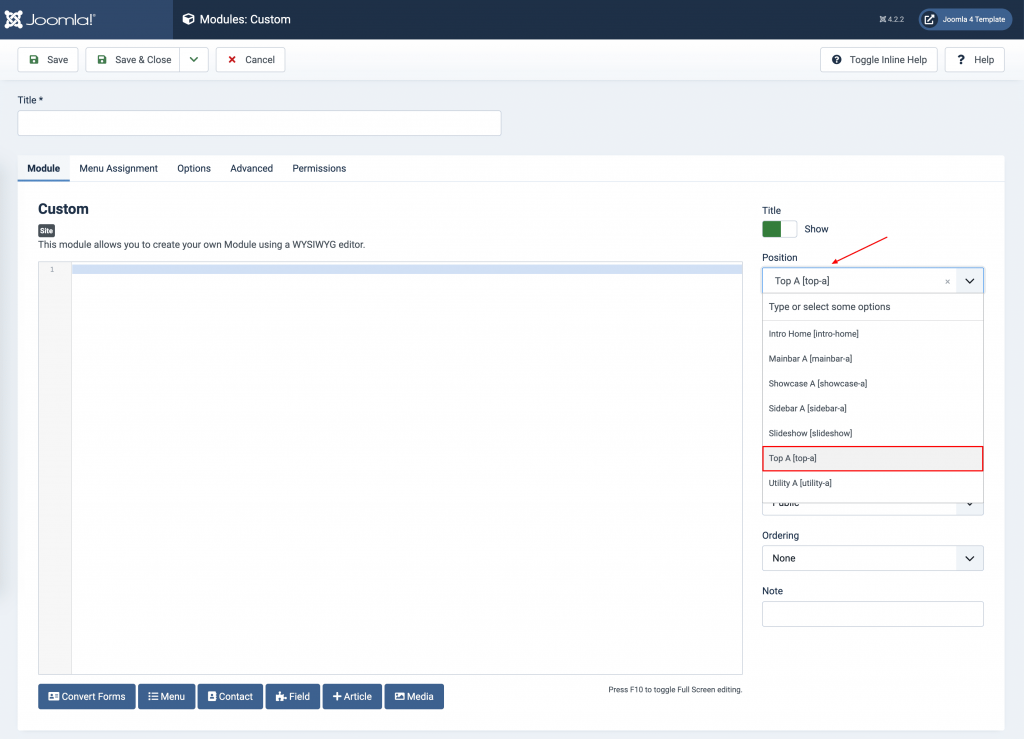
After that, you can assign the Joomla module to the new position
Learn how to create any positions quickly without coding here.
Alternative Layouts
JoomLead templates bring more alternative layouts for Articles – Newsflash (mod_articles_news) and Contact form layout. It is possible to present Joomla content in different layouts by using one of these alternative layouts.
Articles – Newsflash
All templates include 09 alternative layouts for the Articles – Newsflash (mod_articles_news) to display articles in several styles.
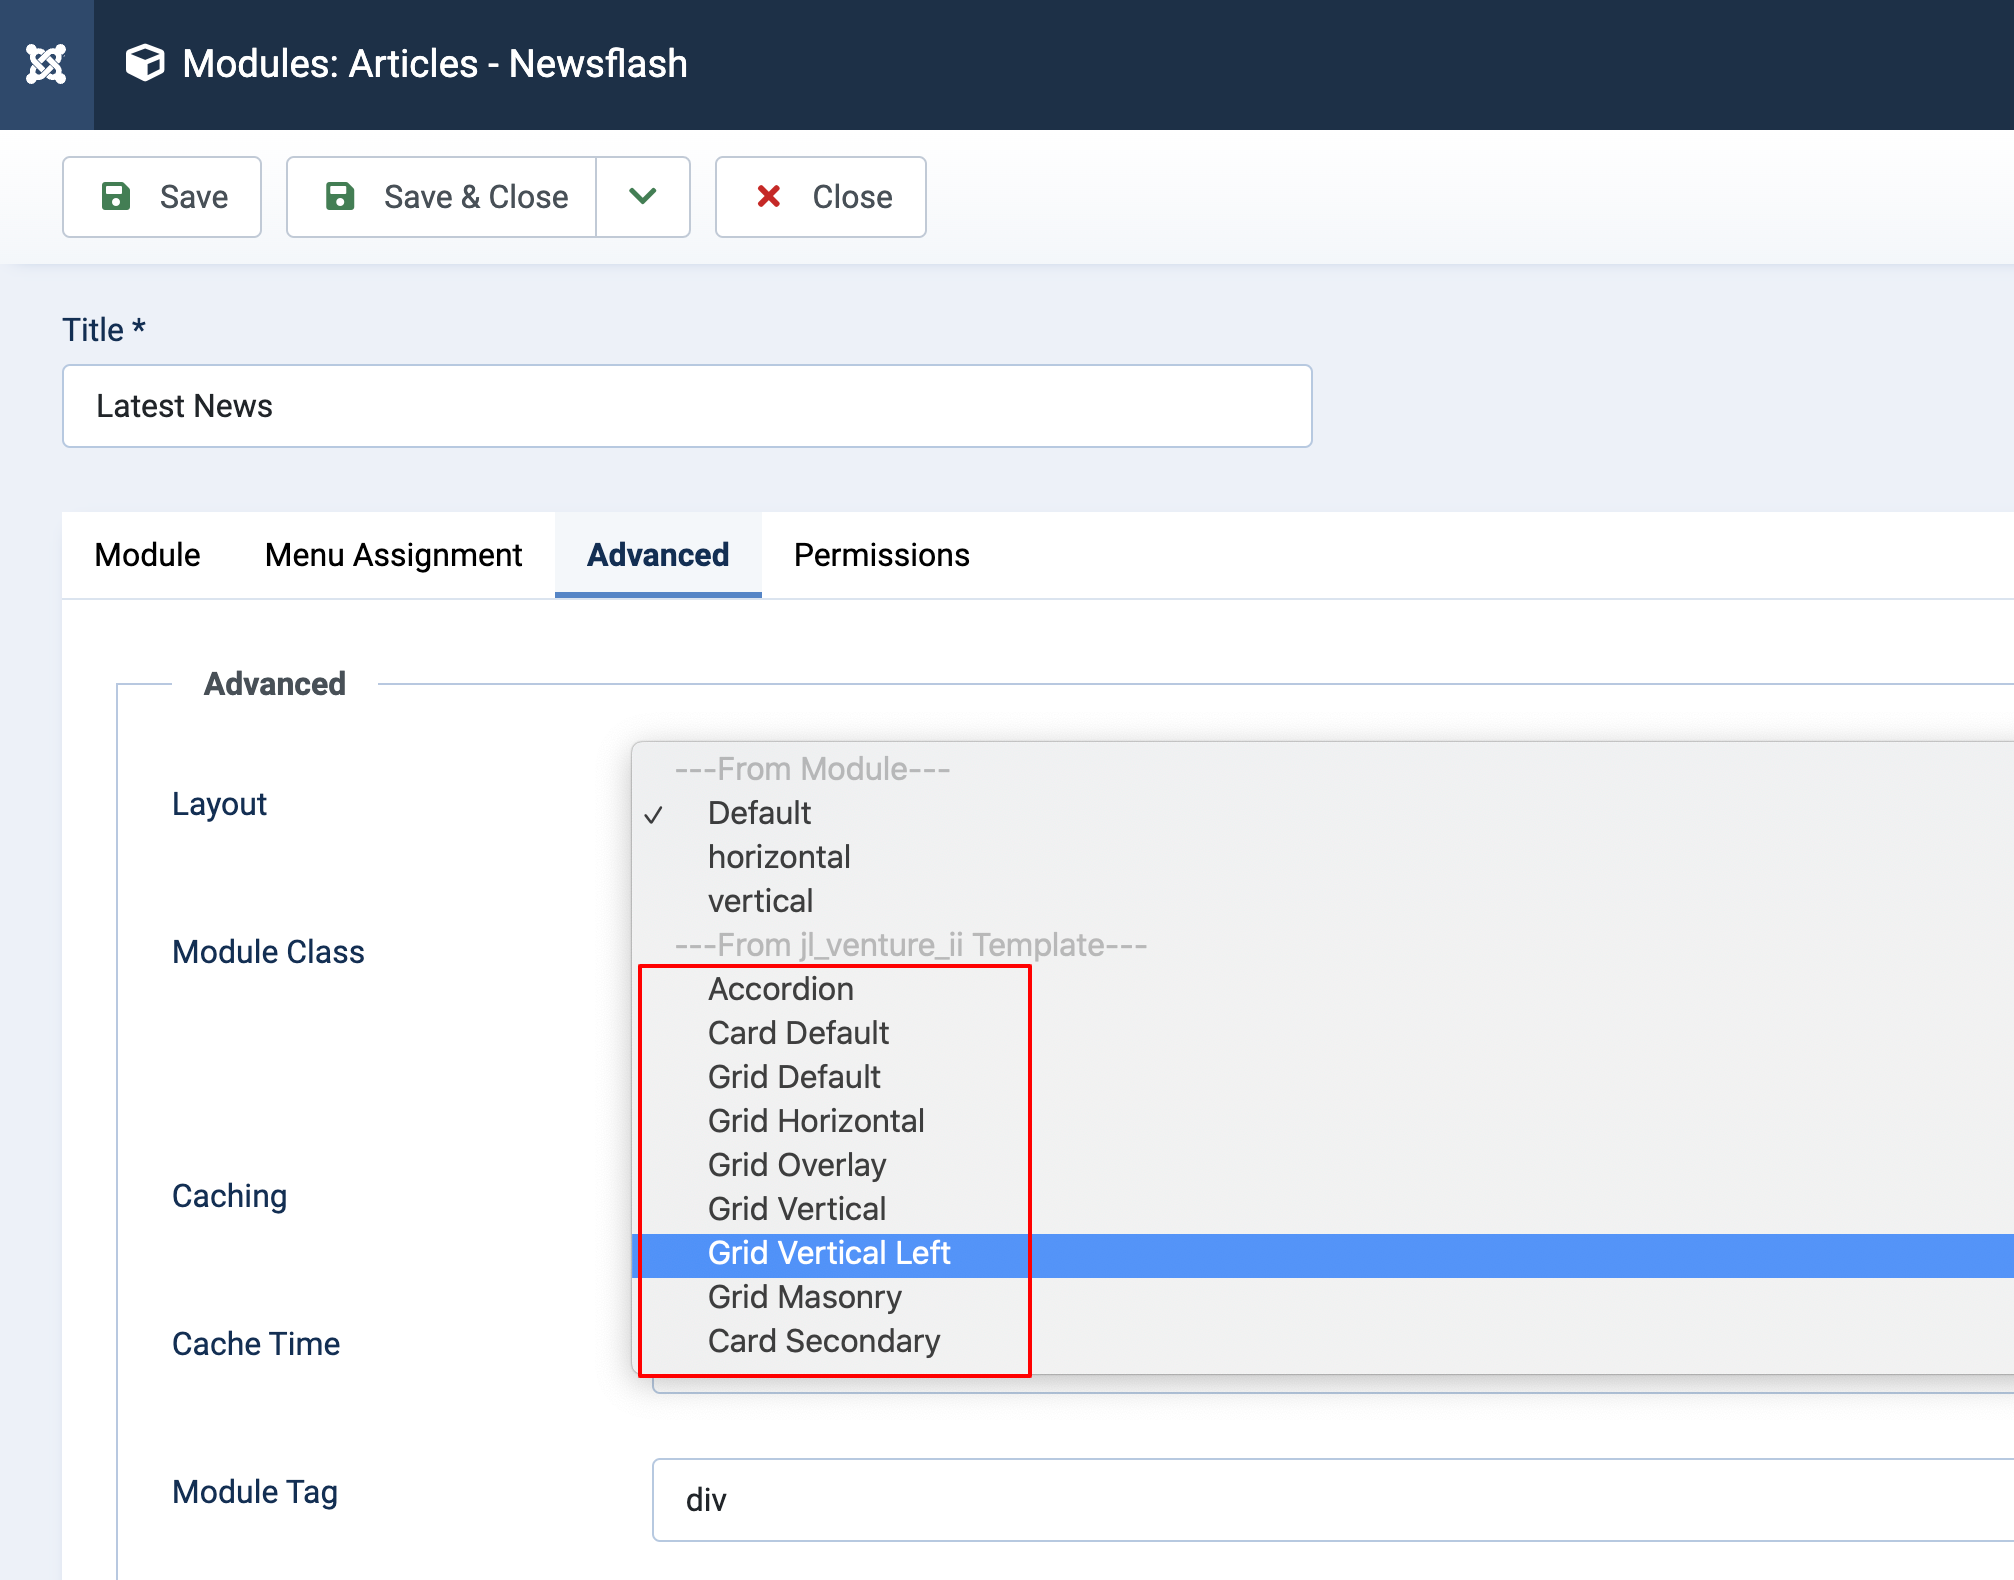
The following alternative layouts can be found in the Articles – Newsflash module → tab Advanced → Layout
Example Grid Vertical Layout

Contact Form
November update brings an alternative layout for the Contact form layout (grid) to display the contact form as a grid layout. Now you can choose between the default Joomla contact form or Grid contact form.
The grid layout can be found in Contact Manager Options.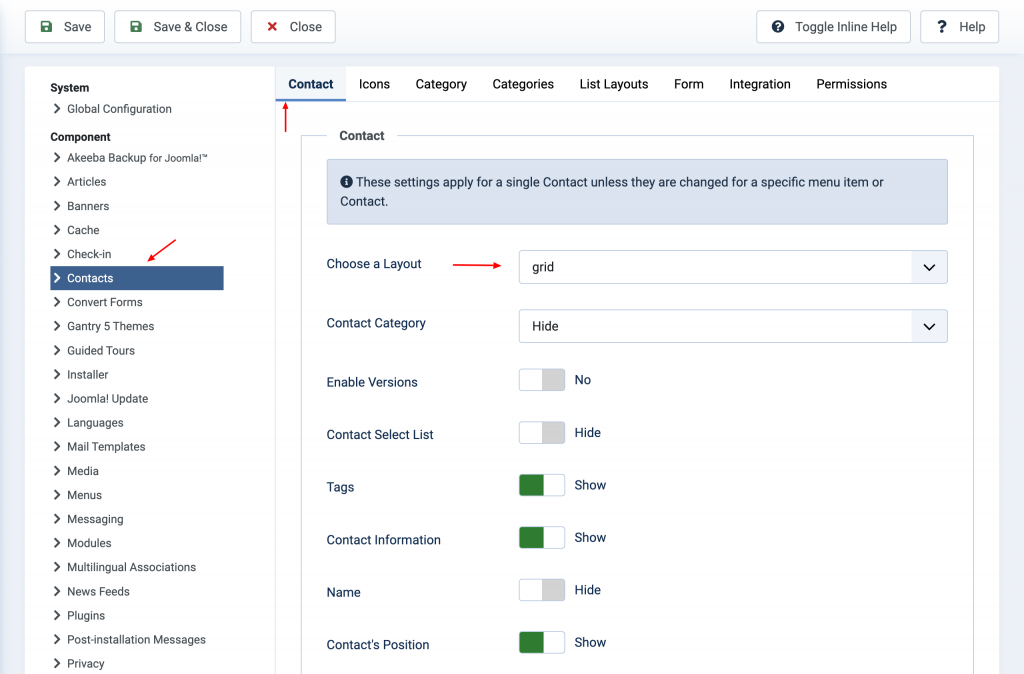
Go to Components → Contacts → click Options button → choose a layout → select Grid layout.
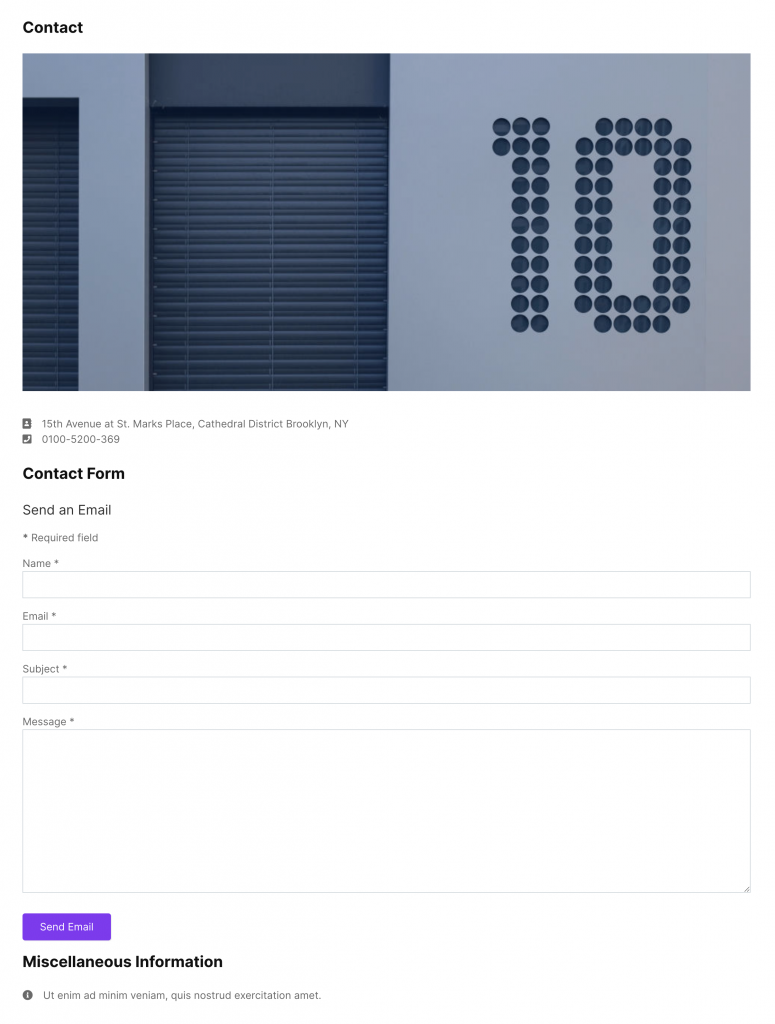
Example Default Contact Form
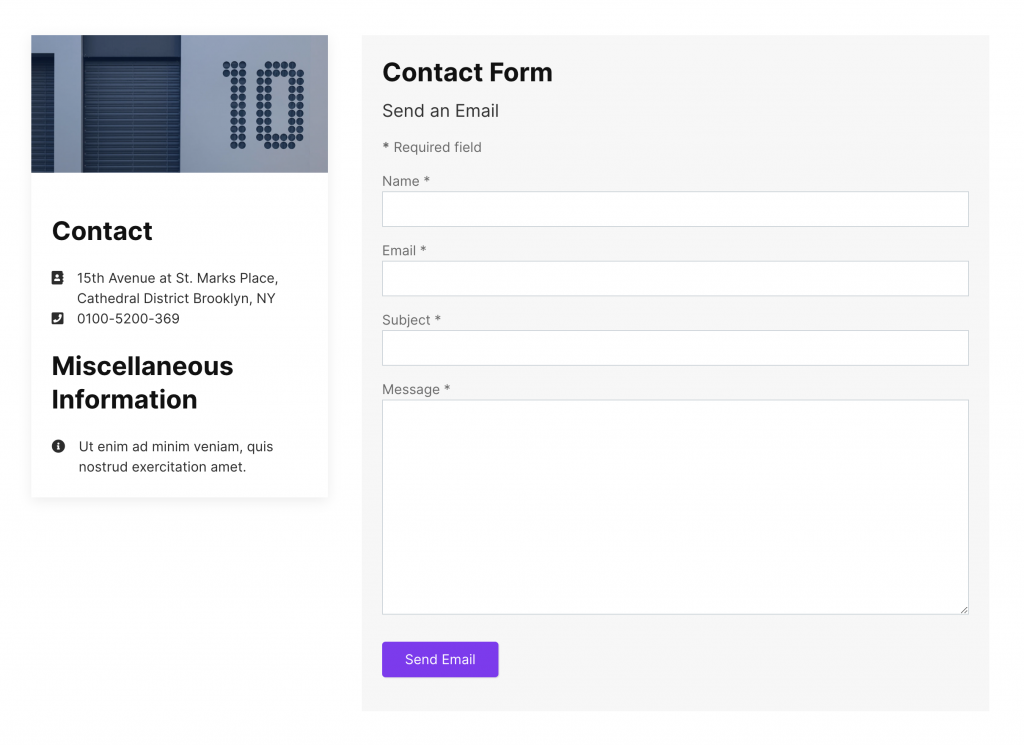
Example Grid Contact Form
Customization
Add custom JavaScript and CSS/SCSS to the website.
Add custom Css
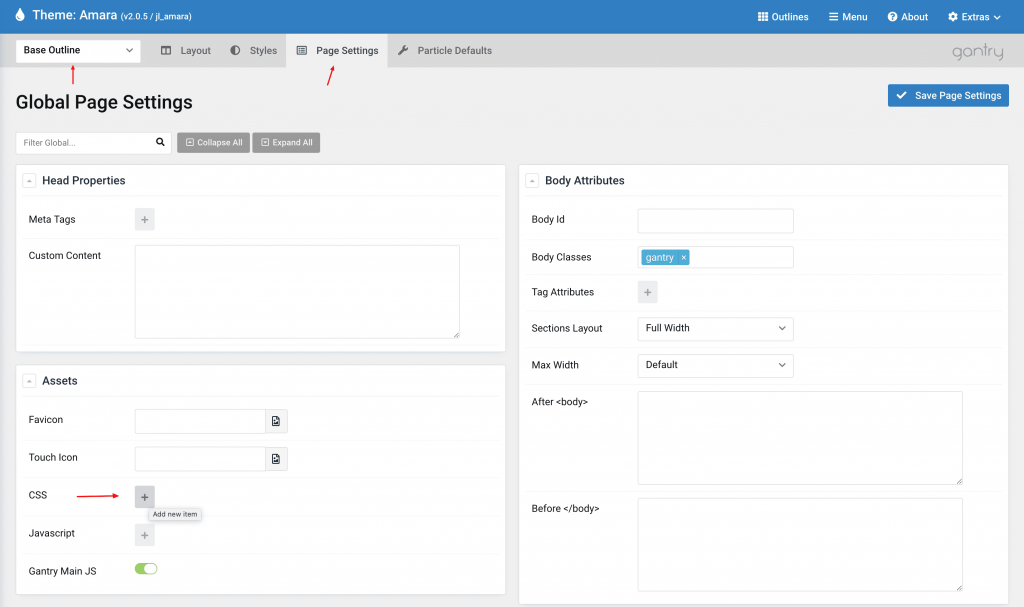
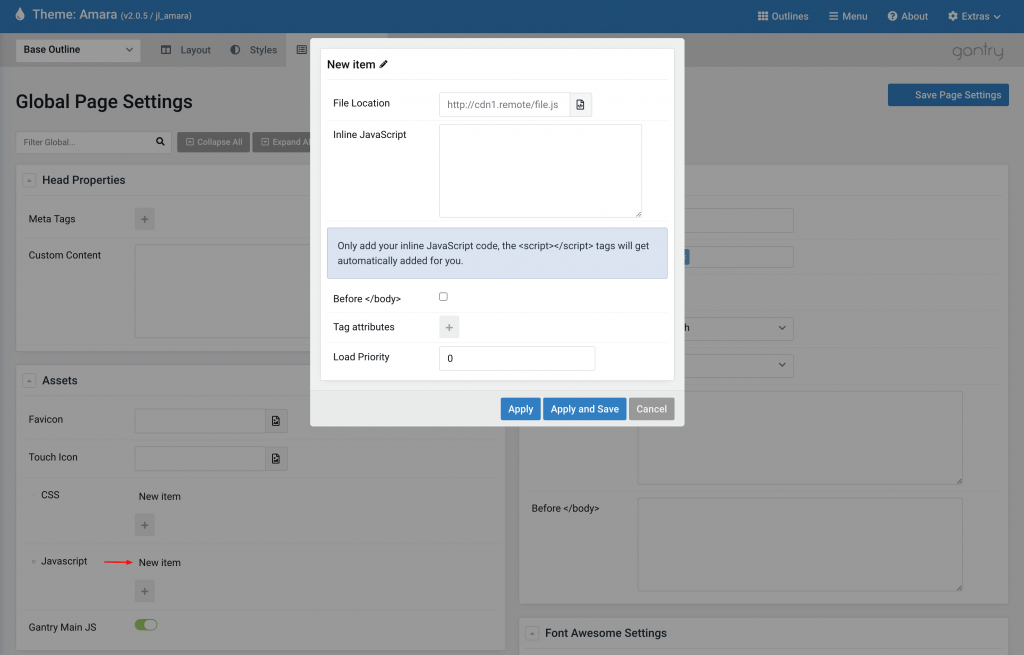
Go to Base Outline → Page Settings → Assets → CSS → then click the plus(+) icon to Add new item
Custom SCSS Code
All your customization (custom code) should be placed in your “Custom Style Sheet” file. This is the custom.scss file. By default, the custom.scss file does not exists, so you need to create a new one.
To do this, navigate in the directory structure to THEME_DIR/custom/scss and create a file called custom.scss if one doesn’t already exist. If the /scss/ directory doesn’t exist within your custom folder, you will need to create that, too. If it already does, just open it and make your additions/changes directly to the file.
You will find all details in the Gantry 5 Documentation, in the “Adding a Custom Style Sheet” chapter.
Add custom Js
Go to Base Outline → Page Settings → Assets → JS → then click the plus(+) icon to Add new item
Joomla! 5 compatibility
Gantry 5 framework and JoomLead templates are compatible with Joomla 5, Joomla 4 and Joomla 3
Joomla 3
You can use any Joomla 4 or Joomla 5 templates for Joomla 3, however, you need to replace the html override to make it works, please note the html layout for Joomla 3 and Joomla 4 is different that why we need to change the html override structure.
Steps:
– Rename/Remove the html folder at root/templates/template_name/html using an FTP program.
– Download the html override for Joomla 3 version here: https://www.dropbox.com/s/zk7sbnf3i59oczi/html.zip?dl=0 then unzip and upload to root/templates/template_name/
Template Tutorials
- Overriding Particle Settings
- Adding a Custom Style Sheet
- Adding a Custom Font
- Customizing the Error Page
- Using the Font Picker
- Using the Color Picker
- Using the Icon Picker
- Creating a New Particle
- Particle YAML Field Types
- Customizing Theme Files
- Creating Layout Presets
- Creating Custom File Overrides
400 Bad Request
Learn how to handle 400 Bad Request issue while saving the Particle defaults
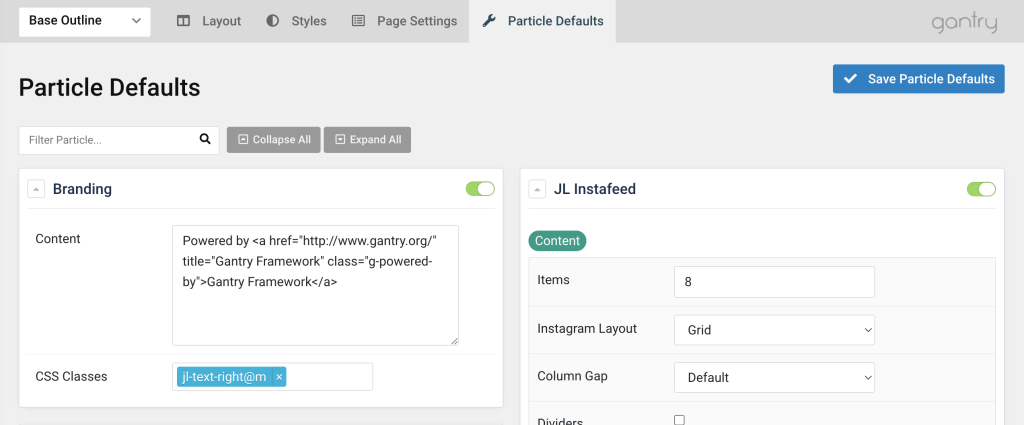
This section of the Particle Defaults administrative panel enables you to set defaults which apply to the currently-selected outline. If you are using the Base Outline, these settings become the global default for those particles.
If you are encountering a 400 error while saving settings in the Particle Defaults panel, it typically indicates that the server is not processing the request due to an exceeded limit.

To resolve this issue, you need to increase the max_input_vars variable in your php.ini file. Open the php.ini file, locate the max_input_vars directive, and change:
max_input_vars = 1000
to
max_input_vars = 1500
Restart the Apache and go to Joomla administrator → System → System Information → PHP Information → search for max_input_vars
This adjustment should help resolve the issue you’re facing with the Particle Defaults panel.
If you have any specific request or feedback as well as suggestions, feel free to drop us a line in Ticket System. We’ll try to cover them all.

Comments