Startup Documentation
Introduction
This document covers the installation and use of this template and often reveals answers to common problems and issues – I encourage you to read this document thoroughly if you need an in-depth guide on how to use the template.
If you have any questions that are beyond the scope of this document, feel free to post them in the dedicated JoomLead’ support system at: JoomLead Ticket System
Overview
Live demo
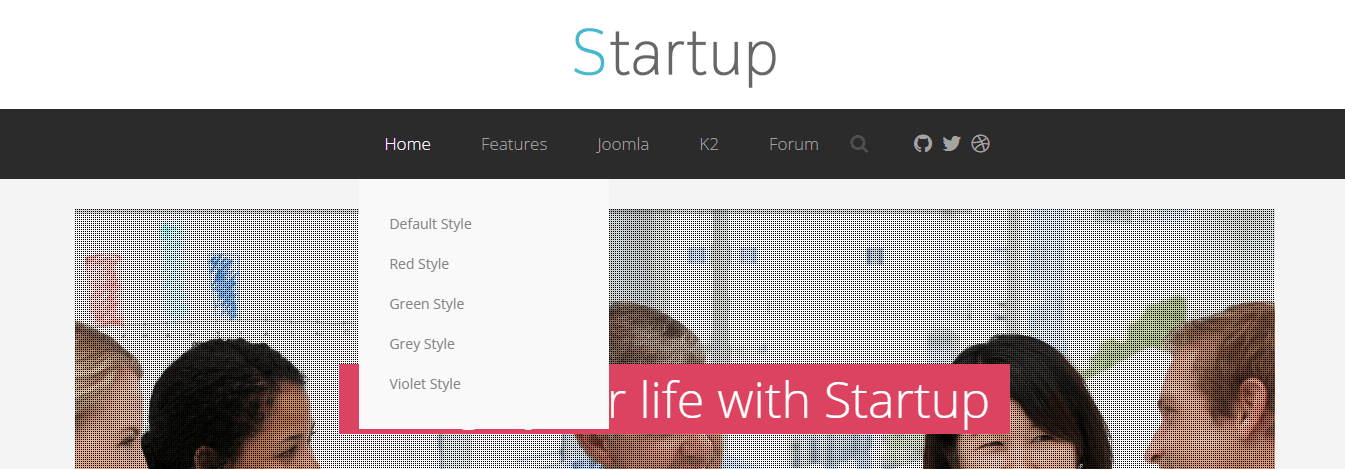
4 colors schemes
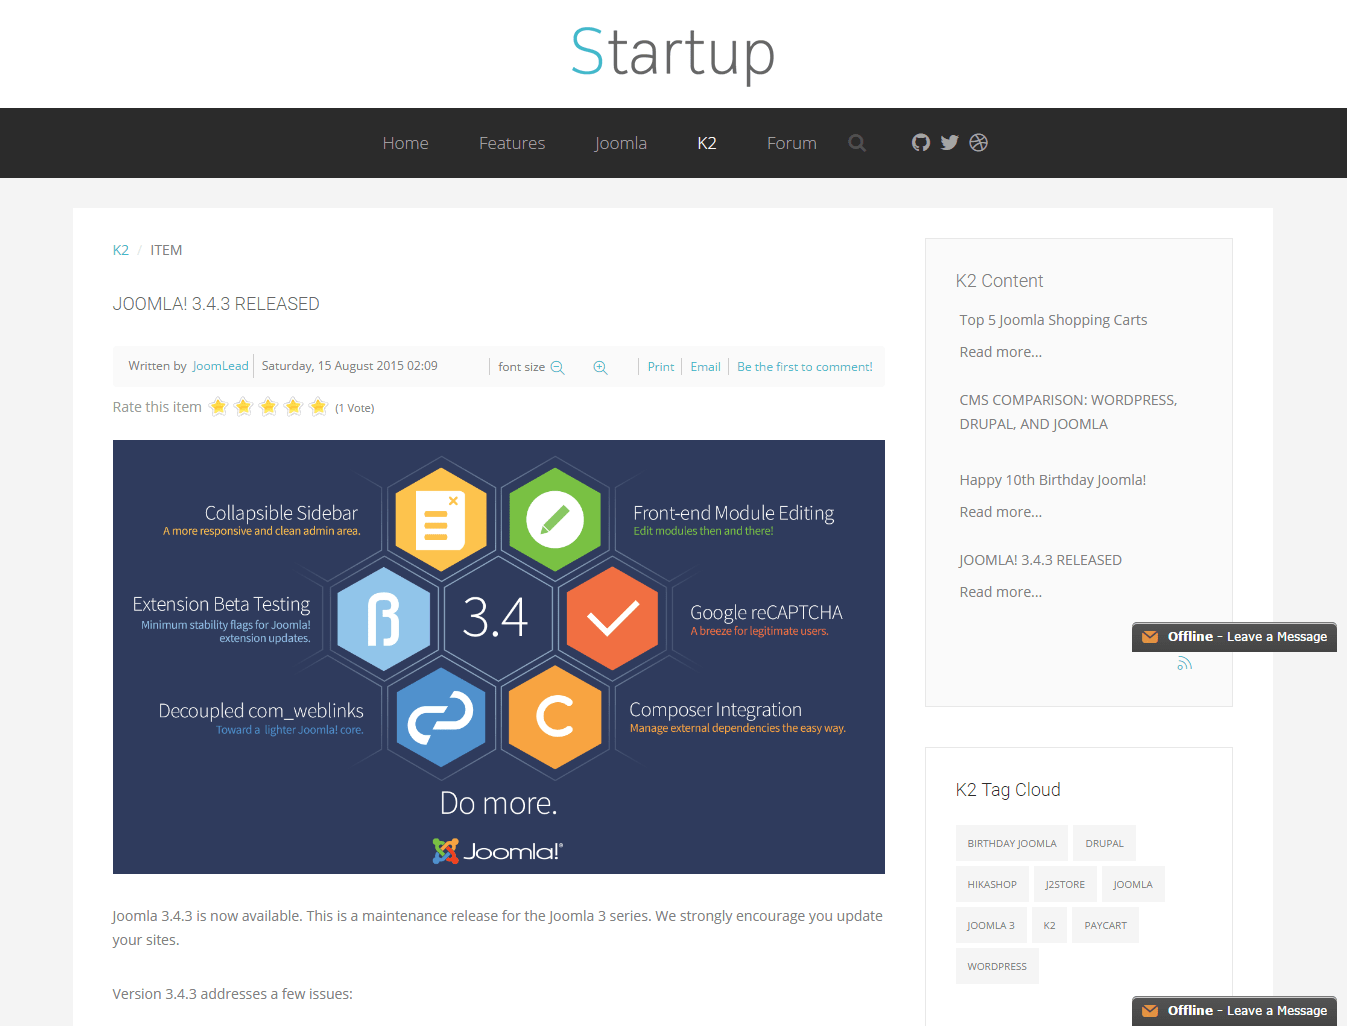
K2 Support
Forum

Installation
The most important decision to make before proceeding with your installation is whether you should install the template manually, or if you can use the Quickstart package, which will install everything for you. The section will help you with steps to install JL Startup template – Quickstart and Manual installation.
Quickstart installation
Why Quickstart
The quickstart allows you to replicate JL Startup demo to your server. It means, after install the quickstart, you will have a site exactly the same as the demo site.
Manual Installation
To install the template do the following:- Login to your Joomla! backend (administrator screen) by going to
http://www.mysite.com/administrator> go to Extensions > Extensions Manager > Install. - Under Upload Package file, click on ‘Choose File’ button and locate your template zip
jl_startup_pro_j3x_installation_1.0.1.zip - Click on “Upload & Install” button. If the template installs successfully, you should see a success message at the top
- Go to Extensions > Template Manager. Under the styles tab, you’ll see the template ‘jp-startup-pro- Default’. Select the checkbox besides it and click the ‘Default’ button to make the template your default template.
Template structure
Get an overview of how all source files of Warp 7 based themes are organized.
| Folder/File | Description |
/css |
Contains all CSS files of the theme. |
/css/custom.css |
Use this file to easily add custom CSS. |
/css/ie8.css |
Fixes basic issues for Microsoft Internet Explorer 8. |
/css/theme.css |
Contains the theme’s default CSS. This file is compiled from the less/theme.less file. |
/images |
Contains all image files of the theme. |
/js |
Contains all JavaScript files of the theme. |
/js/theme.js |
Responsible for all JavaScript effects and all JavaScript based functions. |
/layouts |
Contains the core files responsible for the theme’s layout. |
/layouts/theme.php |
Provides the complete HTML markup for the base theme layout. |
/layouts/theme.config.php |
Includes layout calculations and assembles the theme’s CSS and JS files. |
/layouts/widget.php |
Responsible for displaying all widget variations. |
/less |
All LESS files of your theme are stored in this folder. |
/less/uikit |
Contains all UIkit theme LESS files, the frontend framework on which Warp is built. |
/less/bootstrap |
Contains all Bootstrap related LESS files (Joomla 3 only). |
/less/theme.less |
Defines the theme style and imports the UIkit theme. This file will be compiled into CSS and saved in the /css folder everytime you hit Compile LESS in the theme settings. At the same time, all styles will be saved in the /styles/STYLE-NAME/css folder. |
/less/customizer.json |
Defines which customizer parameters will be displayed in default or advanced mode. It groups UIkit variables, sets what can be defined through the color picker, direct input or a select box and adds fonts. |
/less/bootstrap.less |
Imports all Bootstrap related files (Joomla 3 only). Just like the /less/theme.less file it will be compiled into CSS, everytime you hit Compile LESS in the theme settings. |
/styles |
Here you can find the available style variations and add your own custom style. |
/styles/STYLE-NAME/style.less |
Custom set of LESS variables generated through the customizer. Everytime you hit Compile LESS in the theme settings these variables will be used to compile the CSS file in /styles/STYLE-NAME/css. If this file is not present no CSS file will be compiled which is great if you want to use completely your own custom CSS. |
/styles/STYLE-NAME/css |
Contains all compiled CSS files of your style, i.e. a theme.css file and for Joomla 3 only an additional bootstrap.css file. All these files are generated and compiled through the customizer. |
/warp |
This folder contains the actual Warp 7 core framework. |
/CHANGELOG.md |
Gives you information on the version number of your Warp theme and all changes that have so far been made. |
/config.xml |
Defines the theme settings. |
/config.json |
Stores the saved theme settings. This file will be generated automatically as soon as you save your settings. |
/config.default.json |
A backup of the default theme settings. |
/config.php |
Registers all LESS files which should be compiled to CSS. |
/templateDetails.xmltheme.xml |
This file contains general information on your theme, like the name, release date, directories and module settings. In Joomla it’s templateDetails.xml and in WordPress it’s theme.xml. |
/warp.php |
This file loads the Warp Framework. |
/favicon.ico |
Will be displayed in your browser bar. To change the favicon, simply replace this file. |
/apple_touch_icon.png |
Will be displayed, if you bookmark your website on mobile devices. To change the icon, simply replace this file. |
Basic Configuration
Layout Settings
This section makes the arrangement of your content very easy and flexible. You can enable or disable system output, define the layout of the theme’s widget or module positions and select a style you created in the customizer. Additionally you have the possibility to store your modifications in a layout profile and assign it to different pages.
Style
This option enables you to assign a style to your layout. In addition with the customizer and the layout manager this makes styling your pages very flexible.

Content
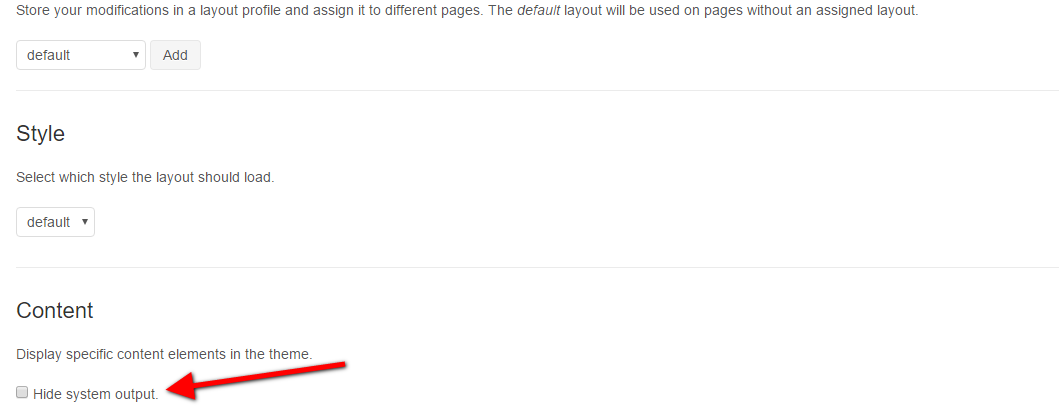
This option allows you to hide the main system output. This is useful, if you want to position only modules on certain pages, without leaving redundant space.
Sidebars

The Warp framework provides the following layout options for the sidebars.
| Setting | Description |
|---|---|
| Width | Choose from the provided percent values to set the sidebar width. |
| Alignment | Define, whether the sidebar is published on the left or right side of the content. |
The sidebar settings allow you to create a fully functional multi-column layout. The only requirement is to publish a module on a sidebar position to display the selected alignment.
Grid
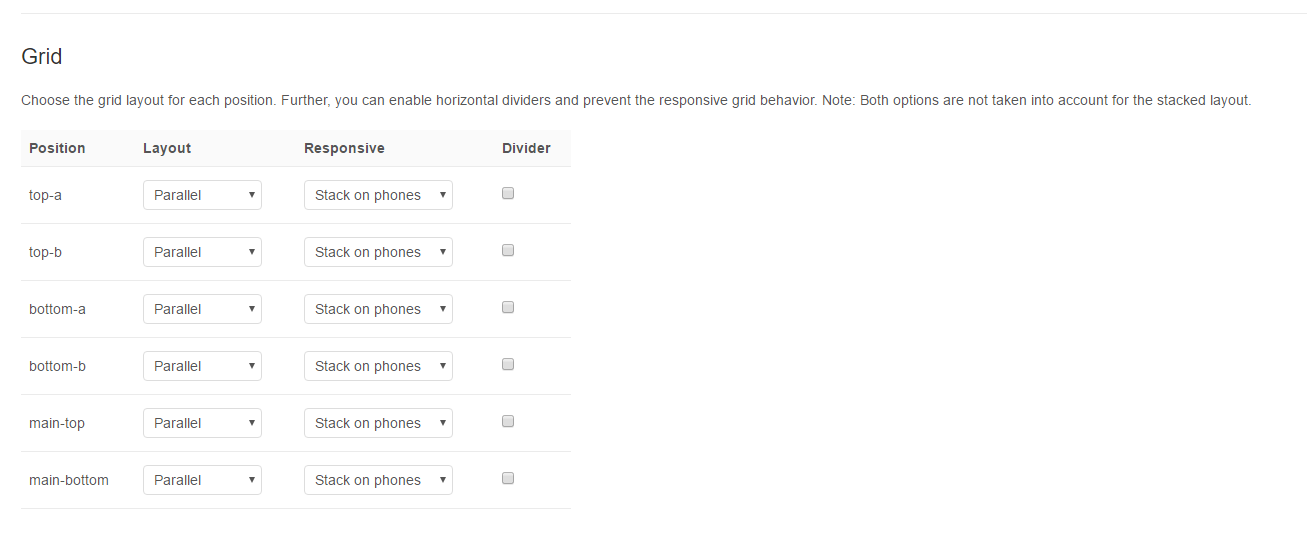
This table gives you an overview of the grid layout settings.
| Setting | Description |
|---|---|
| Layout | Define, whether the widgets or modules are positioned side-by-side, stacked vertically or first doubled. |
| Responsive | Define, on which devices the widgets or modules take up full width and stack vertically. |
| Divider | Add a vertical divider between parallel or first doubled widgets/modules to separate them from each other. |
Layout Manager
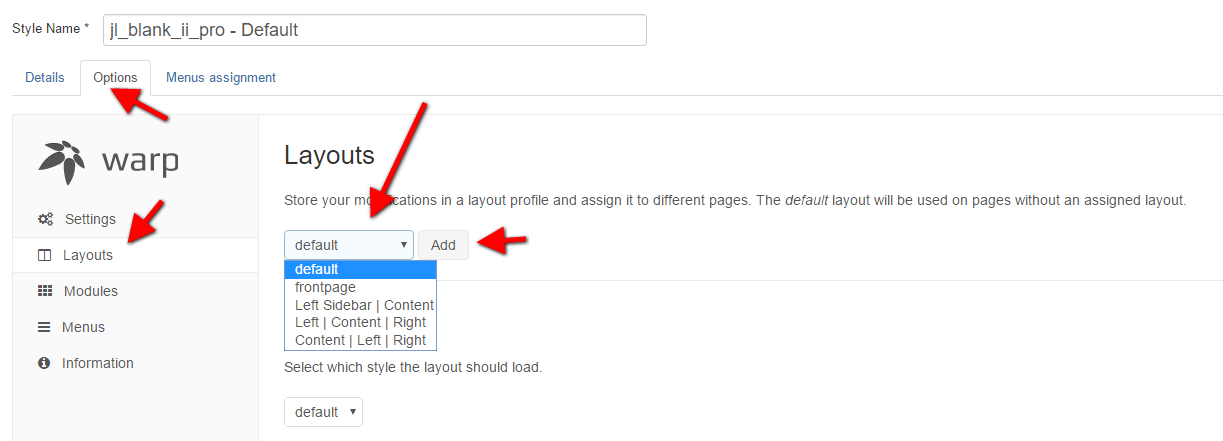
The layout manager allows you to create new layouts and assign them to different pages. Warp provides a default layout as a reference.
How to create a new layout?
To create a new layout, follow these steps:
- Hit Add and enter a name to create a layout.
- That’s it! You can start customizing your layout.
- Finally, assign your layout to the appropriate pages within the scrollable box at the bottom of the layout setting page.
IMPORTANT You can’t assign two different layouts to one page.
Setup the menus
After creating your menu, you need to assign it to a menu module published in the menu module position. To do so, just go to Extensions > Module Manager, create a new Menu module and publish it in the menu position of the template.
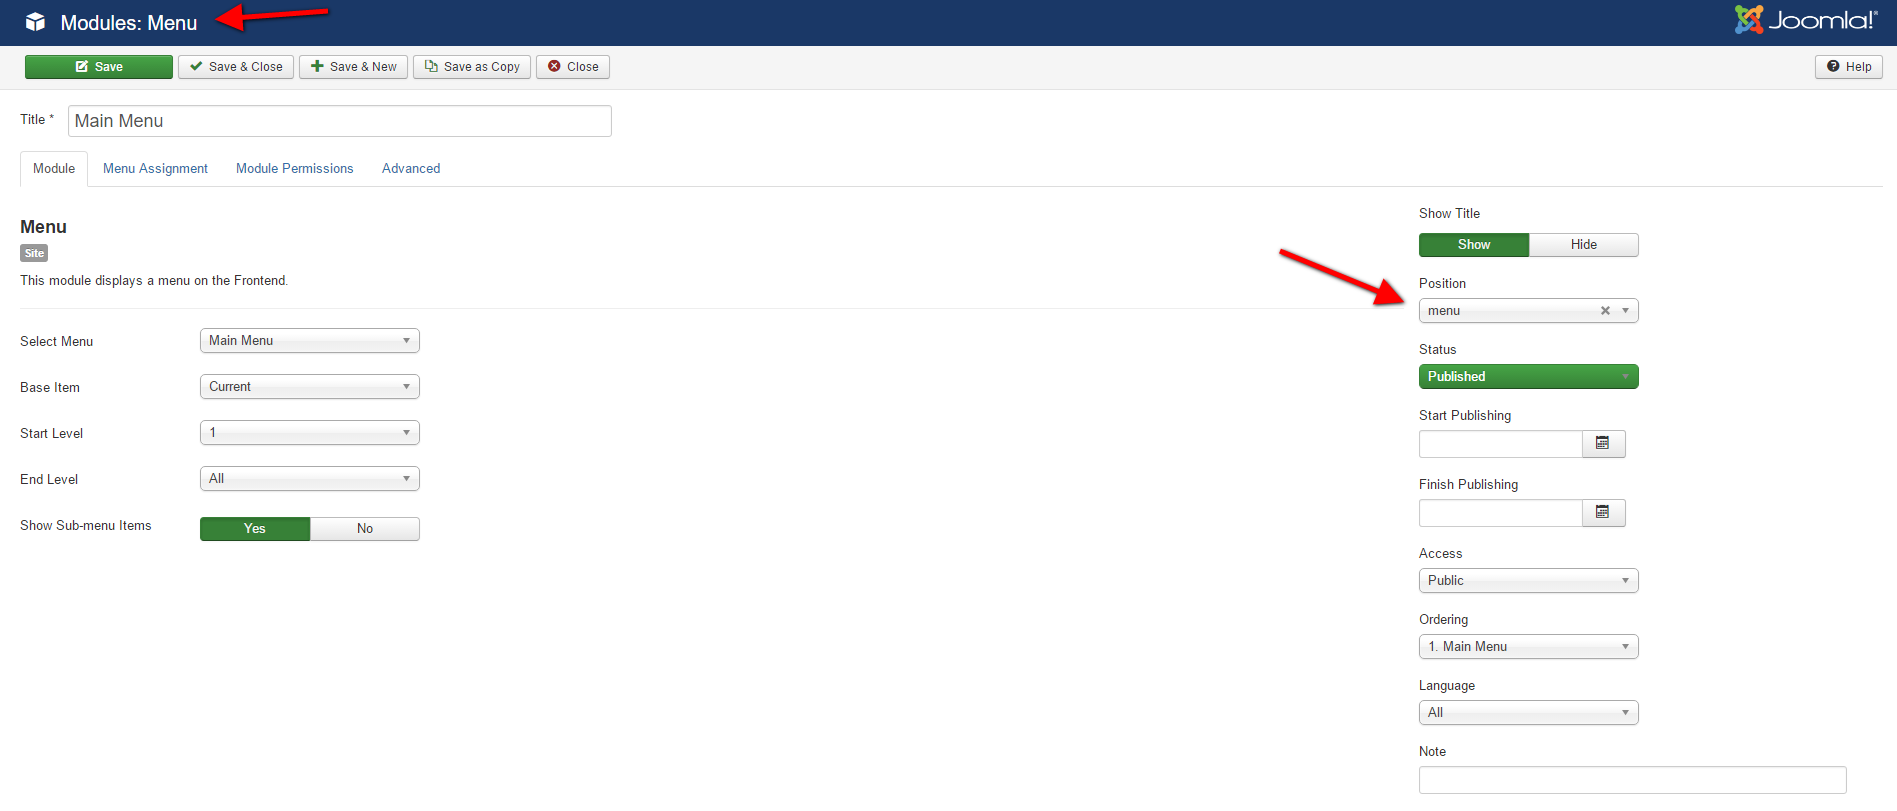
Module in menu position
You can also publish any module in the menu position. The module name is used as menu item and the module content appears in the dropdown.
Module Settings
Modules can be displayed in different styles with additional icons and badges. In the Warp Modules overview, widgets and modules are grouped according to the positions in which they are published. Additionally, you can filter them by keyword and positions to which they are assigned.
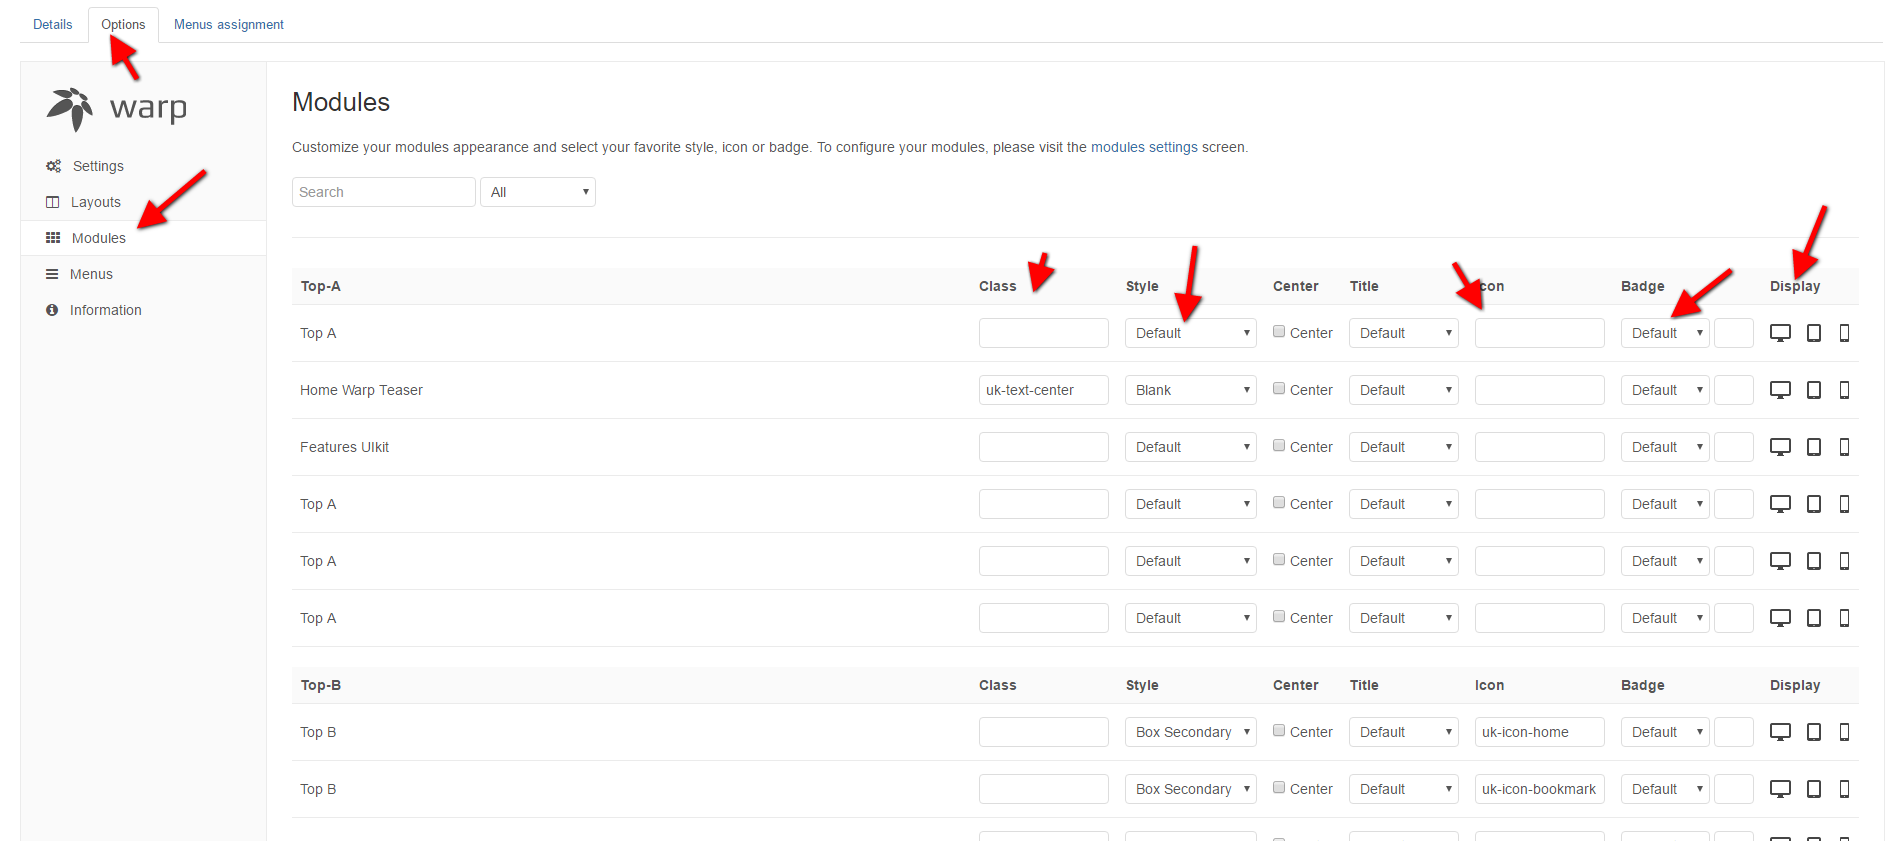
This table gives you an overview of all available module options.
| Setting | Description |
|---|---|
| Class | Allows you to add your own custom CSS classes. |
| Style | Lets you choose a widget/module preset style from the select box. |
| Icon | Allows you to select an icon from the icon preview. You can also enter a path to a custom image. In Joomla enter the full path, for example /images/MY-IMAGE.jpg. WordPress already looks into the /wp-content/uploads folder. So you only need your custom path, for example MY-IMAGE.jpg. |
| Badge | Adds a badge to your widget/module. Type in the text for the badge and select a color. |
| Display | Display or hide a widget/module on specific devices like desktops, tablets or phones. |
Live Demo: Click here
Menu Settings
Manage and organize your menus with additional settings. Menu items can be filtered by the position to which they are assigned.
The following table shows you all additional menu settings.
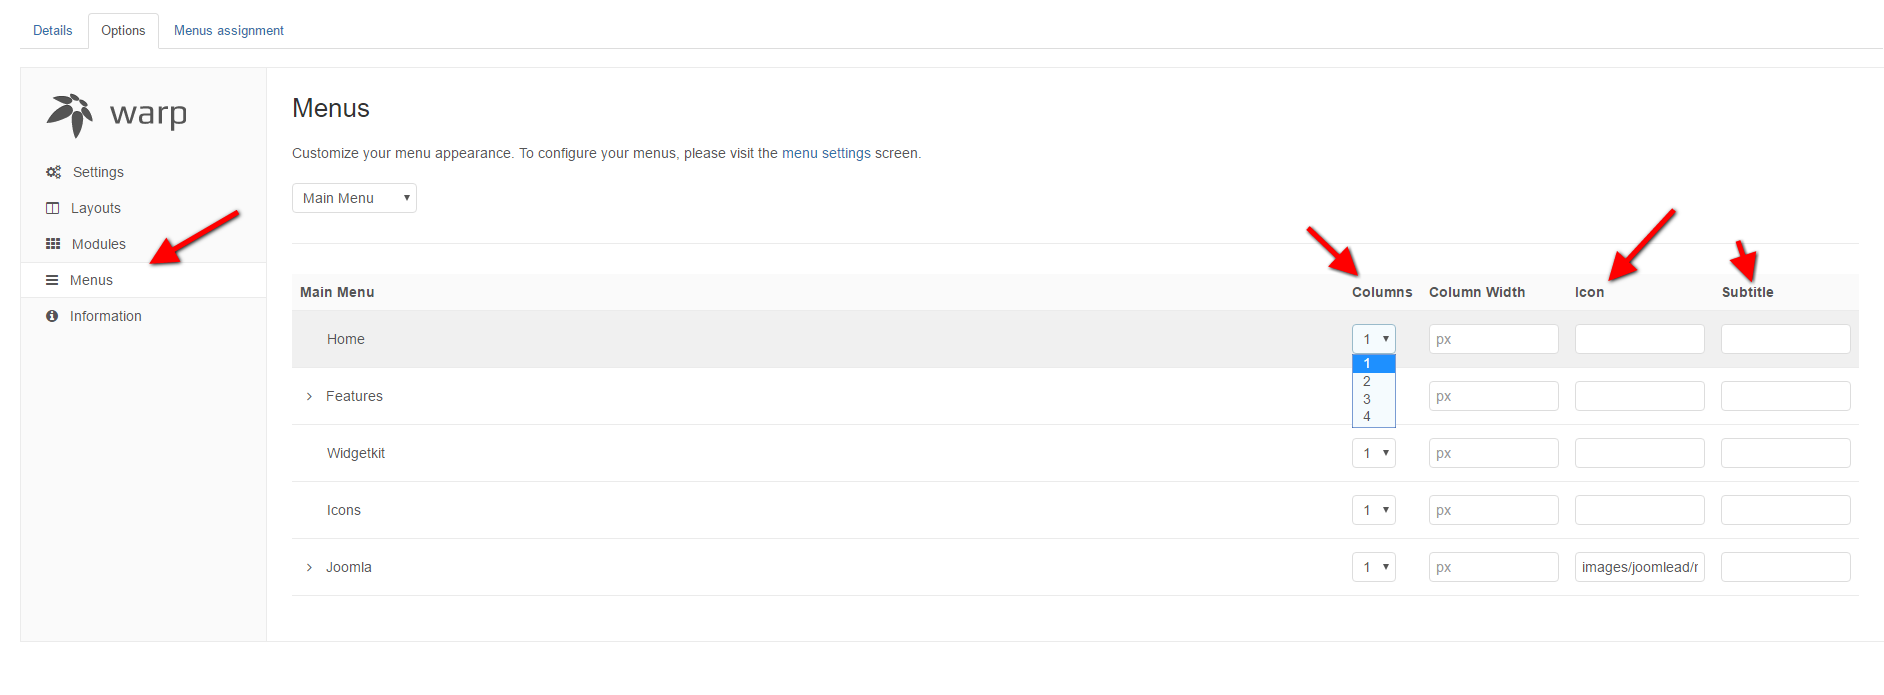
| Setting | Description |
|---|---|
| Columns | Display up to 4 columns within the dropdown. |
| Width | Enter a pixel value to set the width of the dropdown. |
| Icon | Choose an icon from the icon preview within the select box to assign it to a menu item or even a sub item. You can also use a custom image. Enter the full path in Joomla, for example /images/MY-IMAGE.jpg. WordPress already looks into the /wp-content/uploads folder. So you only need to enter your custom path, for example MY-IMAGE.jpg. |
Setup the logo
Setting up the logo in Joomla is pretty straightforward. Just create a Custom HTML module in the logo position. Now you can enter your markup in the Custom output field.
For example use the following code:
<img src="images/logo.png" width="200" height="50" alt="logo" />NOTE Warp 7 also provides the logo-small position, where you can display an alternative logo image for smaller viewport sizes.
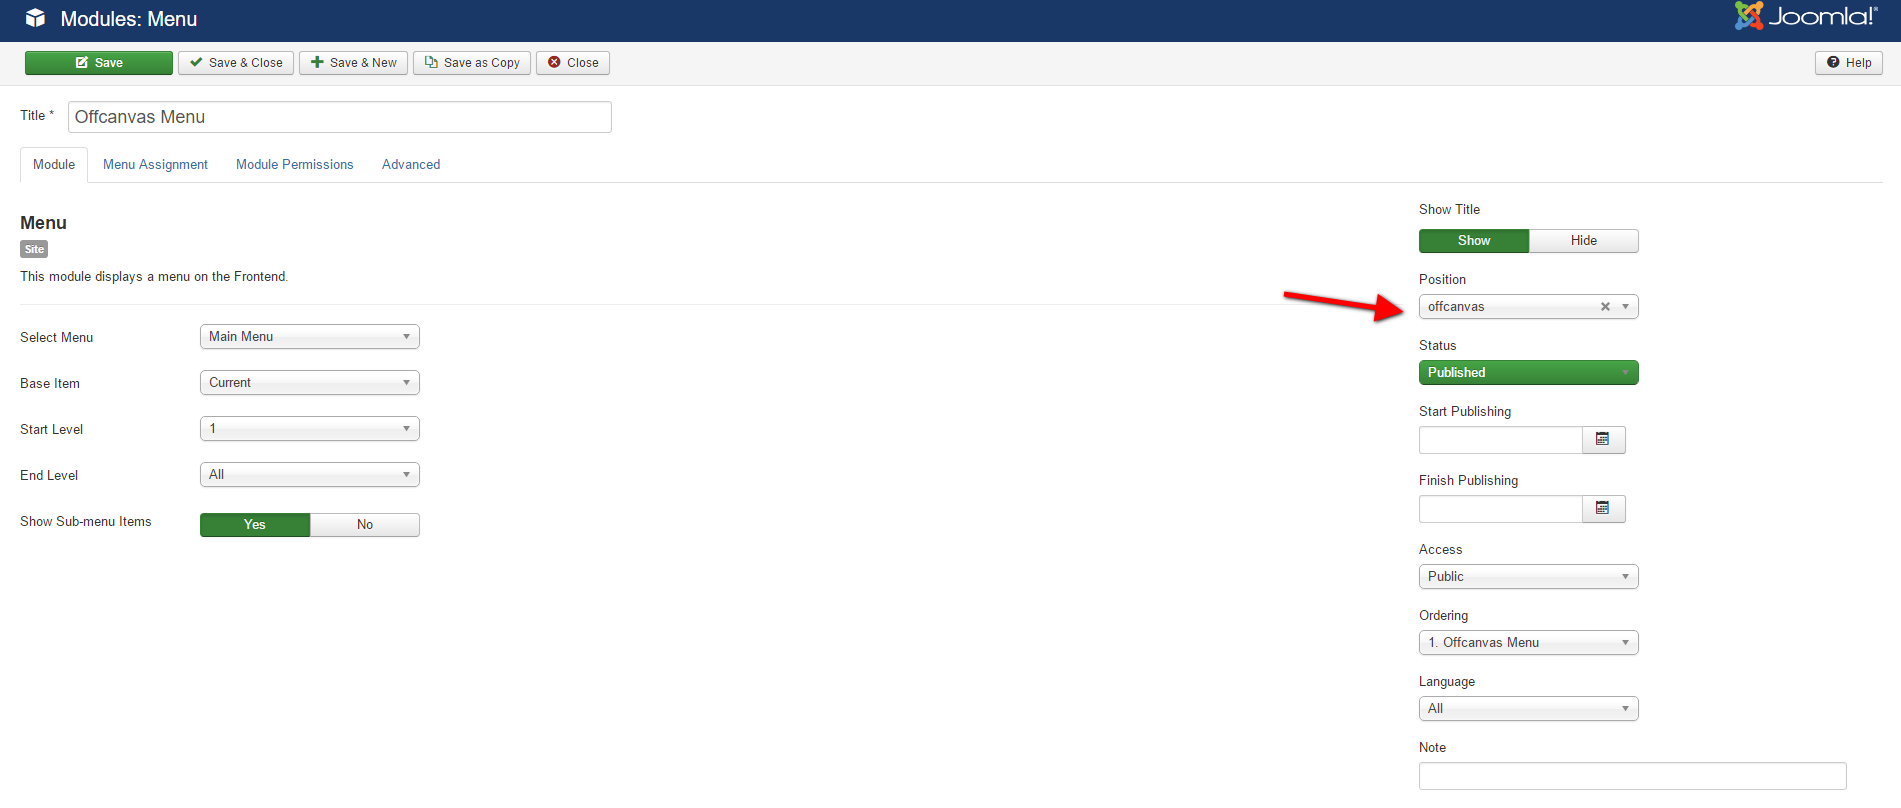
Offcanvas Settings
Create a new menu module then assign it to offcanvas module position. To do so, just go to Extensions > Module Manager, create a new Menu module and publish it in the offcanvas position of the template.
 Result from Front-end page
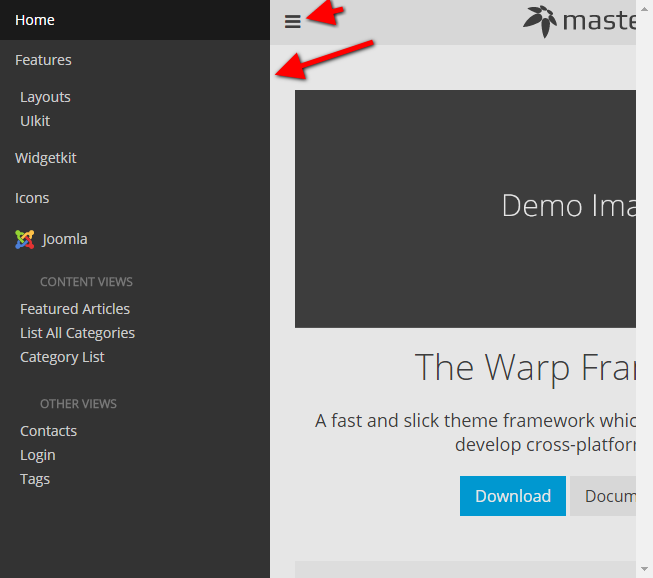
Customization
LESS Customization
Learn how you can do LESS customizations in your theme, adding your own UIkit theme or adding new settings to the Customizer.
File structure
Here is a short overview of the /less folder.
| Folder/File | Description |
|---|---|
/less/theme.less |
Defines the theme style and imports the UIkit theme. This file will be compiled into CSS and saved in the /css folder everytime you hit Compile LESS in the theme settings. At the same time, all styles will be saved in the /styles/STYLE-NAME/css folder. |
/less/customizer.json |
Defines which customizer parameters will be displayed in default or advanced mode. It groups UIkit variables, sets what can be defined through the color picker, direct input or a select box and adds fonts. |
/less/bootstrap.less |
Imports all Bootstrap related files (Joomla 3 only). Just like the /less/theme.less file, it will be compiled into CSS everytime you hit Compile LESS in the theme settings. |
/less/uikit |
Contains the UIkit theme files. The UIkit core files can be found in /warp/vendor/uikit. |
Add your own custom LESS folder
Follow this tutorial first, before doing any LESS customizations.
- Copy the
/lessfolder and rename it to/less-custom. - Open the theme’s
config.phpand register the new folder instead of the/lessfolder:
Note: This will change the core LESS folder. All styles which are generated through the customizer will compile their CSS using the new'path' => array( 'theme' => array(__DIR__), 'js' => array(__DIR__.'/js'), 'css' => array(__DIR__.'/css'), 'less' => array(__DIR__.'/less-custom'), // Here 'layouts' => array(__DIR__.'/layouts') ),/less-customfolder. - Import the old
/less/theme.lessin your new/less-custom/theme.lessby replacing the whole content with the following import rule.
Joomla 3 only: In order to make customizations update proof, import the old@import "../less/theme.less";/less/bootstrap.lessin your new/less-custom/bootstrap.lessby replacing the whole content with the following import rule.@import "../less/bootstrap.less"; - Delete the folders
/less-custom/UIkitand/less-custom/bootstrap - Now you can start adding your custom code within the
/less-custom/theme.less.
Customize UIkit
UIkit has its own documentation, which you can find on the UIkit website. You might want to take a particular look at the docs on Variables, Best theming practices and the customizer.json when starting out with Warp themes and UIkit.
Do the following steps to add your own UIkit theme.
- Follow the tutorial Add your own custom LESS folder above.
- Copy following files to your
/less-custom/folder:/less/uikit/less/bootstrap.less/less/theme.less
- Now you can customize all files in
/less-customlike the whole/less-custom/uikitfolder, the/less-custom/theme.lessfile or the/less-custom/customizer.jsonto add your custom variables.
Select a custom font in the customizer
Warp gives you access to all fonts available in the Google fonts directory. But occasionally you might want to add your own font or one that is not provided by Google.
Add a font from a link
- Follow the tutorial Add your own custom LESS folder above.
- Open the
/less-custom/customizer.jsonfile and add your font option and the correct path to the list."Custom Fonts": [ {"name": "FONT-FAMILY", "value": "'FONT-FAMILY'", "url":""} ], "System Fonts": [ ... ]
Add your own font
- Firstly, follow the tutorial Add your own custom LESS folder above.
- Create a
/fontsfolder inside the theme directory and put your font files there. - Add the
@font-facerule for your font to your/less-custom/theme.lessand link to your font files:@font-face { font-family: 'FONT-FAMILY'; src: url('../fonts/FONT-FAMILY-webfont.eot'); .... } - Open
/less-custom/customizer.jsonfile and add your font option like this:"Custom Fonts": [ {"name": "FONT-FAMILY", "value": "\"FONT-FAMILY\", Helvetica, Arial, sans-serif"} ], "System Fonts": [ ... ]
And that’s it! You can now use your font within the theme.
Customizer and images
If you would like to add the option of picking images, like different backgrounds, to the Customizer, you can do so by following this tutorial. Let’s say, you want to add two different background styles, red and blue.
- Firstly, create an
/imagesfolder inside your style/styles/STYLE-NAMEdirectory and put your background images there. - Create a new
theme.lessby following the tutorial Add your own custom LESS folder above. - Create a new variable for the body style and add it to the
/less-custom/theme.lessfile.@theme_global-body-style: ''; - Now we’ll create mixins for each background case. In our example we have a mixin for the red case and one for the blue case.
.body-style() when (@theme_global-body-style = red) { body { background: url(../styles/STYLE-NAME/images/my-red.jpg) 0 0 repeat; } } .body-style() when (@theme_global-body-style = blue) { body { background: url(../styles/STYLE-NAME/images/my-blue.jpg) 0 0 repeat; } } - Afterwards, we need to call the mixin, which generates the actual CSS output.
.body-style(); - Now, we’ll create a select box for our body style
@theme_global-body-style. Just add the following code in the/less-custom/customizer.json.{ "type": "select", "vars": [ "@theme_global-body-style" ], "options": [ {"name": "Default", "value": ""}, {"name": "Red", "value": "red"}, {"name": "Blue", "value": "blue"} ] }, - Lastly, define, in which group your newly created variable should appear. In our example we added it to the General variables.
    "groups": [
              {
                  "label": "General",
                  "vars": [
                      "@theme_global-body-style",
                      "@global-background",
                      "@global-border",
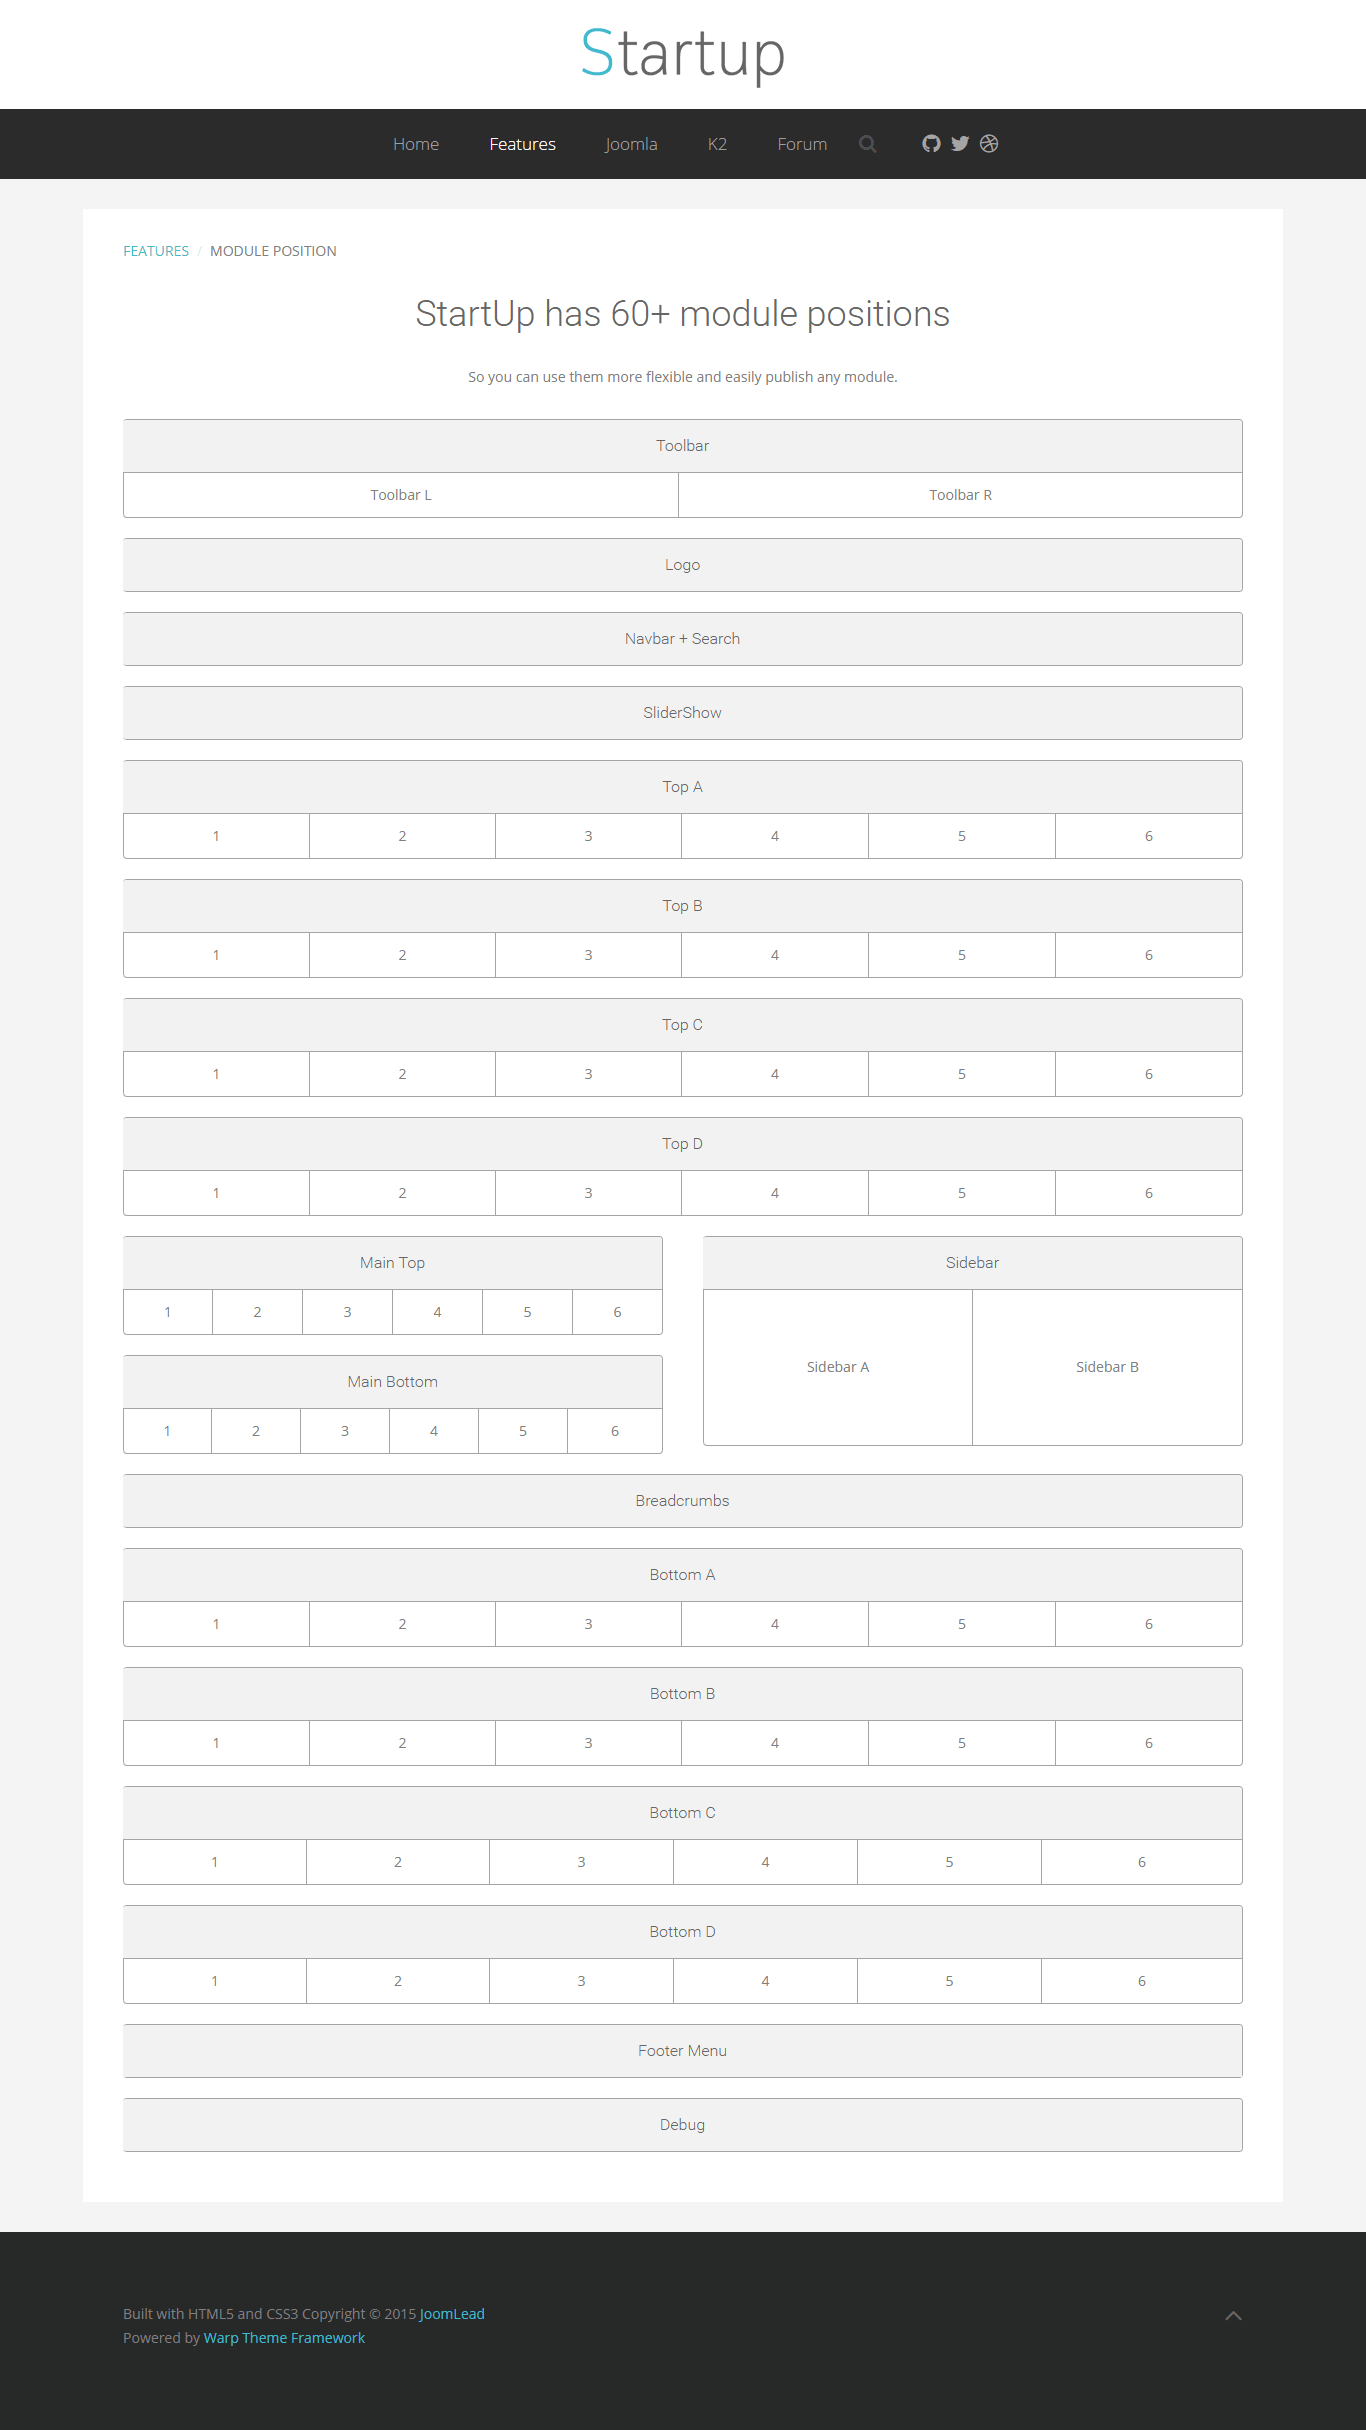
Module Positions
Full Module Positions: Live Demo
Update Warp Framework
A comprehensive guide to updating a Warp 7 template/theme
Applying the Update
Download the latest Warp 7 Framework hereRename your current warp folder to old_warp then extract the zip file and copy warp folder to joomla/templates/template_name/
Apply System > Clear Cache > √ [select all] > Delete (Joomla)
Still in System > Clear Cache apply “Purge Expired”. (Joomla)
Most important: Clear your browser’s cache.
In the template/theme administration go to Settings > Development and once click the button “Compile LESS”:

Extensions
- Warp Framework by YooTheme
- Revolution Slider (Already included in Quickstart) – Purchase | Documentation
- K2 – Download | Documentation
- Kunena Forum- Download | Documentation
Comments