Nova Documentation
Introduction
This document covers the installation and use of this template and often reveals answers to common problems and issues – we encourage you to read this document thoroughly if you need an in-depth guide on how to use the template.
If you have any questions that are beyond the scope of this document, feel free to ask via ticket support system: Ticket System
To get access to the ticket system, create an account on this page: Create an AccountInstallation
The section will help you with steps to install JL Nova template – Quickstart and Manual installation.
Which installation method you should use depends on the current status of your site. Also, before installing either the template manually or the Quickstart Package, please make sure you meet the Joomla! and the template requirements.
Requirements
- Apache 2.2+ or Microsoft IIS 7 (Apache strongly recommended)
- PHP 7+ (PHP 6+ Recommended)
- MySQL 5.1+
- Joomla 3.4+
Also, please have a look at the Gantry5 requirements. Basically, they are the same as the above, but you will find some additional details there.
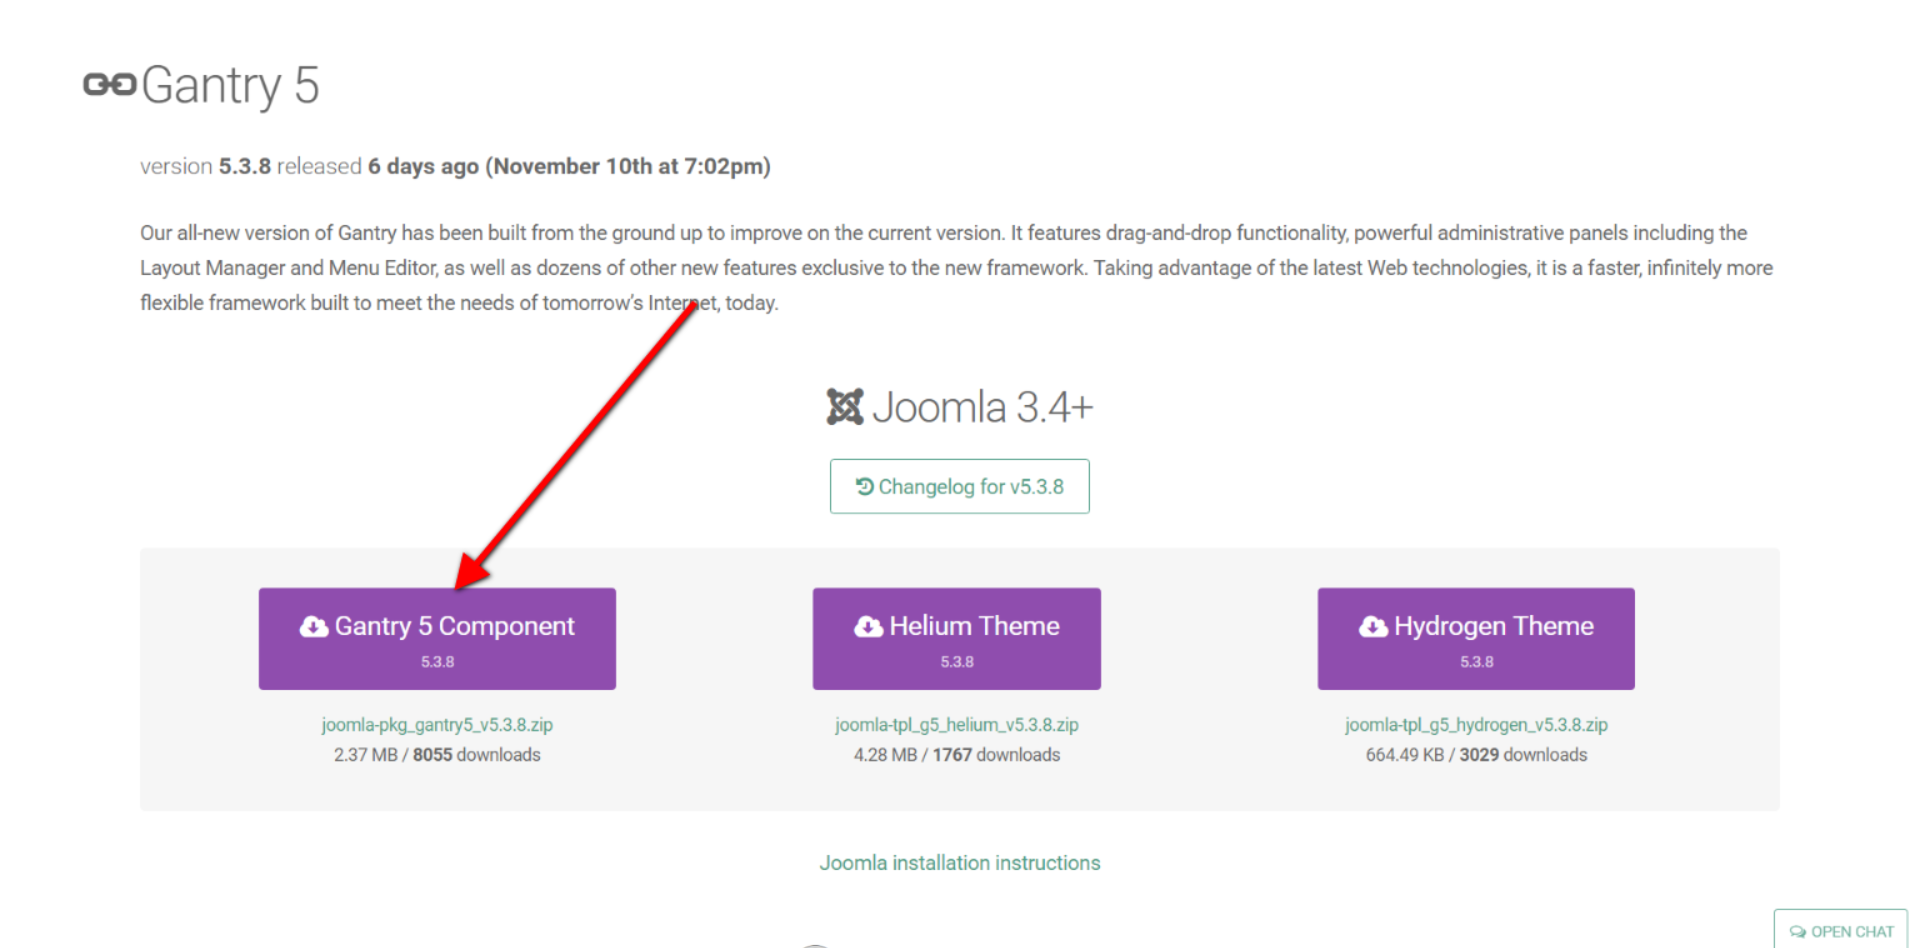
Quickstart Installation
Why Quickstart
The quickstart allows you to replicate JL Nova demo to your server. It means, after install the quickstart, you will have a site exactly the same as the demo site.
Download JL Nova quickstart package, upload to your server and extract it.
Step 1 Configuration: add Site name, Admin email, Admin username and password
Step 2 Database: select database type, host name, database username, password, database name & table prefix
Step 3 Remove/Rename “installation” folder: for security purpose, you need to rename or remove the “installation” folder
Detail documentation with screenshots
Manual Installation
You can find step-by-step instructions as well as a video instructions regarding the Manual Installation in the Gantry5 Documentation, in the “Installation” chapter.
Install Gantry 5 Framework
Step 1 Install Gantry 5 Framework
From your back-end setting panel, go to: “Extensions → Extension Manager”, browse Gantry 5 plugin installation package then hit the “Upload and Install”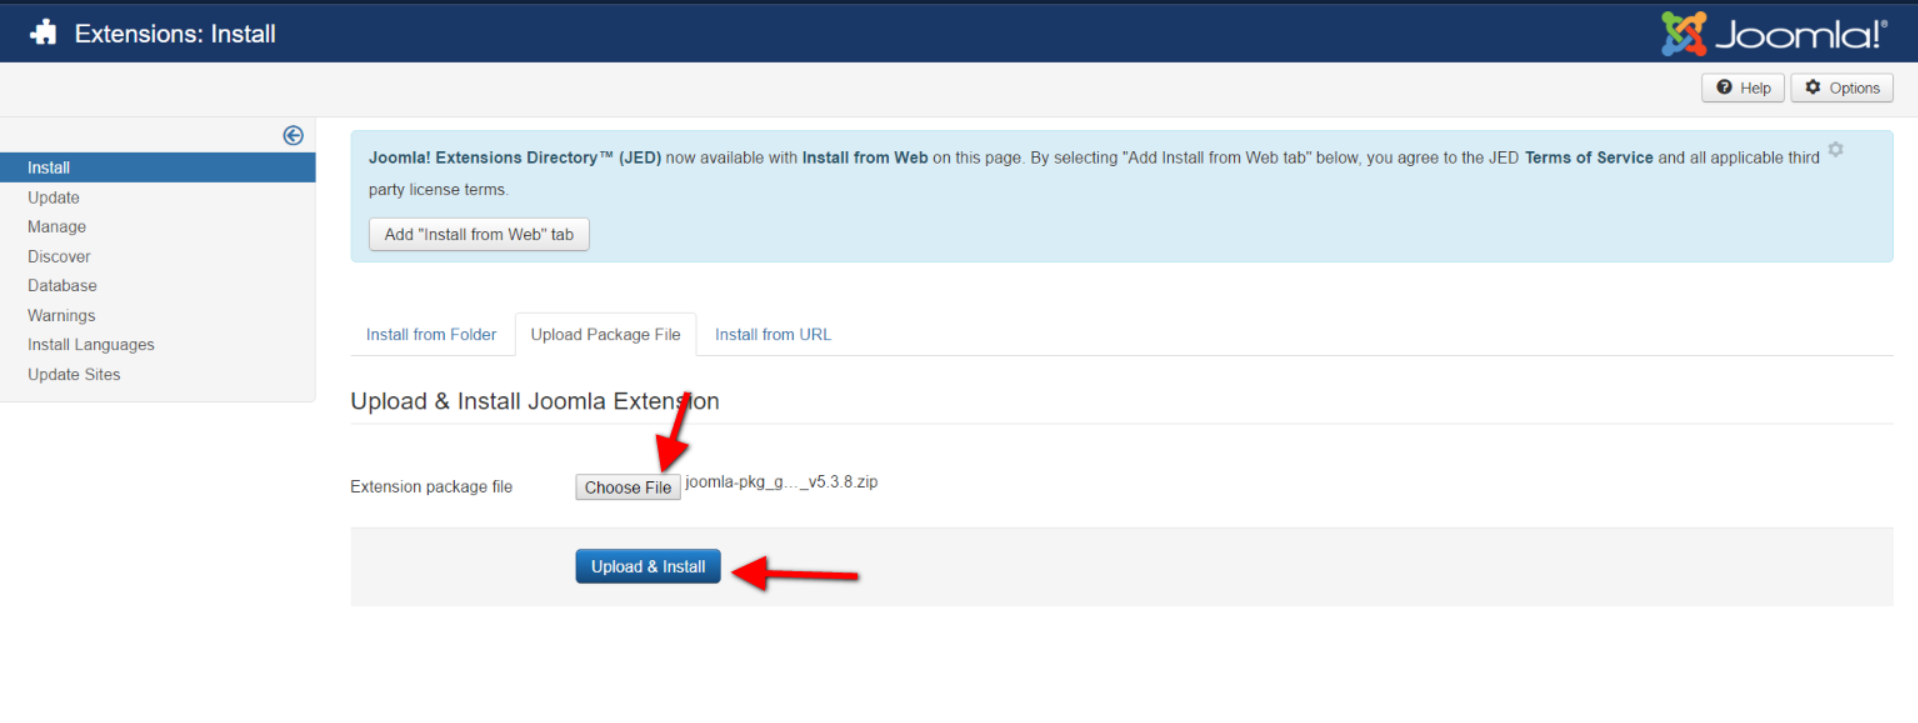
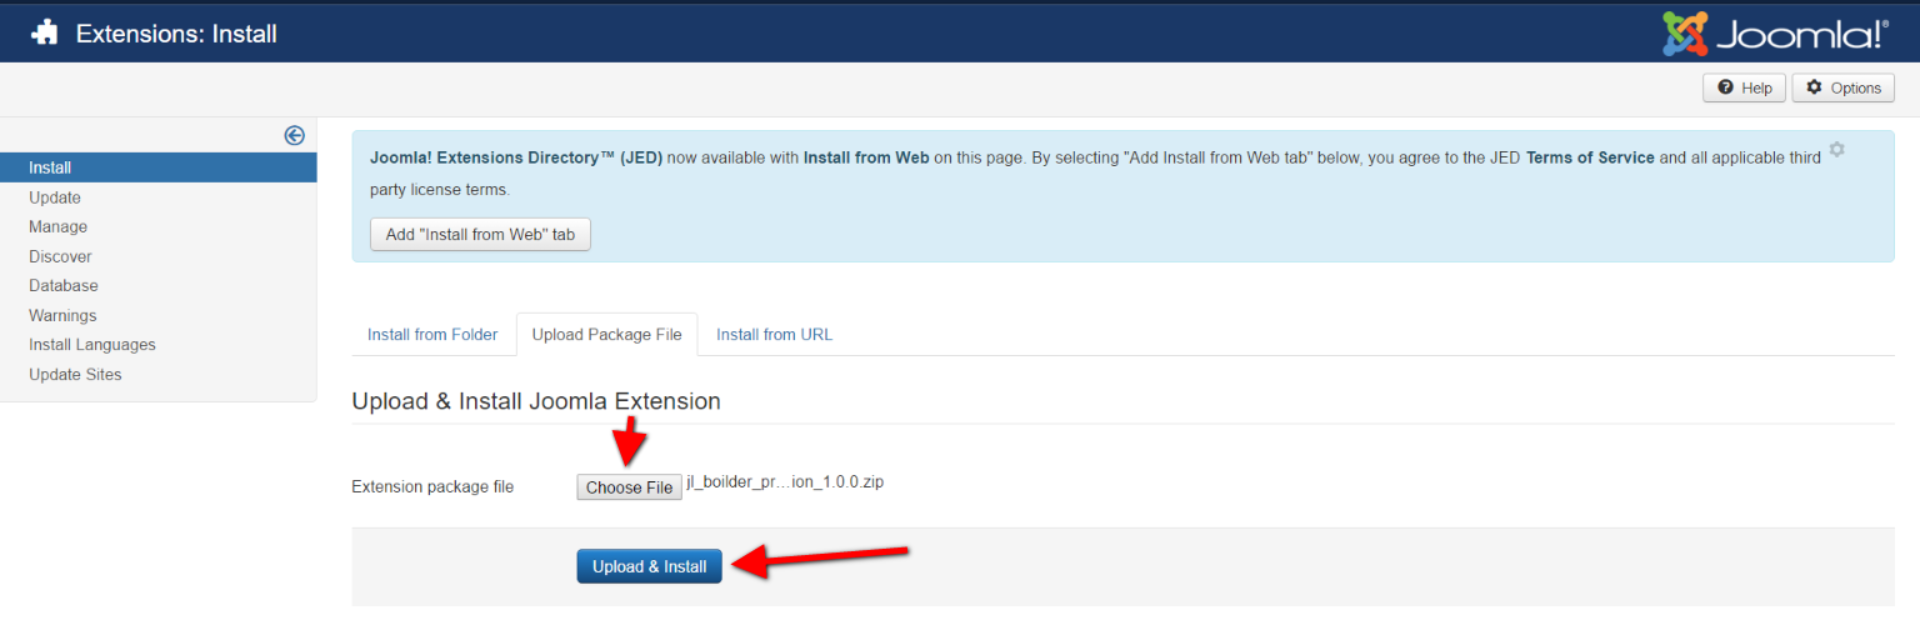
Install JL Nova template
From your back-end setting panel, go to: “Extensions → Extension Manager”, browse JL Nova template installation package then hit the “Upload and Install”
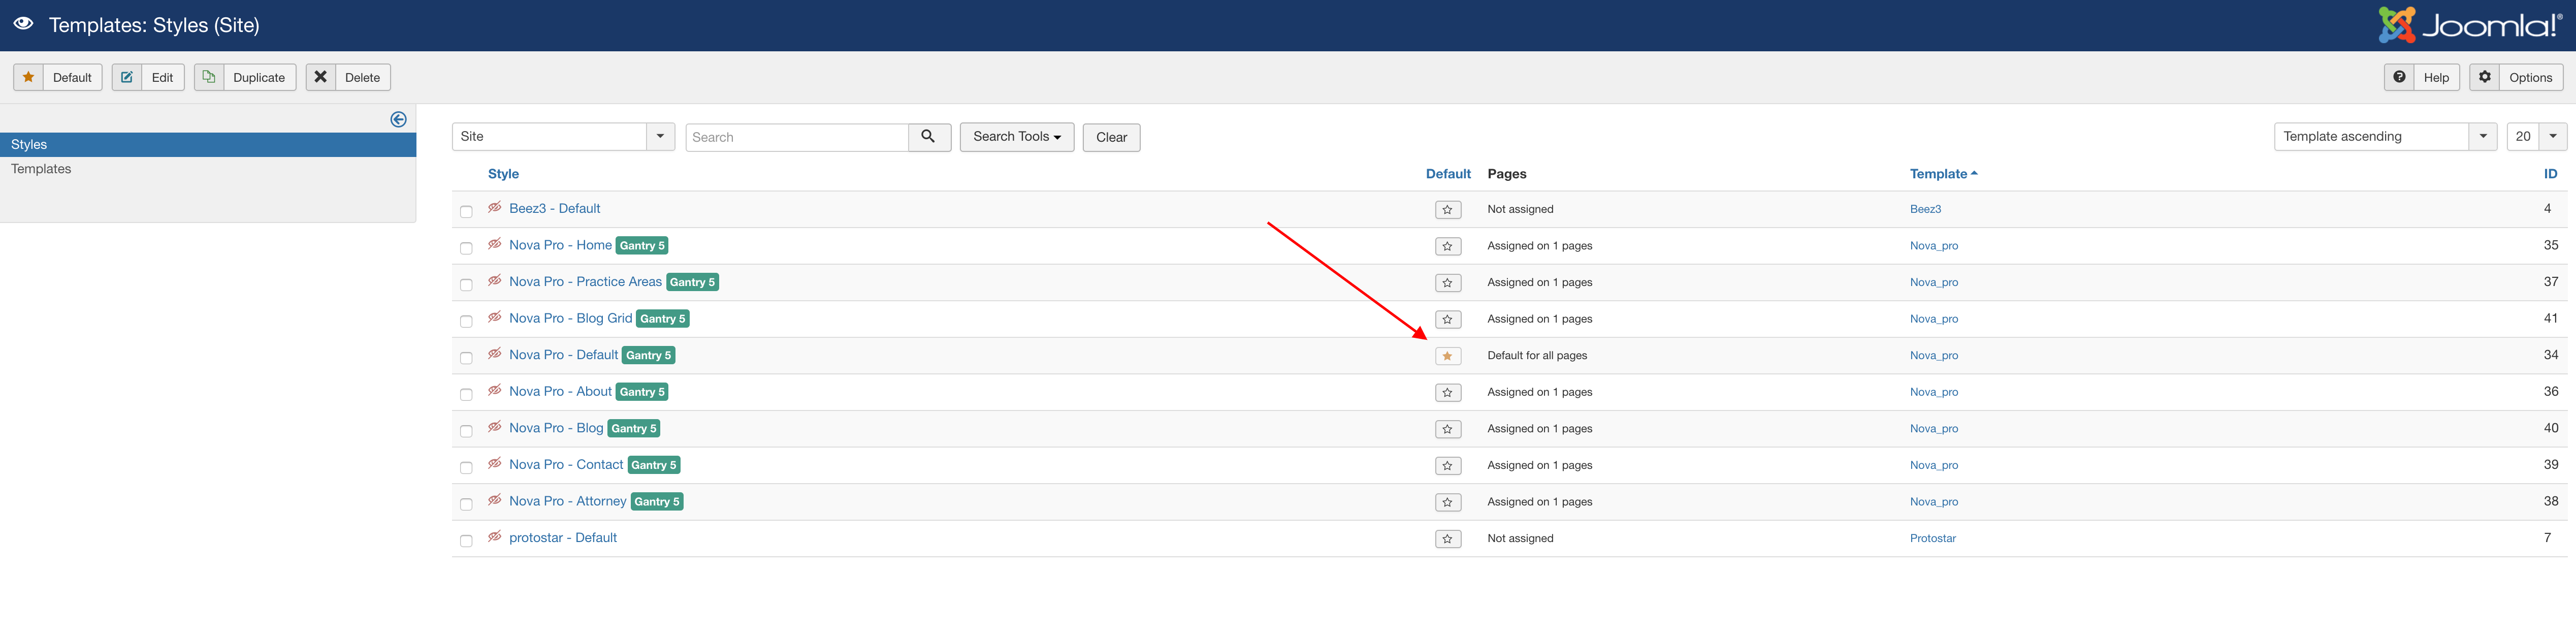
Step 2 Set default template style
Go to: “Extensions -> Template Manager”, set JL Nova template style as your default template style.
Update
Updating the template
Updating the template is really easy. Here are the steps you need to perform:
- Download the new version of the template from the “Download” section on our website
- Go to “Extensions” → “Manage” and click on the “Browse” button
- Select the template file you downloaded in step 1. It will usually be called
tpl_it_NAME.zip - Click on the “Upload & Install” button
Gantry5 Framework update
This is just a simple one click task. If there is a newer version of the Gantry Framework released you will notice that in your Joomla Admin as well as in the Template Manager. Then just click on the button.
You might also want to read the “Updating” and “Updating Themes” chapters in the Gantry5 Documentation.
Gantry 5 Basics
Gantry has an extensive set of documentation, describing every option in Gantry. You can find the documentation on http://docs.gantry.org/gantry5/basics.
You’ll find tutorials on many different topics, including.
- All the basics
- Creating your own Particles and Atoms
- Creating your own layout presets
- Advanced use of the Layout manager
- Advanced theme customization
- Creating your own themes
- And much more
Key Features
Included 75+ PREMIUM Particles / Atoms
The theme/template already included over 75+ Gantry 5 particles and Atoms by JoomLead to build your content.
All these particles and atoms work out-of-the-box with any Gantry 5 theme on Joomla, WordPress and Grav.
Template Features
- Responsive Layout
- 4 Preset Styles
- Fixed Sidebar
- Block Variations
- Custom Typography
- Unlimited Positions
- Custom Section Variations
- Custom Particles
- Social Icons
- Mobile Menu
- Coming Soon Page
- Font Awesome Icons
Gantry 5 Core Features
- YAML-based Configuration
- Twig Templating
- Powerful Particle System
- Visual Menu Editor
- MegaMenu Support
- Off-Canvas Panel
- Ajax Admin
- Layout Manager
- Inheritance System
- Fluid Width Option
- Fixed Width Option
- SCSS Support
- Sophisticated Fields
- Unlimited Undo/Redo
- Styles Panel
Preview UI Typography
Typography is an important instrument in not only the site design, but how your content is portrayed and utilized by your visitors.
Inheritance
Nova takes full advantage of Gantry’s new inheritance system, making it easier than ever to configure and manage your website through synced particles, atoms, sections, and layouts. Save time by using inheritance to avoid repetitive changes!

Styles
The Styles administrative panel gives you the ability to quickly and easily configure settings related to the appearance of the Gantry-powered theme. This includes being able to switch between pre-configured presets, as well as to refine the look of an outline using a set of style settings linked to the theme.
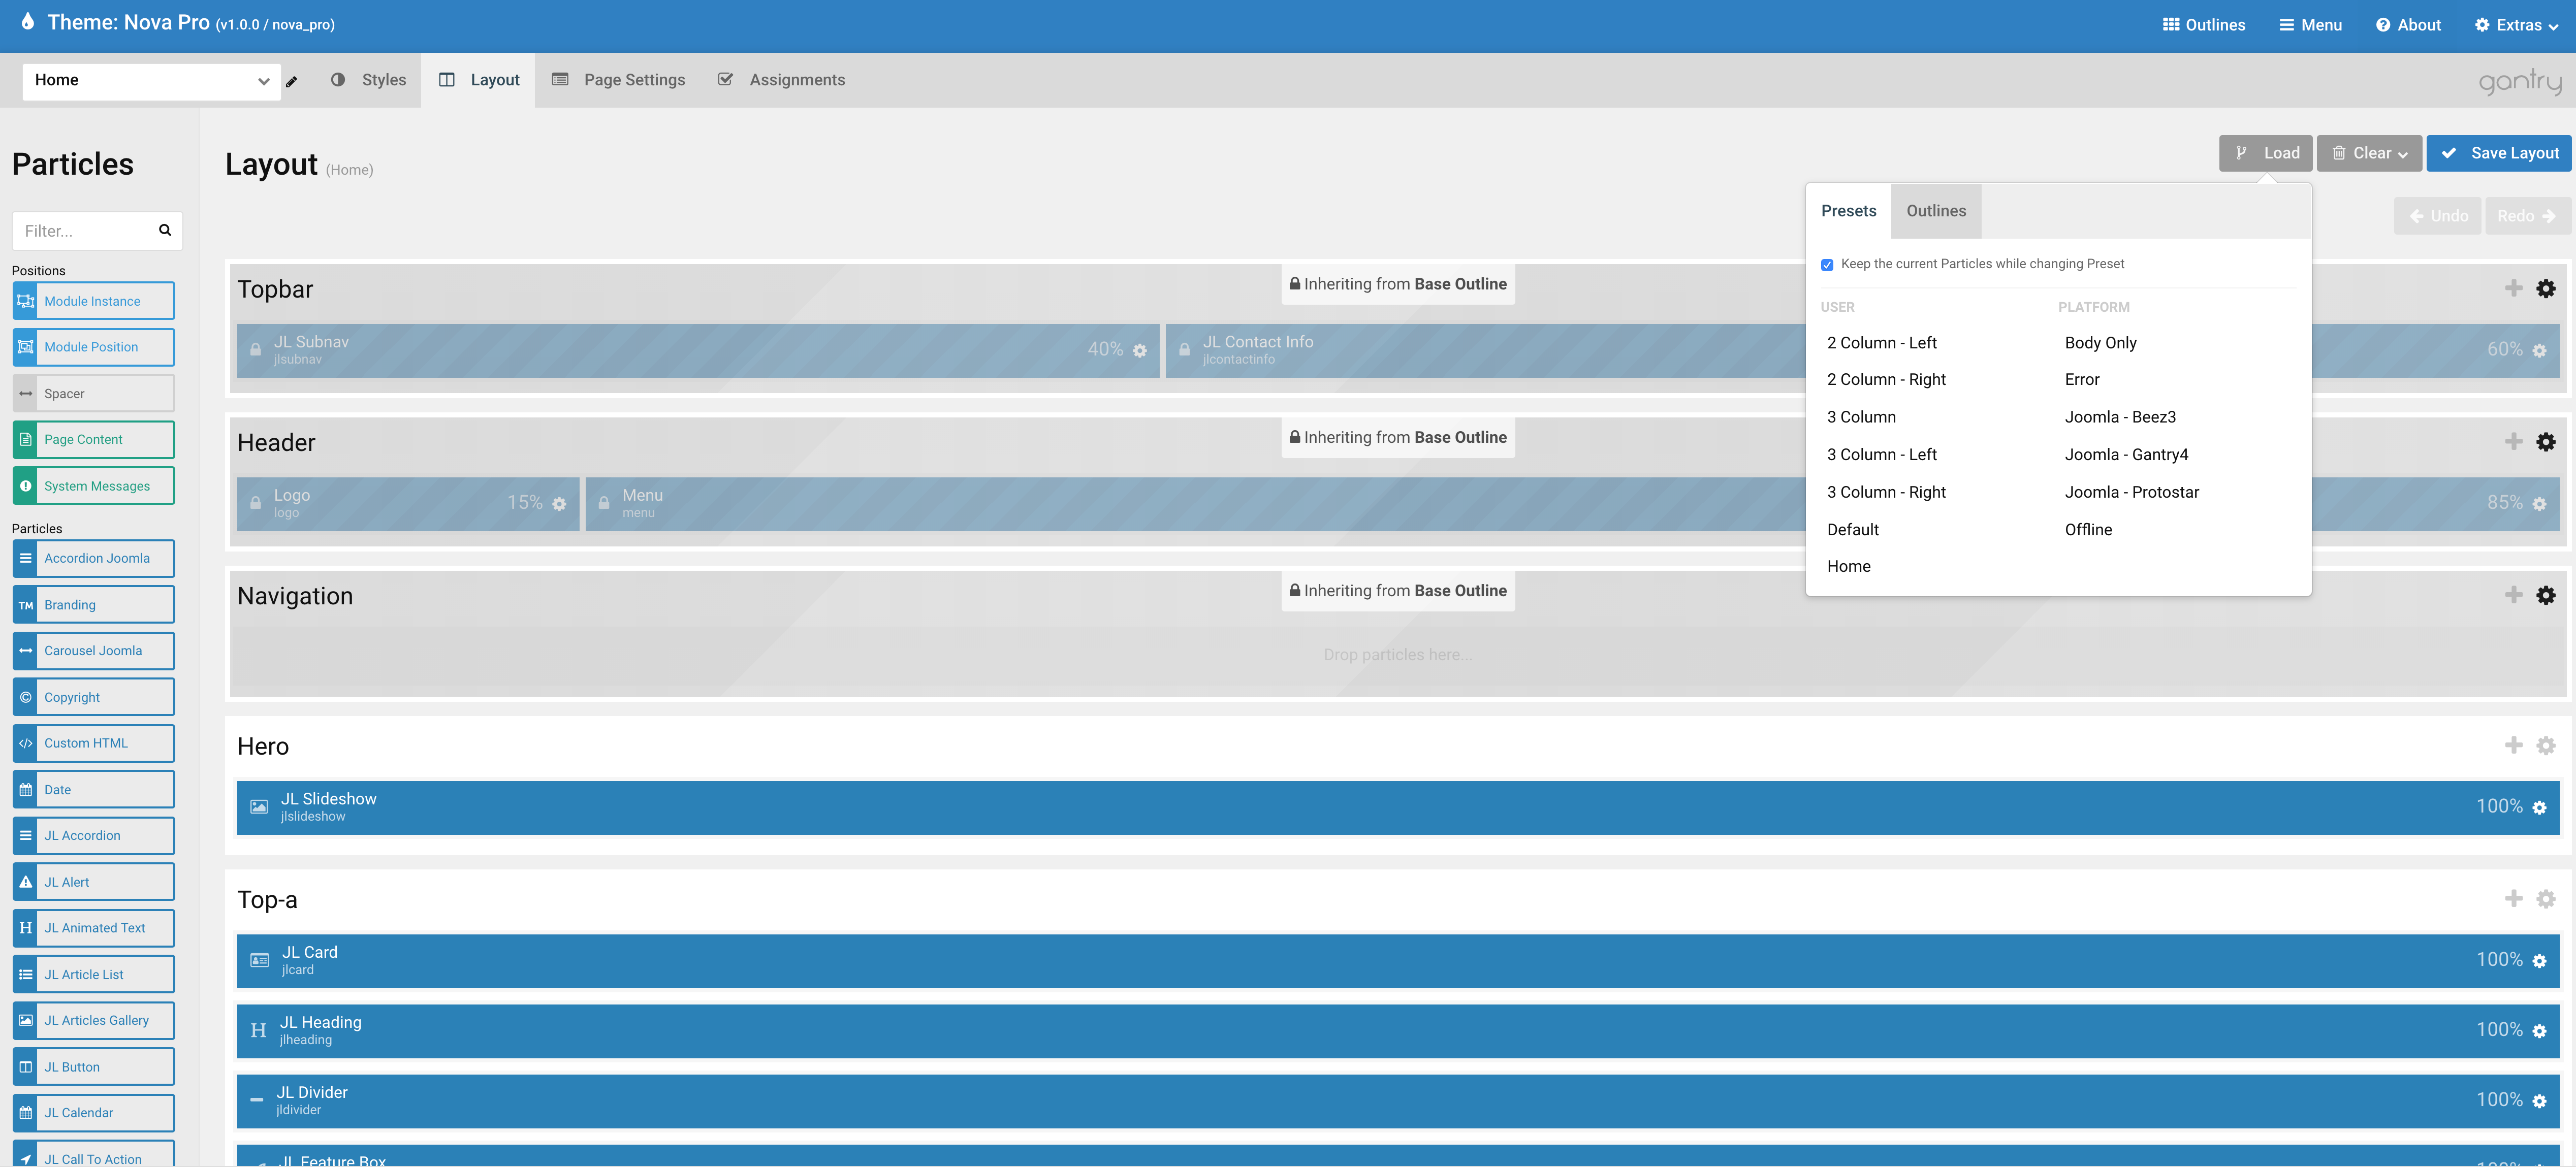
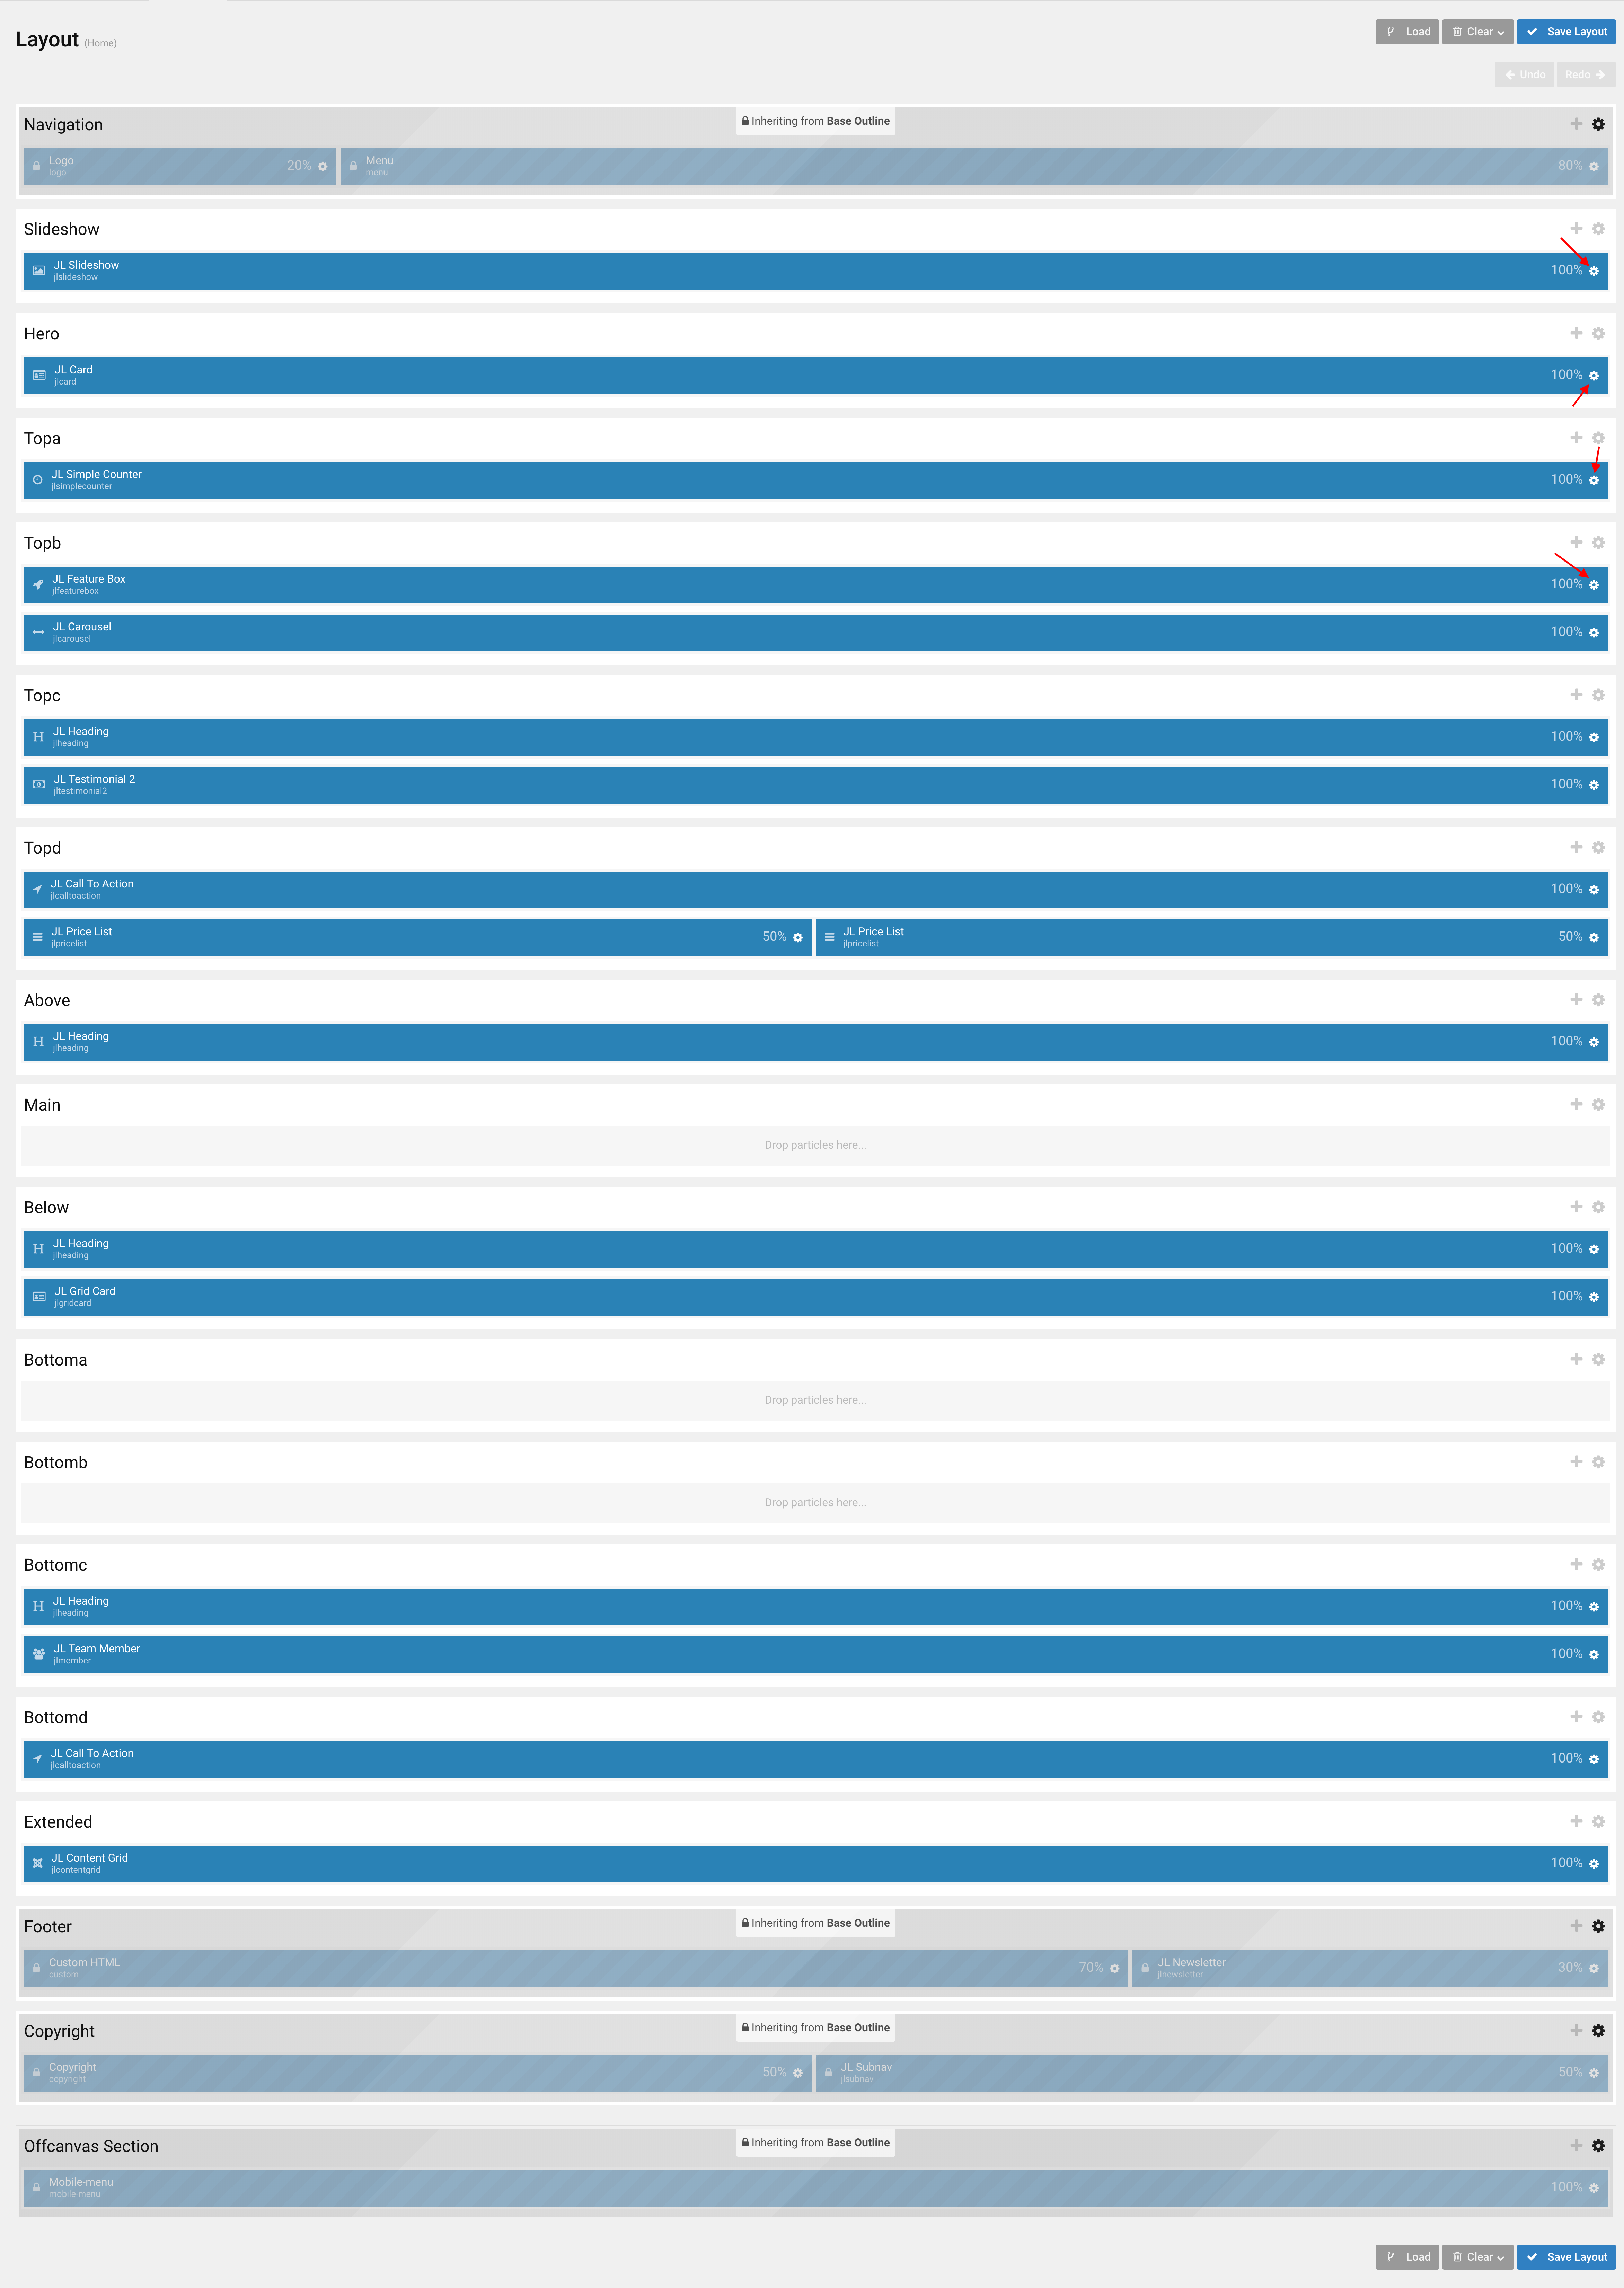
Nova Layout Manager
Base Outline
This page will acts as the global default for any gantry pages. This is where global style, particle defaults, page settings, and layout options are set. For more information, please take a look at Gantry 5 Inheritance. To edit this page, go to Outline -> Base Outline -> Layout Tab

Home Layout
Using this layout for any pages that require multiple positions/sections, example Home, About, Services, etc… The home page is designed using this layout. To edit this page, go to Outline -> Home -> Layout Tab

Other presets
The template itself support multiple layout preset, you can choose the special layout preset for special pages to suite your needs. Example: You can load different layout for Blog layout (2 Columns left/right, 3 columns and 3 columns left/right)
Changing content via Layout Manager
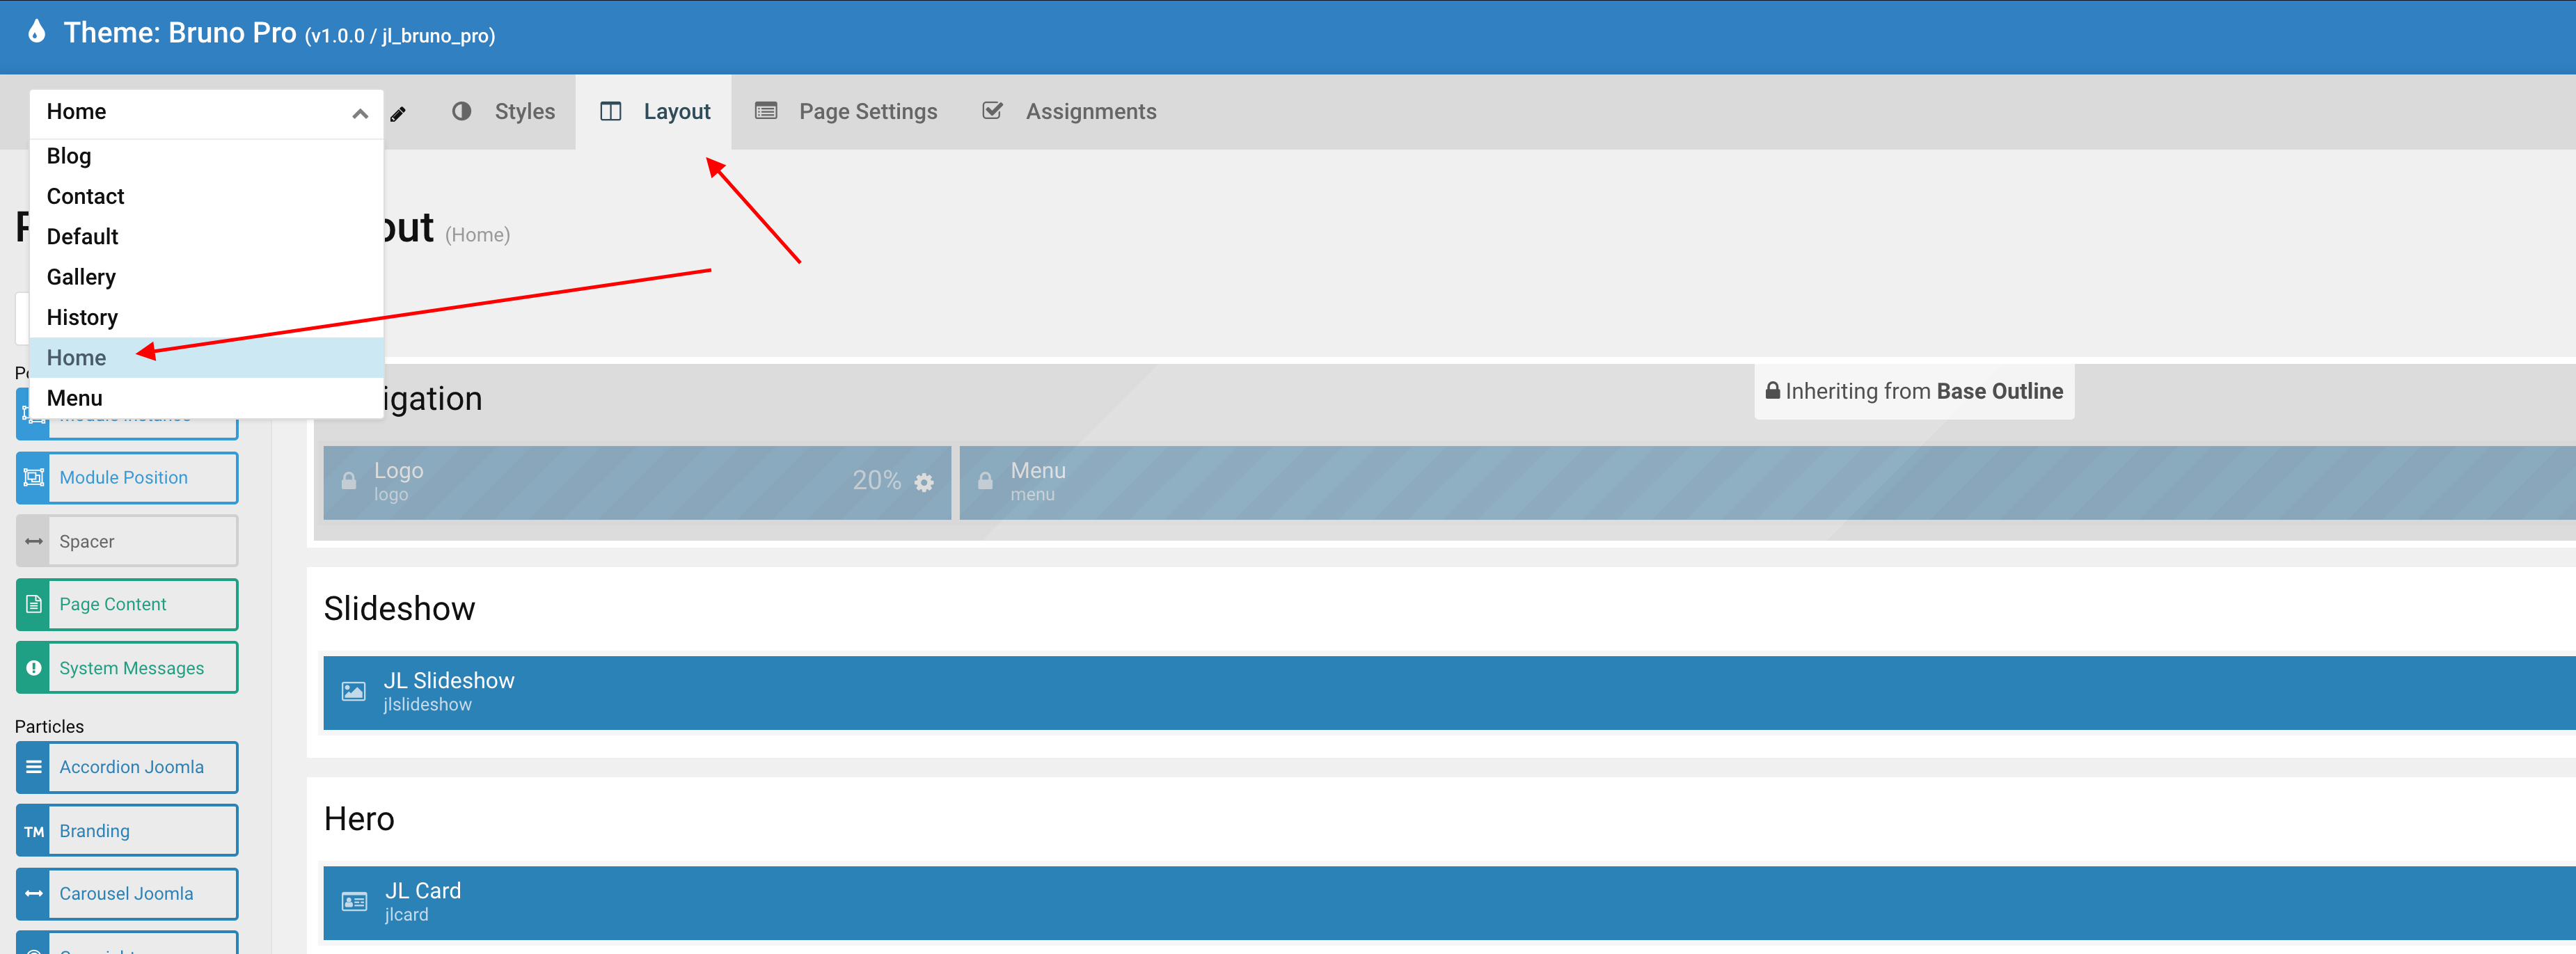
You can change the content that used for whole pages like Logo, Menu and Bottom, Footer information.Navigation Content (Logo and Menu)
Go to template settings -> Base Outline -> Layout. Here you can change the content info for Opening hour and social icons. Just click the “settings” icon then modify logo image or select main menu.
![]()
Footer Info
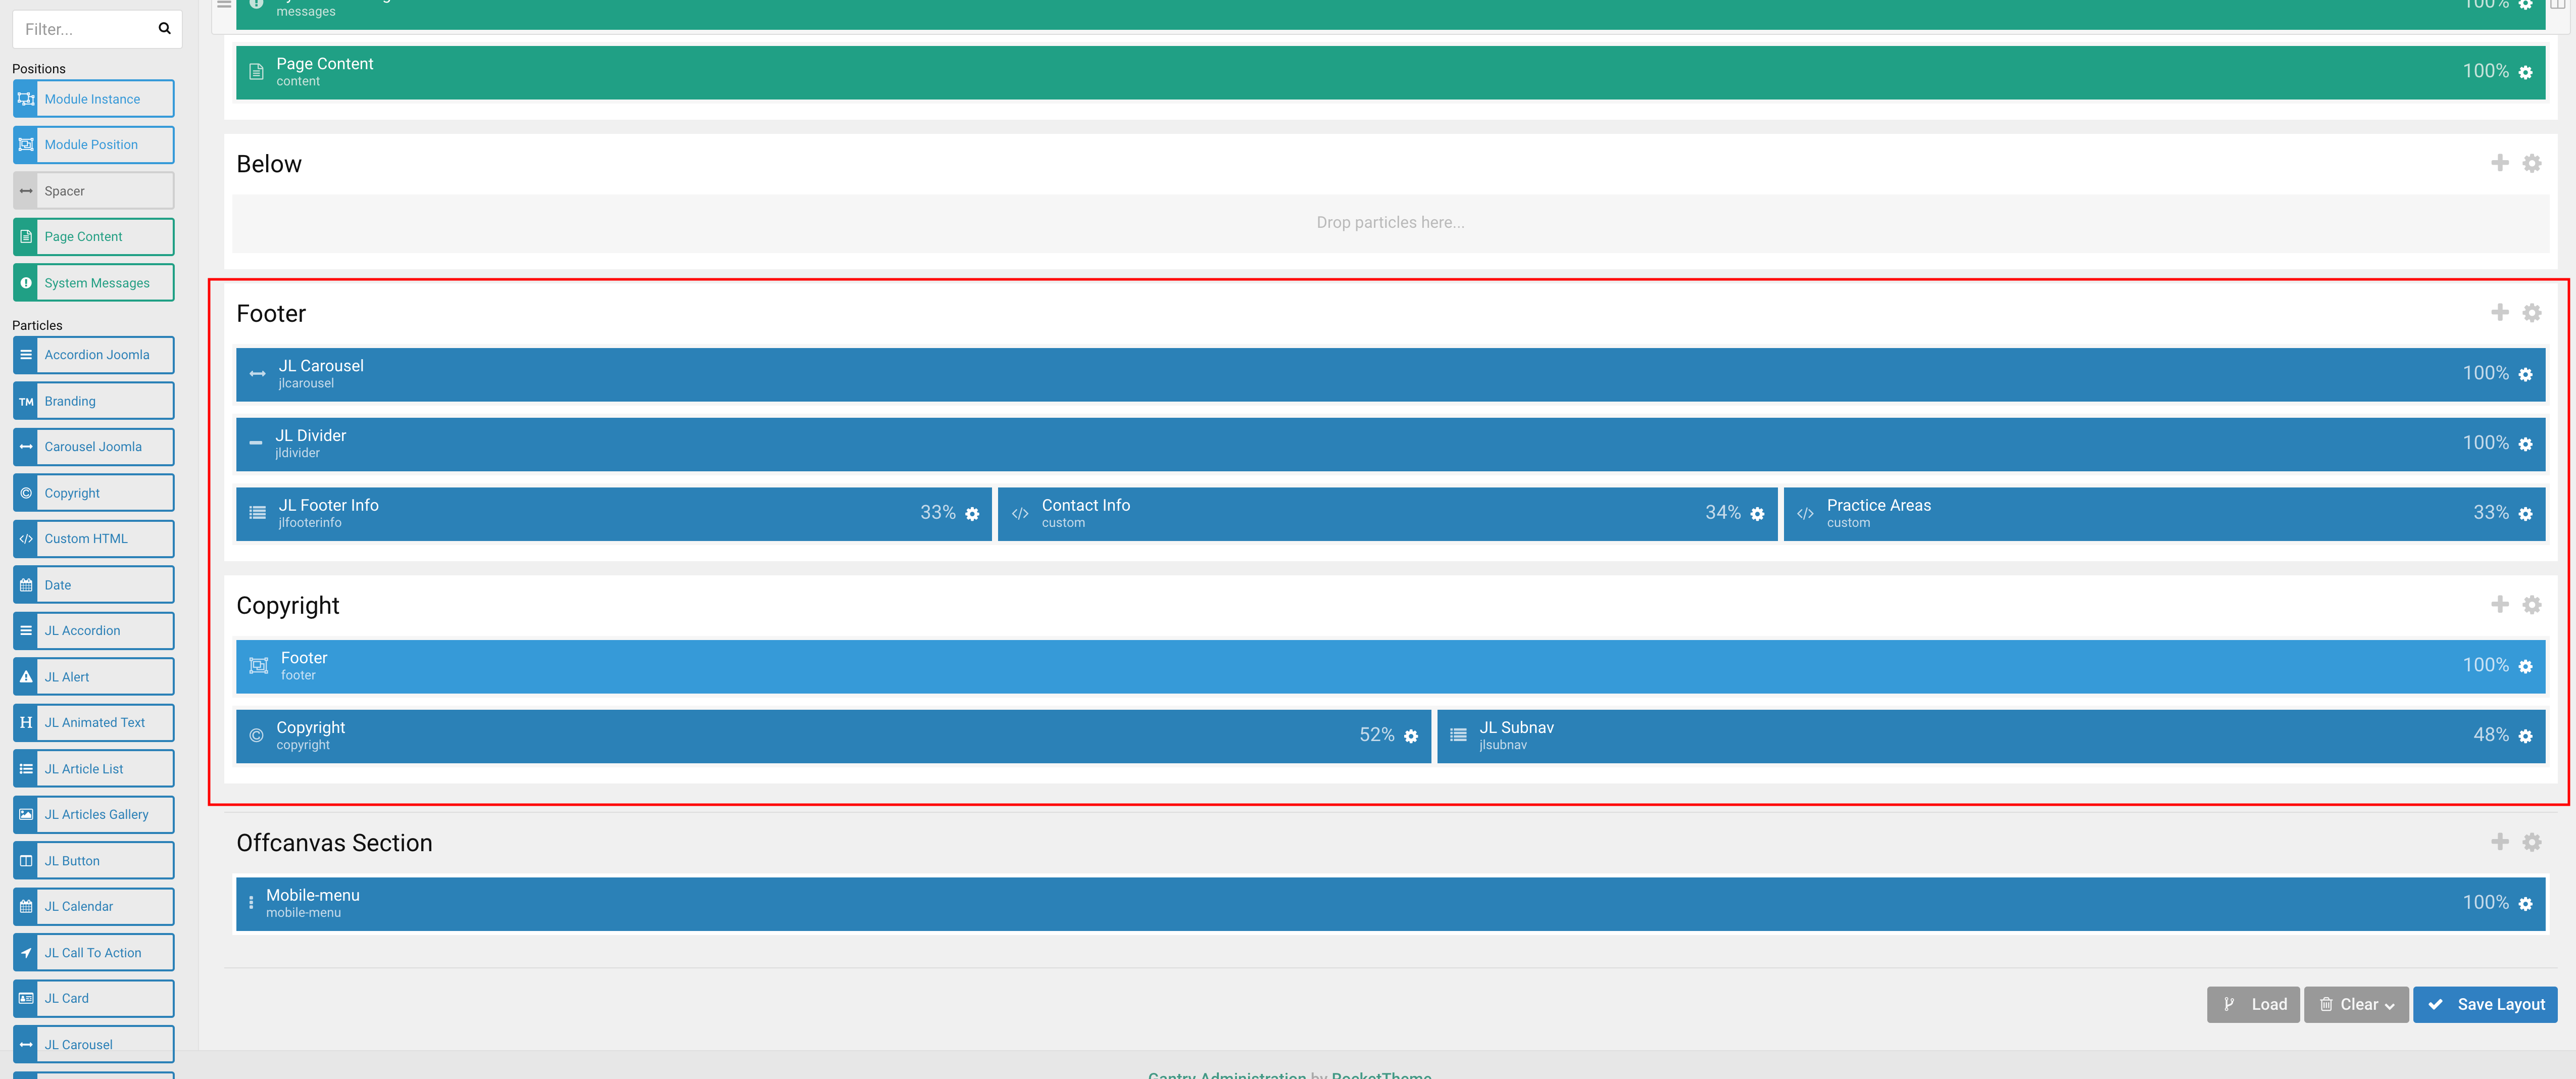
For more detail about Positions with Gantry5, please take a look Positions
Variations
The following settings can be found in the Layout panel -> Section settings. Just click on the settings icon right next to the name the section to open the section settings
1. Padding Variations
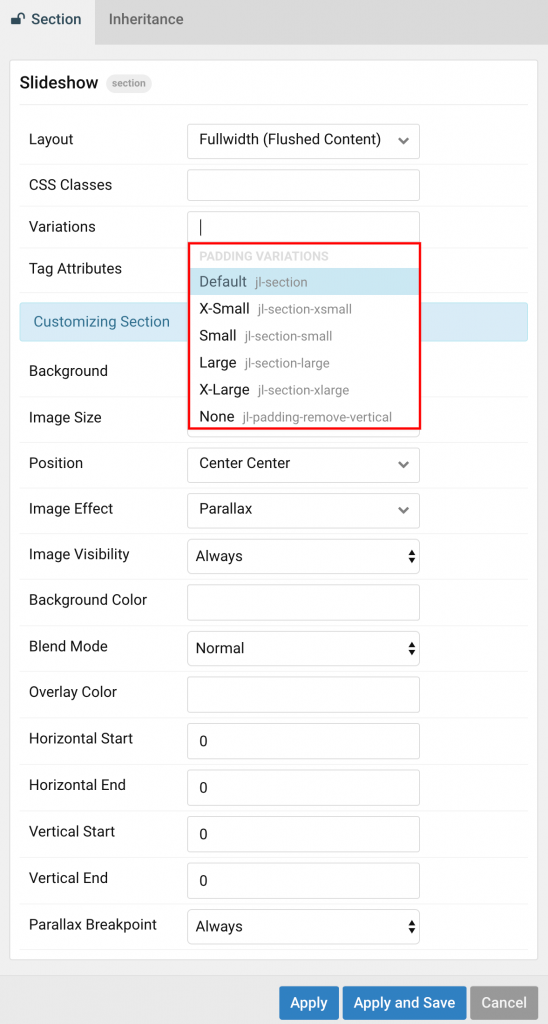
| Style | Description |
|---|---|
| Default | Create default horizontal layout sections: Padding values default: 70px |
| X-Small | Add this class to decrease a section’s padding to a minimum(20px). |
| Small | Add this class to decrease a section’s padding (40px). |
| Large | Add this class to increase a section’s padding (140px). |
| X-Large | Add this class to further increase a section’s padding (210px). |
| None | Add this class to remove a section’s padding. |
2. Predefined Section Styles
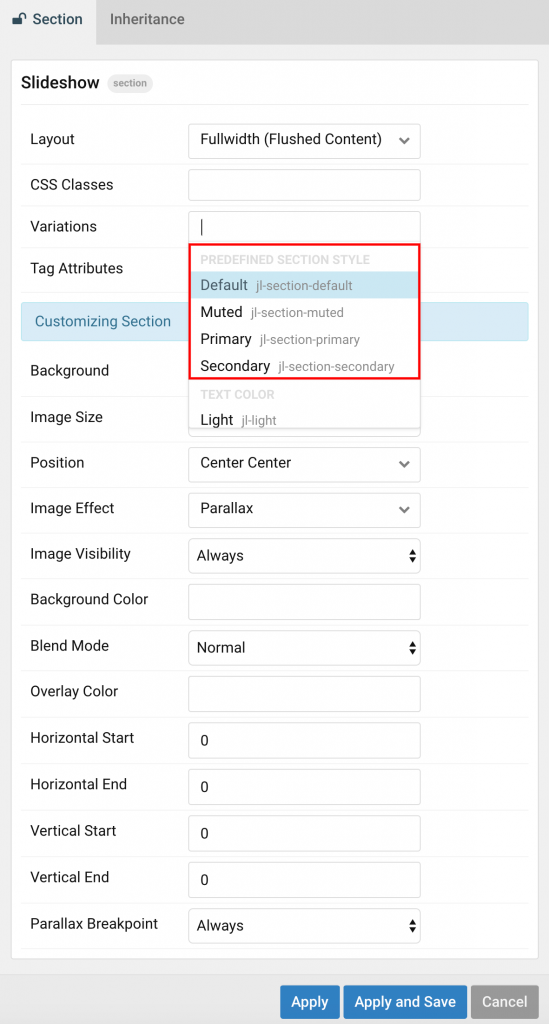
| Style | Description |
|---|---|
| Default | Adds the default background of your site – often white or light gray. |
| Muted | Adds a muted background – often slightly darker than the default background. |
| Primary | Adds a primary background – often a vibrant color. |
| Secondary | Adds a secondary background – often dark gray. |
3. Text Color
After picking a background image, you have to select the appropriate Text Color depending on whether it’s a dark or a light image. Only choose Light or Dark if Default doesn’t look good.
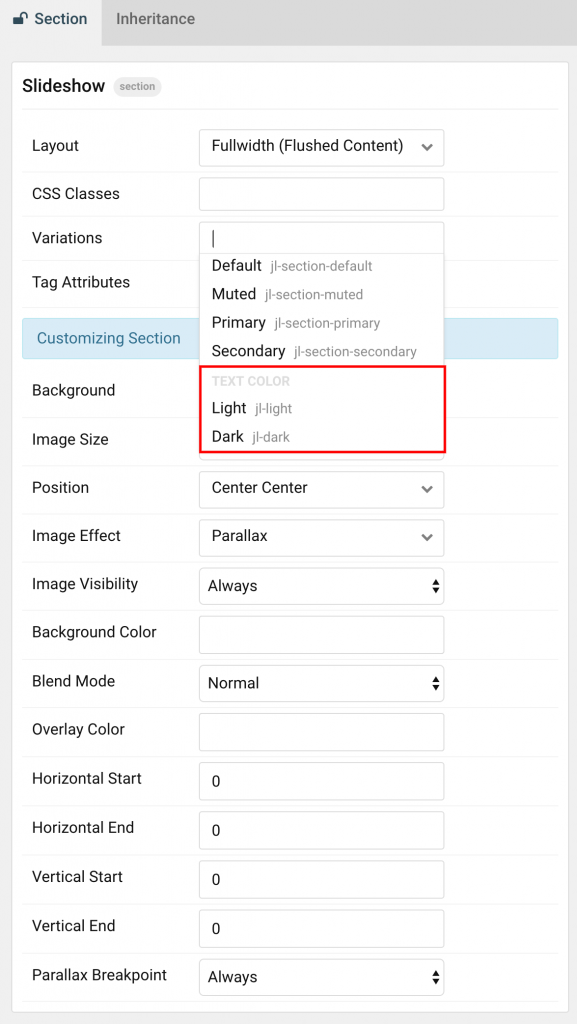
| Style | Description |
|---|---|
| Light | Light text color. |
| Dark | Dark text color |
4. Background Settings
![]()
| Style | Description |
|---|---|
| Background | Select the background image for section. |
| Image Size | Determine whether the image will fit the section dimensions by clipping it or by filling the empty areas with the background color. By default, the image will not be resized. |
| Position | Set the initial background position relative to the section layer. By default, the image is centered. |
| Image Effect | Add a parallax effect or fix the background with regard to the viewport while scrolling. |
| Image Visibility | Display the image only on this device width and larger. This is useful to hide background images if the content becomes illegible on small viewports. |
There are three options of how to recolor the image in a different tone.
| Style | Description |
|---|---|
| Background Color | Use the background color in combination with blend modes, a transparent image or to fill the area, if the image doesn’t cover the whole section. |
| Blend Mode | Determine how the image will blend with the background color. |
| Overlay Color | Set an additional transparent overlay to soften the image. |
The Parallax settings allow you to animate the background image depending on the scroll position of the document.
| Style | Description |
|---|---|
| Horizontal Start | Animate the horizontal position (translateX) in pixels. Min: -600 and Max: 600. |
| Horizontal End | Animate the horizontal position (translateX) in pixels. Min: -600 and Max: 600. |
| Vertical Start | Animate the vertical position (translateY) in pixels. Min: -600 and Max: 600. |
| Vertical End | Animate the vertical position (translateY) in pixels. Min: -600 and Max: 600. |
| Parallax Breakpoint | Display the parallax effect only on this device width and larger. |
Positions
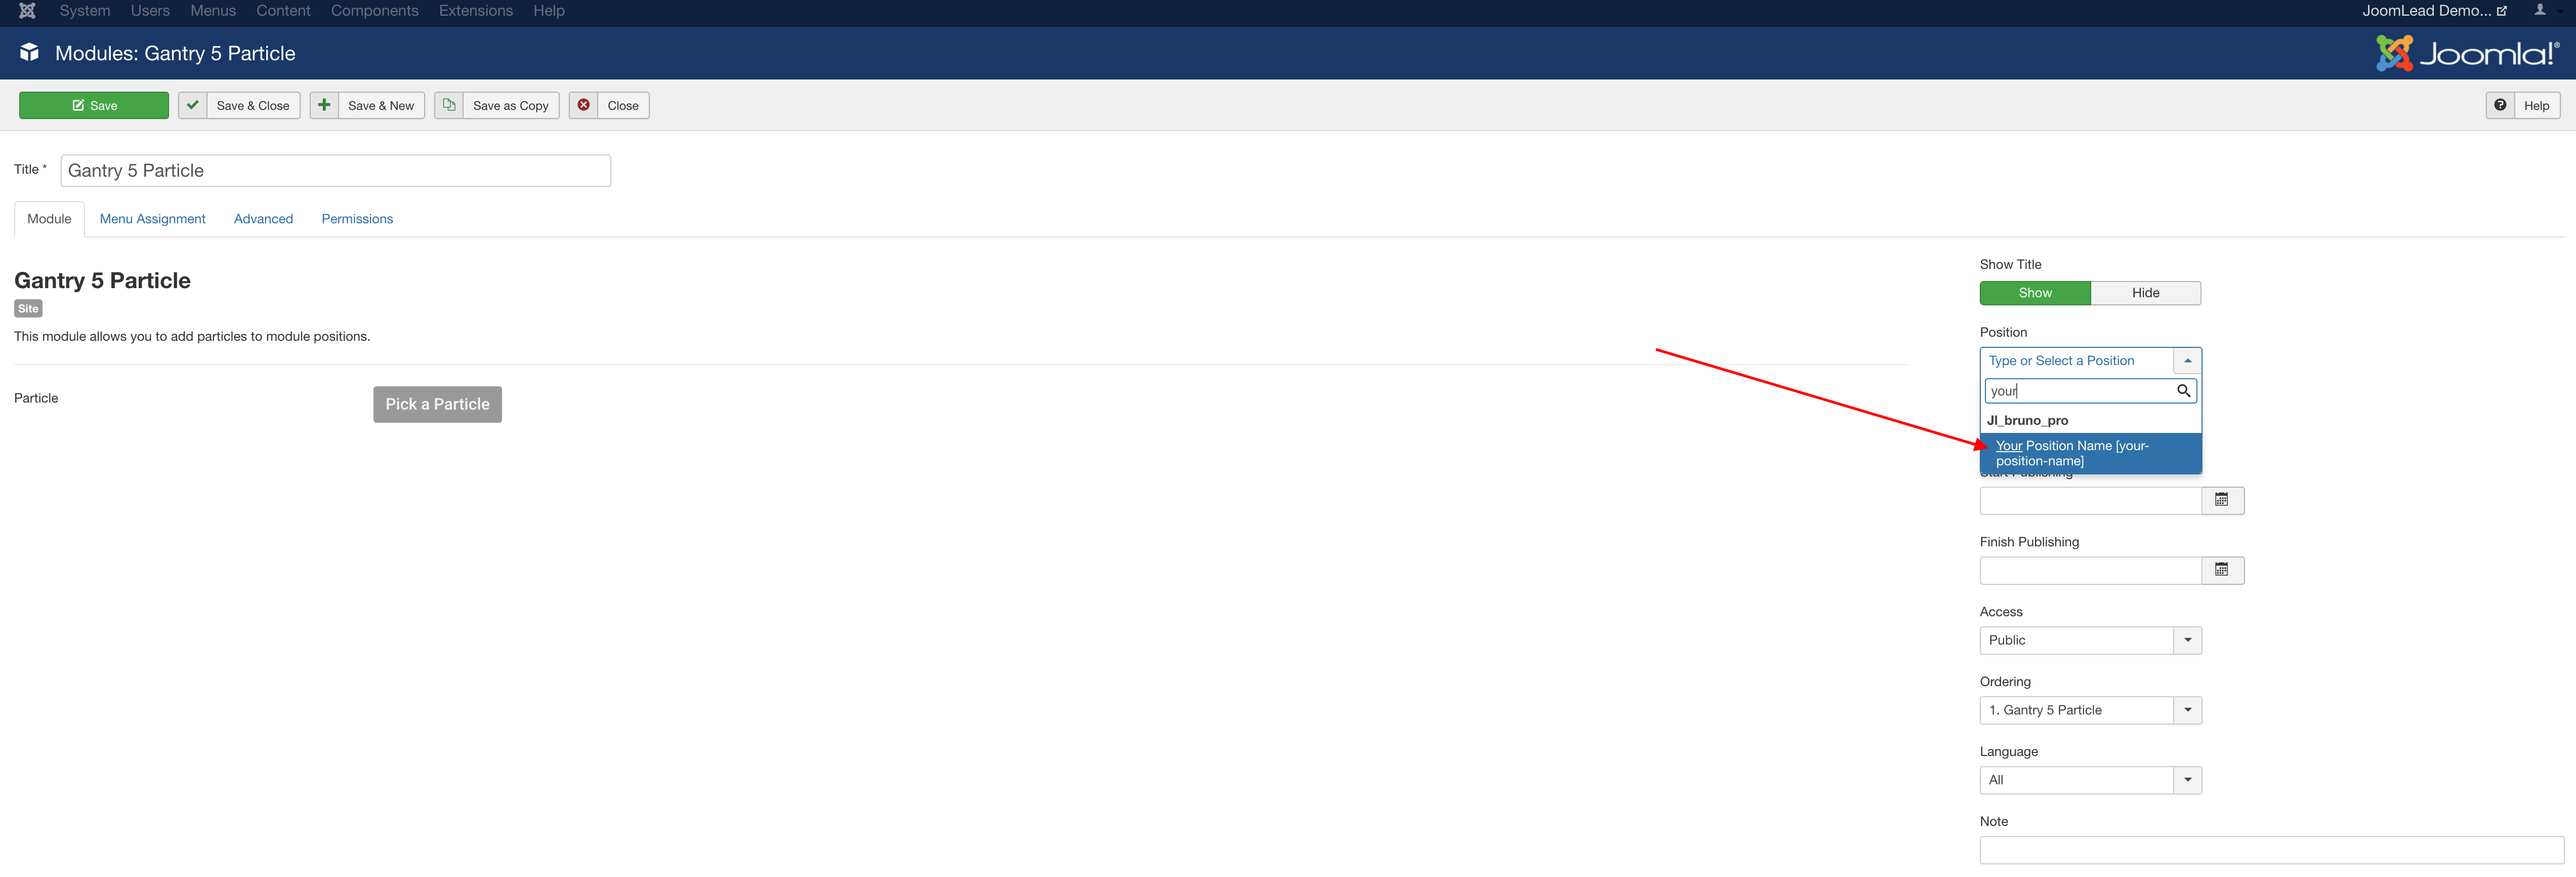
JL Nova comes with unlimited module positions. Thanks to the awesome Gantry 5 framework you can now easily create as many module positions as you want. You just need to go to the Layout Manager, drag and drop the “Module Position” particle wherever you want it to be and set the module position name.
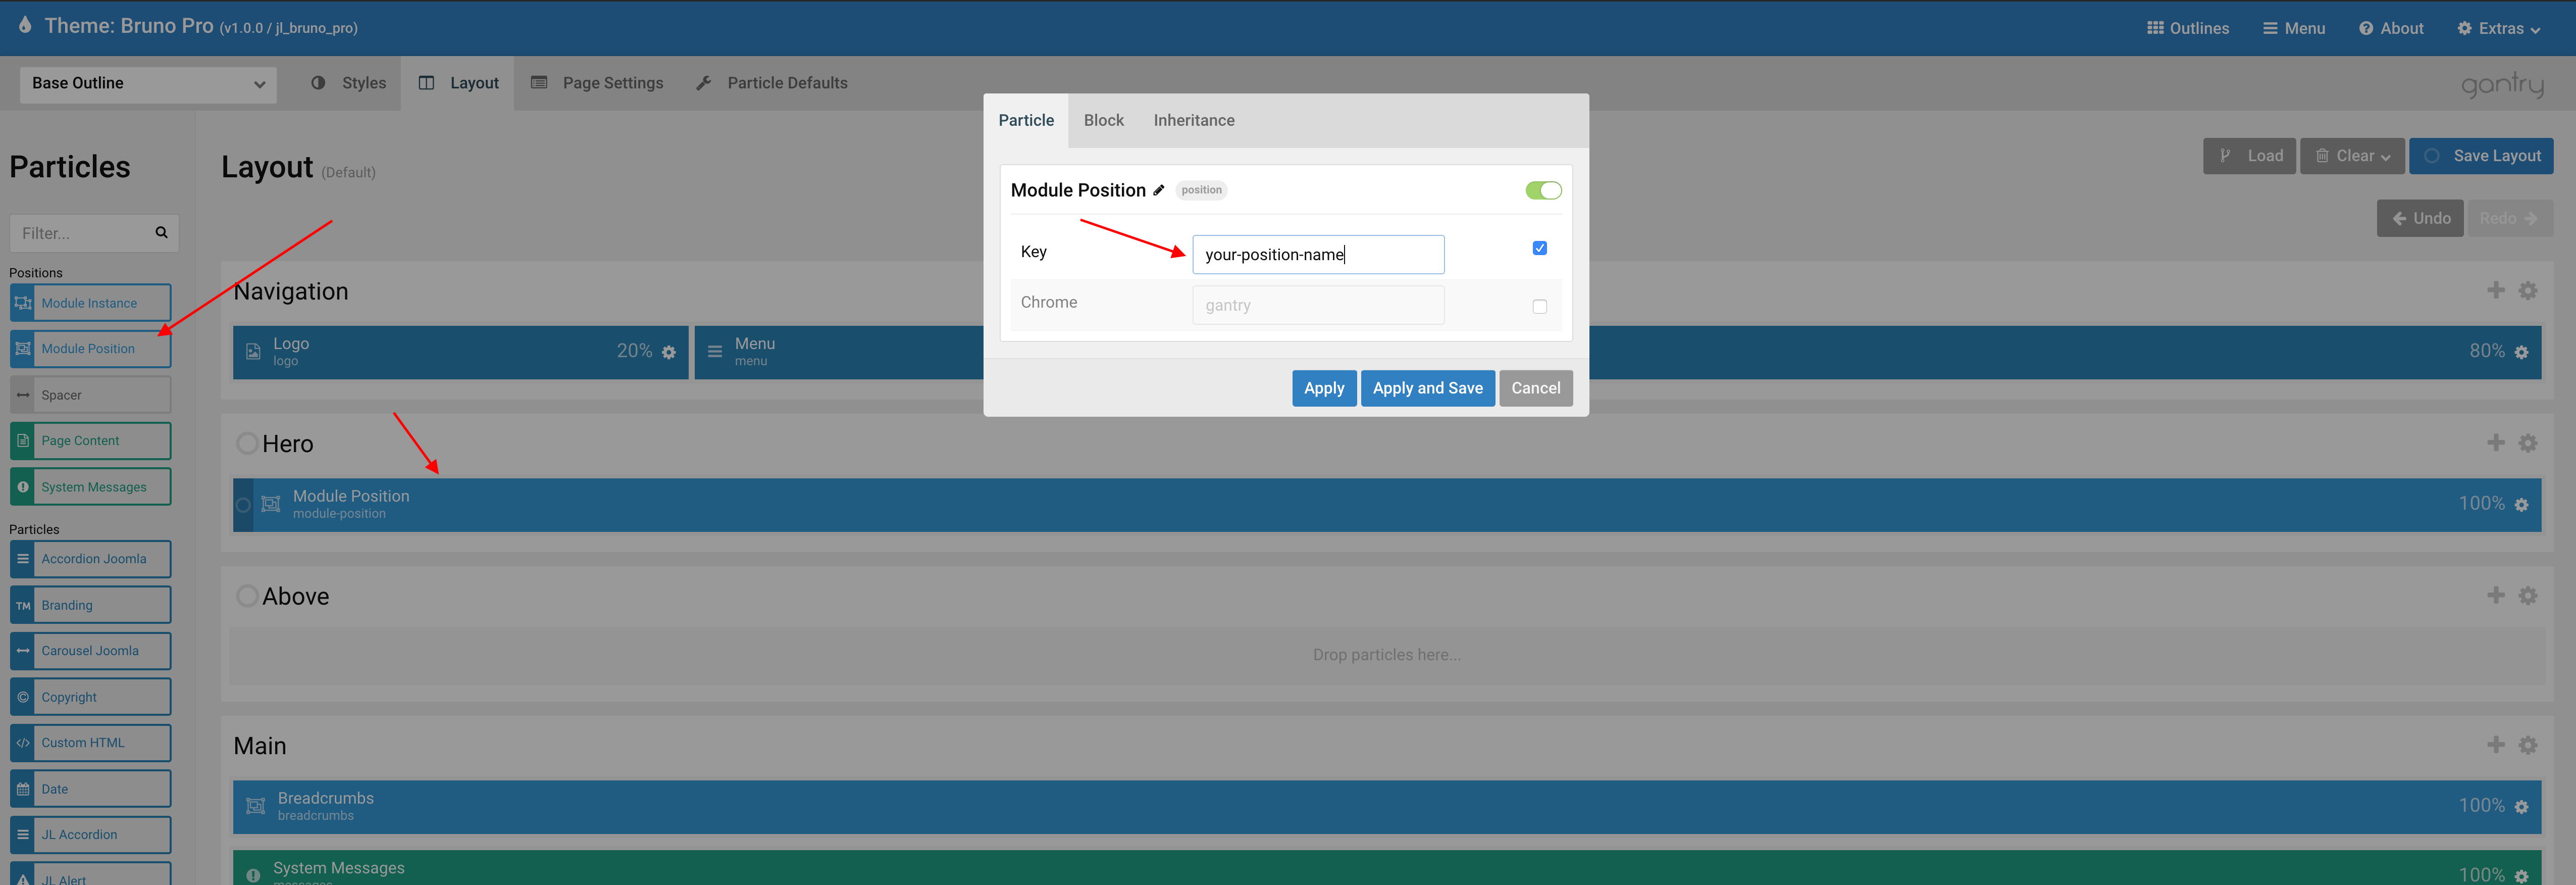
After that, you can assign your Joomla module to the position that you created before.
Learn how to create any positions quickly without coding here.
Customization
All your customization (custom code) should be placed in your “Custom Style Sheet” file. This is the custom.scss file. By default, the custom.scss file does not exists, so you will need to create it. You need to create
this file in root/templates/TEMPLATE_NAME/custom/scss. You will find all details in the Gantry5 Documentation, in the “Adding a Custom Style Sheet” chapter.
Build Demo Pages
Recreating features of the demo site used to show off some of the more interesting aspects of Nova can be done fairly easily. All you need is the right particles and settings, and you should be able to reproduce most (if not all) of the elements found in our demo site.
Note: We have made presets available for several of our additional demo pages, including: About Us, History, Menu, and Gallery. For Outline tutorial(creating, duplicating, and accessing your outlines.), see this documentation
To see full outlines, go to template settings -> Outlines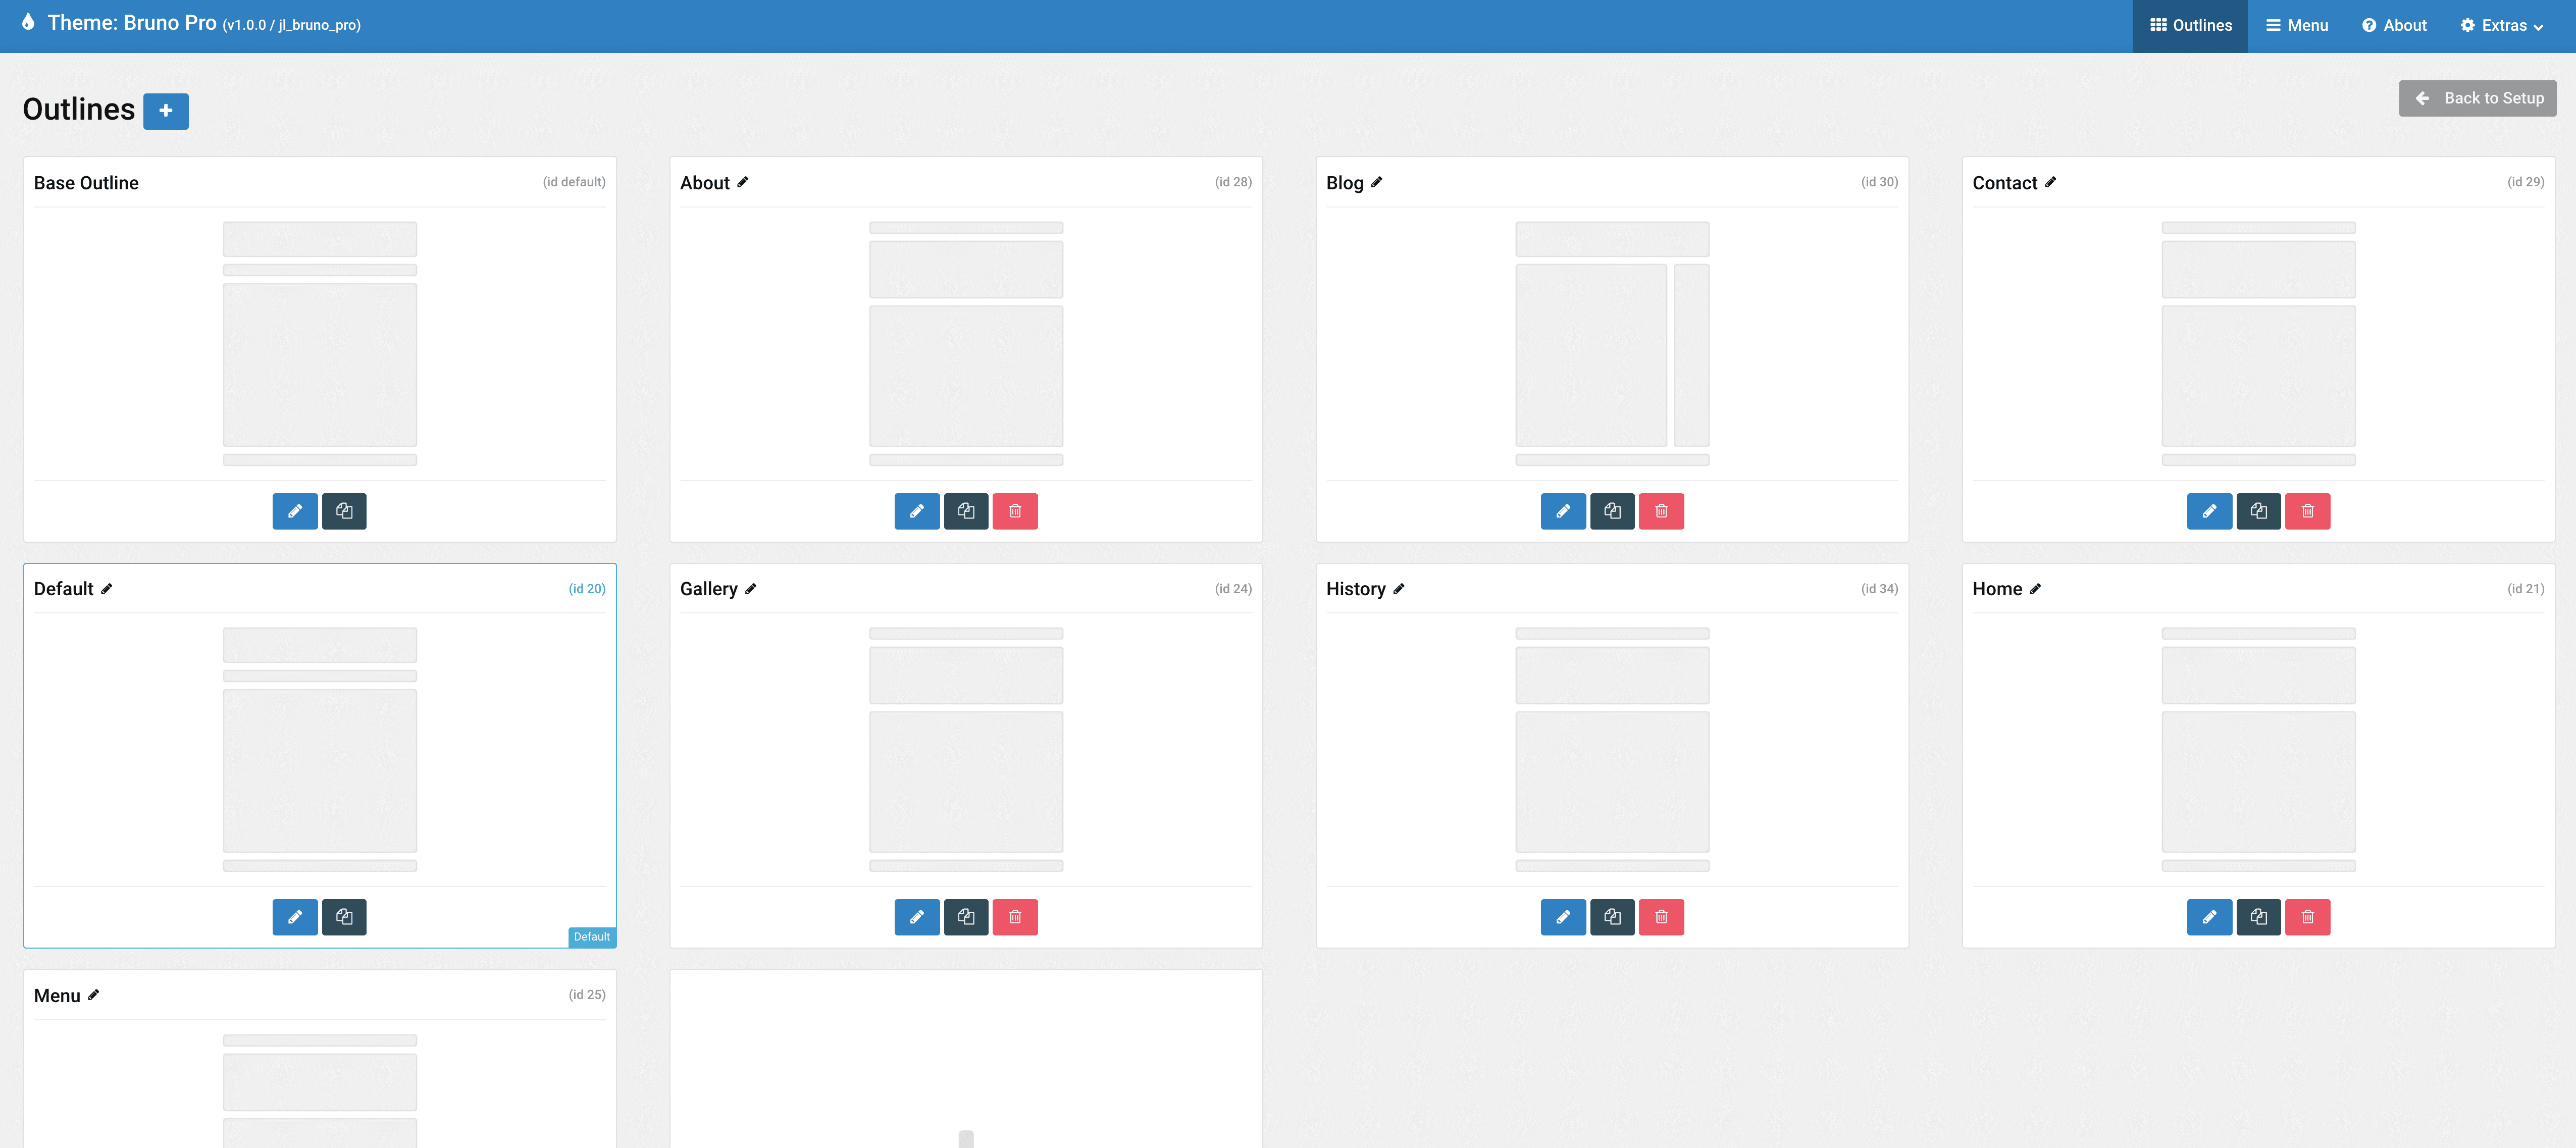
Example Home Page Layout
To access Home layout and modify the sample data for home page, Go to template settings -> select Home outline from dropdown -> Layout tab
Scroll down then click to the setting Icon () to change/replace the content for home page. Do the same steps for other pages.
If you have any specific request or feedback as well as suggestions, feel free to drop us a line in Ticket System. We’ll try to cover them all.
- Introduction
- Installation
- Update
- General
- Gantry5 Basic
- Key Features
- Styles
- Layout
- Layout Manager
- Section Variations
- Positions
- Customization
- Demo Content
- Demo Pages
- Template Tutorials
- Overriding Particle Settings
- Adding a Custom Style Sheet
- Adding a Custom Font
- Customizing the Error Page
- Using the Font Picker
- Using the Color Picker
- Using the Icon Picker
- Creating a New Particle
- Particle YAML Field Types
- Customizing Theme Files
- Creating Layout Presets
- Creating Custom File Overrides
- Template Font Index

Comments