Zmagazine Documentation
Introduction
This document covers the installation and use of this template and often reveals answers to common problems and issues – we encourage you to read this document thoroughly if you need an in-depth guide on how to use the template.
If you have any questions that are beyond the scope of this document, feel free to ask via ticket support system: Ticket System
To get access to the ticket system, create an account on this page: Create an AccountInstallation
The section will help you with steps to install JL Zmagazine template – Quickstart and Manual installation.
Which installation method you should use depends on the current status of your site. Also, before installing either the template manually or the Quickstart Package, please make sure you meet the Joomla! and the template requirements.
Requirements
- Apache 2.2+ or Microsoft IIS 7 (Apache strongly recommended)
- PHP 5.4+ (PHP 5.5+ Recommended)
- MySQL 5.1+
- Joomla 3.4+
Also, please have a look at the Gantry5 requirements. Basically, they are the same as the above, but you will find some additional details there.
Quickstart Installation
Why Quickstart
The quickstart allows you to replicate JL Zmagazine demo to your server. It means, after install the quickstart, you will have a site exactly the same as the demo site.
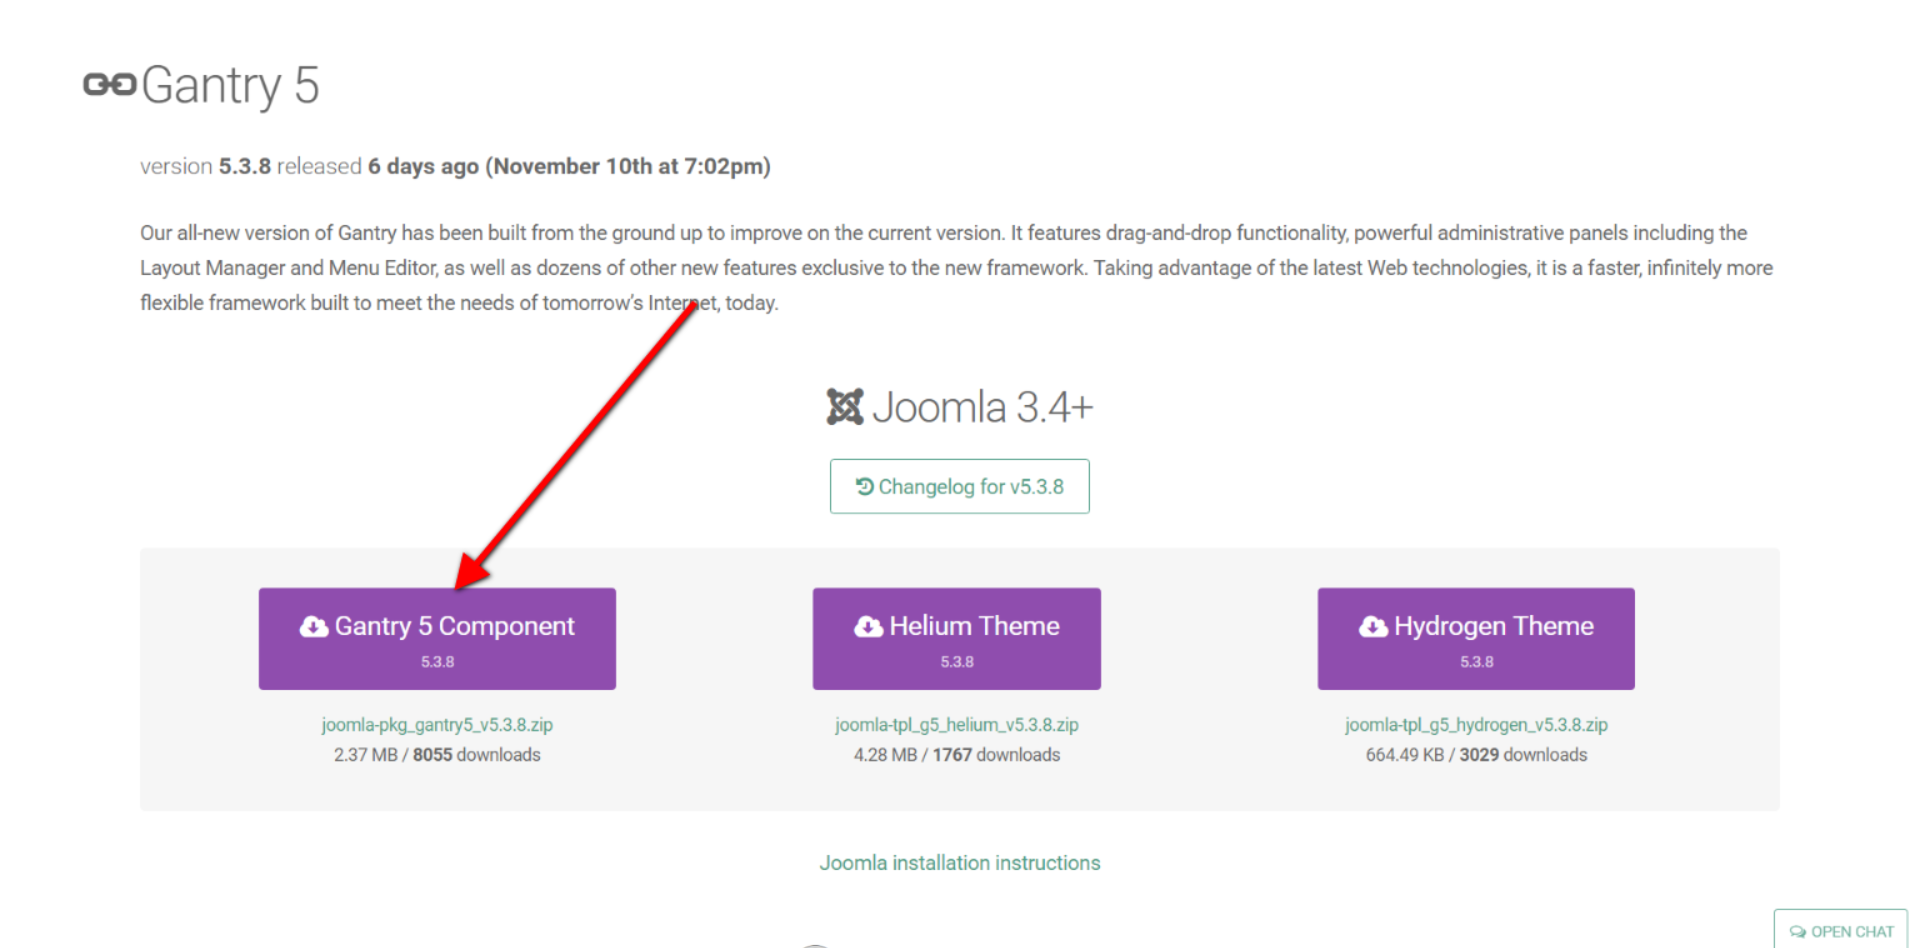
Download JL Zmagazine quickstart package →, upload to your server and extract it.
Step 1 Configuration: add Site name, Admin email, Admin username and password
Step 2 Database: select database type, host name, database username, password, database name & table prefix
Step 3 Remove/Rename “installation” folder: for security purpose, you need to rename or remove the “installation” folder
Detail documentation with screenshots
Manual Installation
You can find step-by-step instructions as well as a video instructions regarding the Manual Installation in the Gantry5 Documentation, in the “Installation” chapter.
Install Gantry 5 Framework
Step 1 Install Gantry 5 Framework
From your back-end setting panel, go to: “Extensions → Extension Manager”, browse Gantry 5 plugin installation package then hit the “Upload and Install”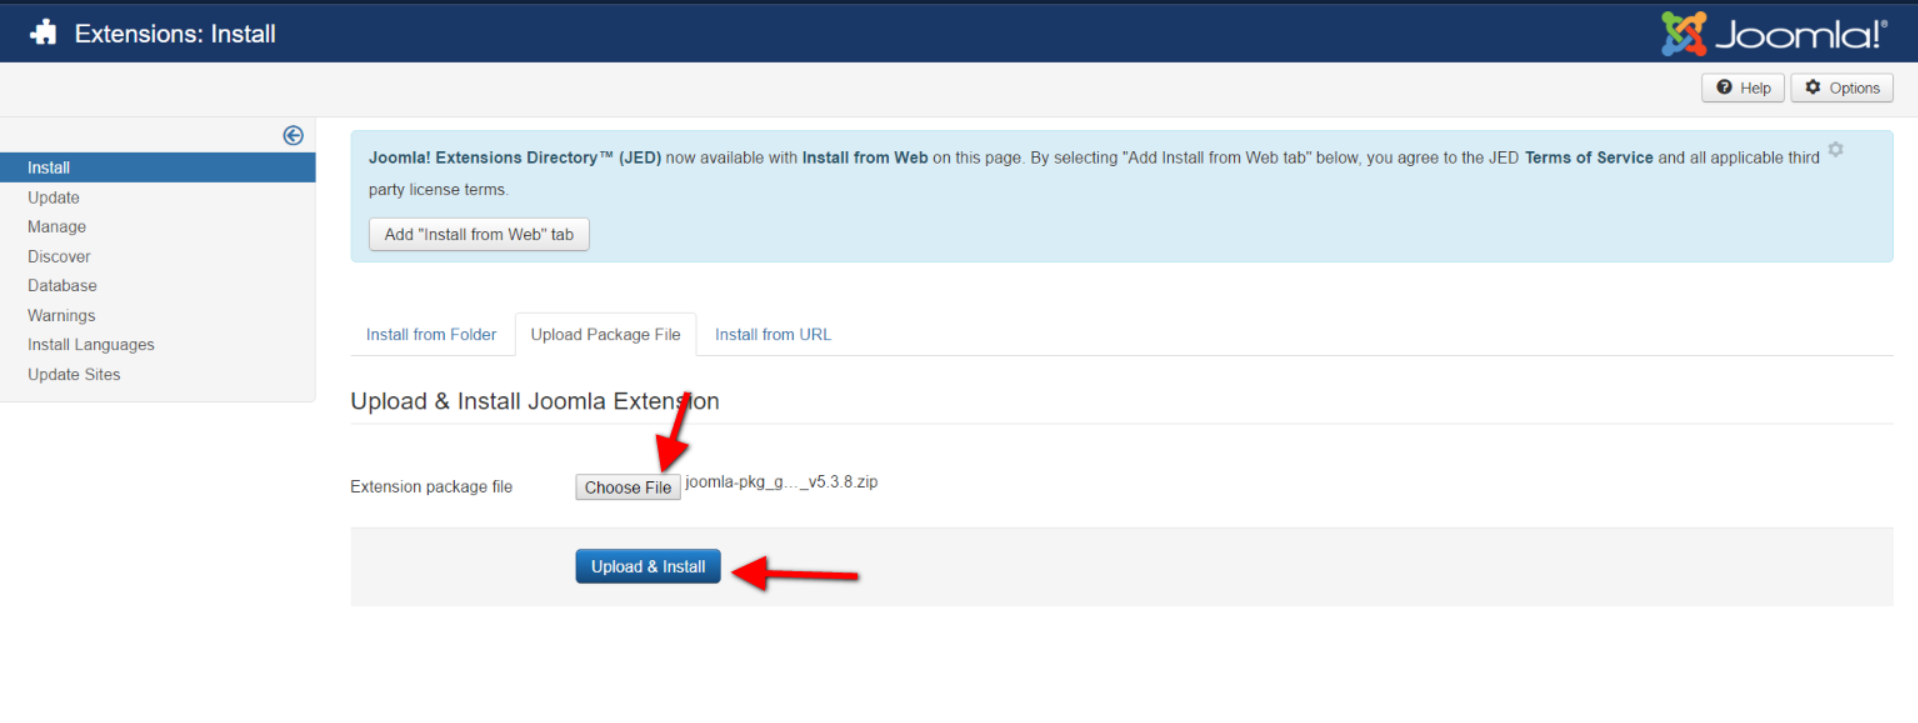
Install JL Zmagazine template
From your back-end setting panel, go to: “Extensions → Extension Manager”, browse JL Zmagazine template installation package then hit the “Upload and Install”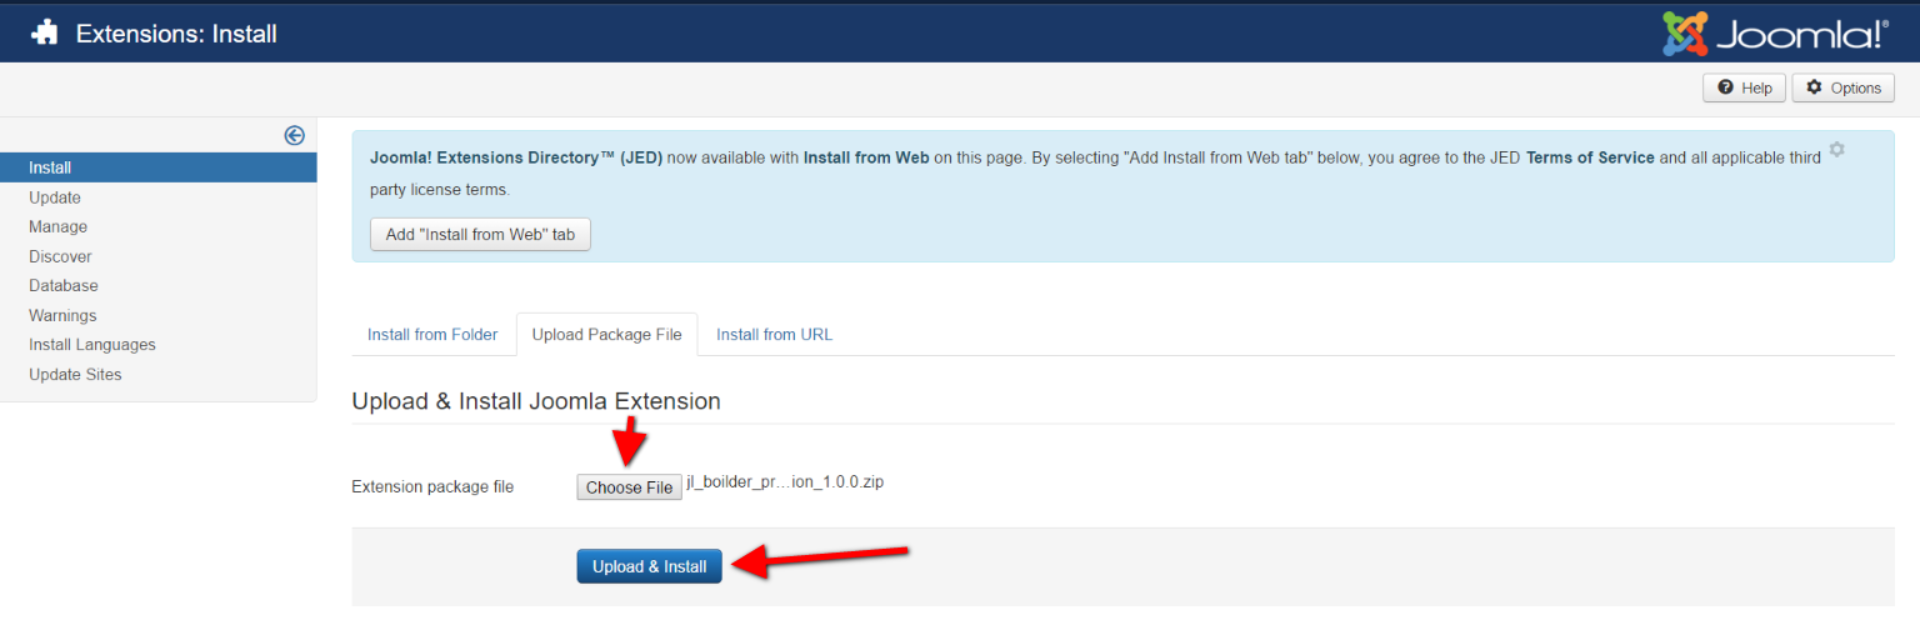
Step 2 Set default template style
Go to: “Extensions → Template Manager”, set JL Zmagazine template style as your default template style.

Update
Updating the template
Updating the template is really easy. Here are the steps you need to perform:
- Download the new version of the template from the “Download” section on our website
- Go to “Extensions” -> “Manage” and click on the “Browse” button
- Select the template file you downloaded in step 1. It will usually be called
tpl_it_NAME.zip - Click on the “Upload & Install” button
Gantry5 Framework update
This is just a simple one click task. If there is a newer version of the Gantry Framework released you will notice that in your Joomla Admin as well as in the Template Manager. Then just click on the button.
You might also want to read the “Updating” and “Updating Themes” chapters in the Gantry5 Documentation.
Gantry 5 Basics
Please have a look at the Gantry Documentation in order to discover what Gantry is all about, the core-concepts behind it, and how to get started with this next-generation framework.
The most important things you need to know when working with our Gantry5-based templates are:
- The Layout Manager is used mostly for creating your module positions. Apart from the module positions, you should also keep the static content in the Layout Manager. By “static content” we mean the “Logo” particle, the “Menu” particle, the “System Messages” particle, the “Page Content” particle, the “To Top” particle and the “Mobile Menu” particle.
- If you want to hide some modules/elements on some devices (phones, tablets, etc) you should use the
hidden-phone,hidden-tablet, etc. classes but you should add them in the particular module positions (under the “Block” tab) in the Layout Manager, rather then in the “Module Class Suffix” field for the particular module. You will find more details in the “Layout Manager” chapter in the Gantry Documentation. - As mentioned above, you create your module positions in the Layout Manager, but then you will use the Module Manager to assign your modules, as you would do in any other framework as well as in the default Joomla!
- In order to publish the custom particles that come with the template you will use the “Gantry5 Particle” module in the Module Manager, rather than adding them directly in the Layout Manager.
- If you want to change the style of some sections (background color, background image, text color, etc.) globally, for the whole website, you should do it under the “Styles” tab in the “Base” outline. The “Base” outline holds the defaults for the whole website. You can then override those defaults in each outline you create.
- If you want to load an asset (JS, CSS, etc.) globally in the whole website, you can do it under the “Page Settings” tab in the “Base” outline.
- If you want to create an empty page so you can assign modules to it, you will use the “Gantry5 Themes” -> “Custom Page” menu item type. Previously, you would use the “Featured Items” menu item type.
Required Atoms
Please have a look at the Atoms sections in the Gantry Documentation so you know what they are all about.
Atoms basically load assets (scripts and stylesheets).
Particles
Gantry5 comes with a brand new Particle system which makes it easy to create, configure, and manage content blocks.
Basically, everything that you would create a Custom HTML module for is now coded in to a particle. You no longer need to copy/paste long HTML codes and edit them, you just need to click here and there and fill out fields in the Admin.
In this chapter we will show you the custom particles that we developed as well as some of the core Gantry 5 particles that we modified and enhanced, for example the “Social” particle.
Zmagazine Template Atom
- Cookie Consent | Documentation
- Backtotop | Documentation
- Sticky Atom | Documentation
Core Gantry5 Particles
- Logo
- Menu
- To Top
- Social
- Module Positions
- Spacer
- Mobile Menu
- Custom HTML
- Module Instance
- Page Content
- System Messages
Build Demo Pages
Base Outline
This page will acts as the global default for any gantry pages. This is where global style, particle defaults, page settings, and layout options are set. For more information, please take a look at Gantry 5 Inheritance. To edit this page, go to Outline -> Base Outline -> Layout Tab
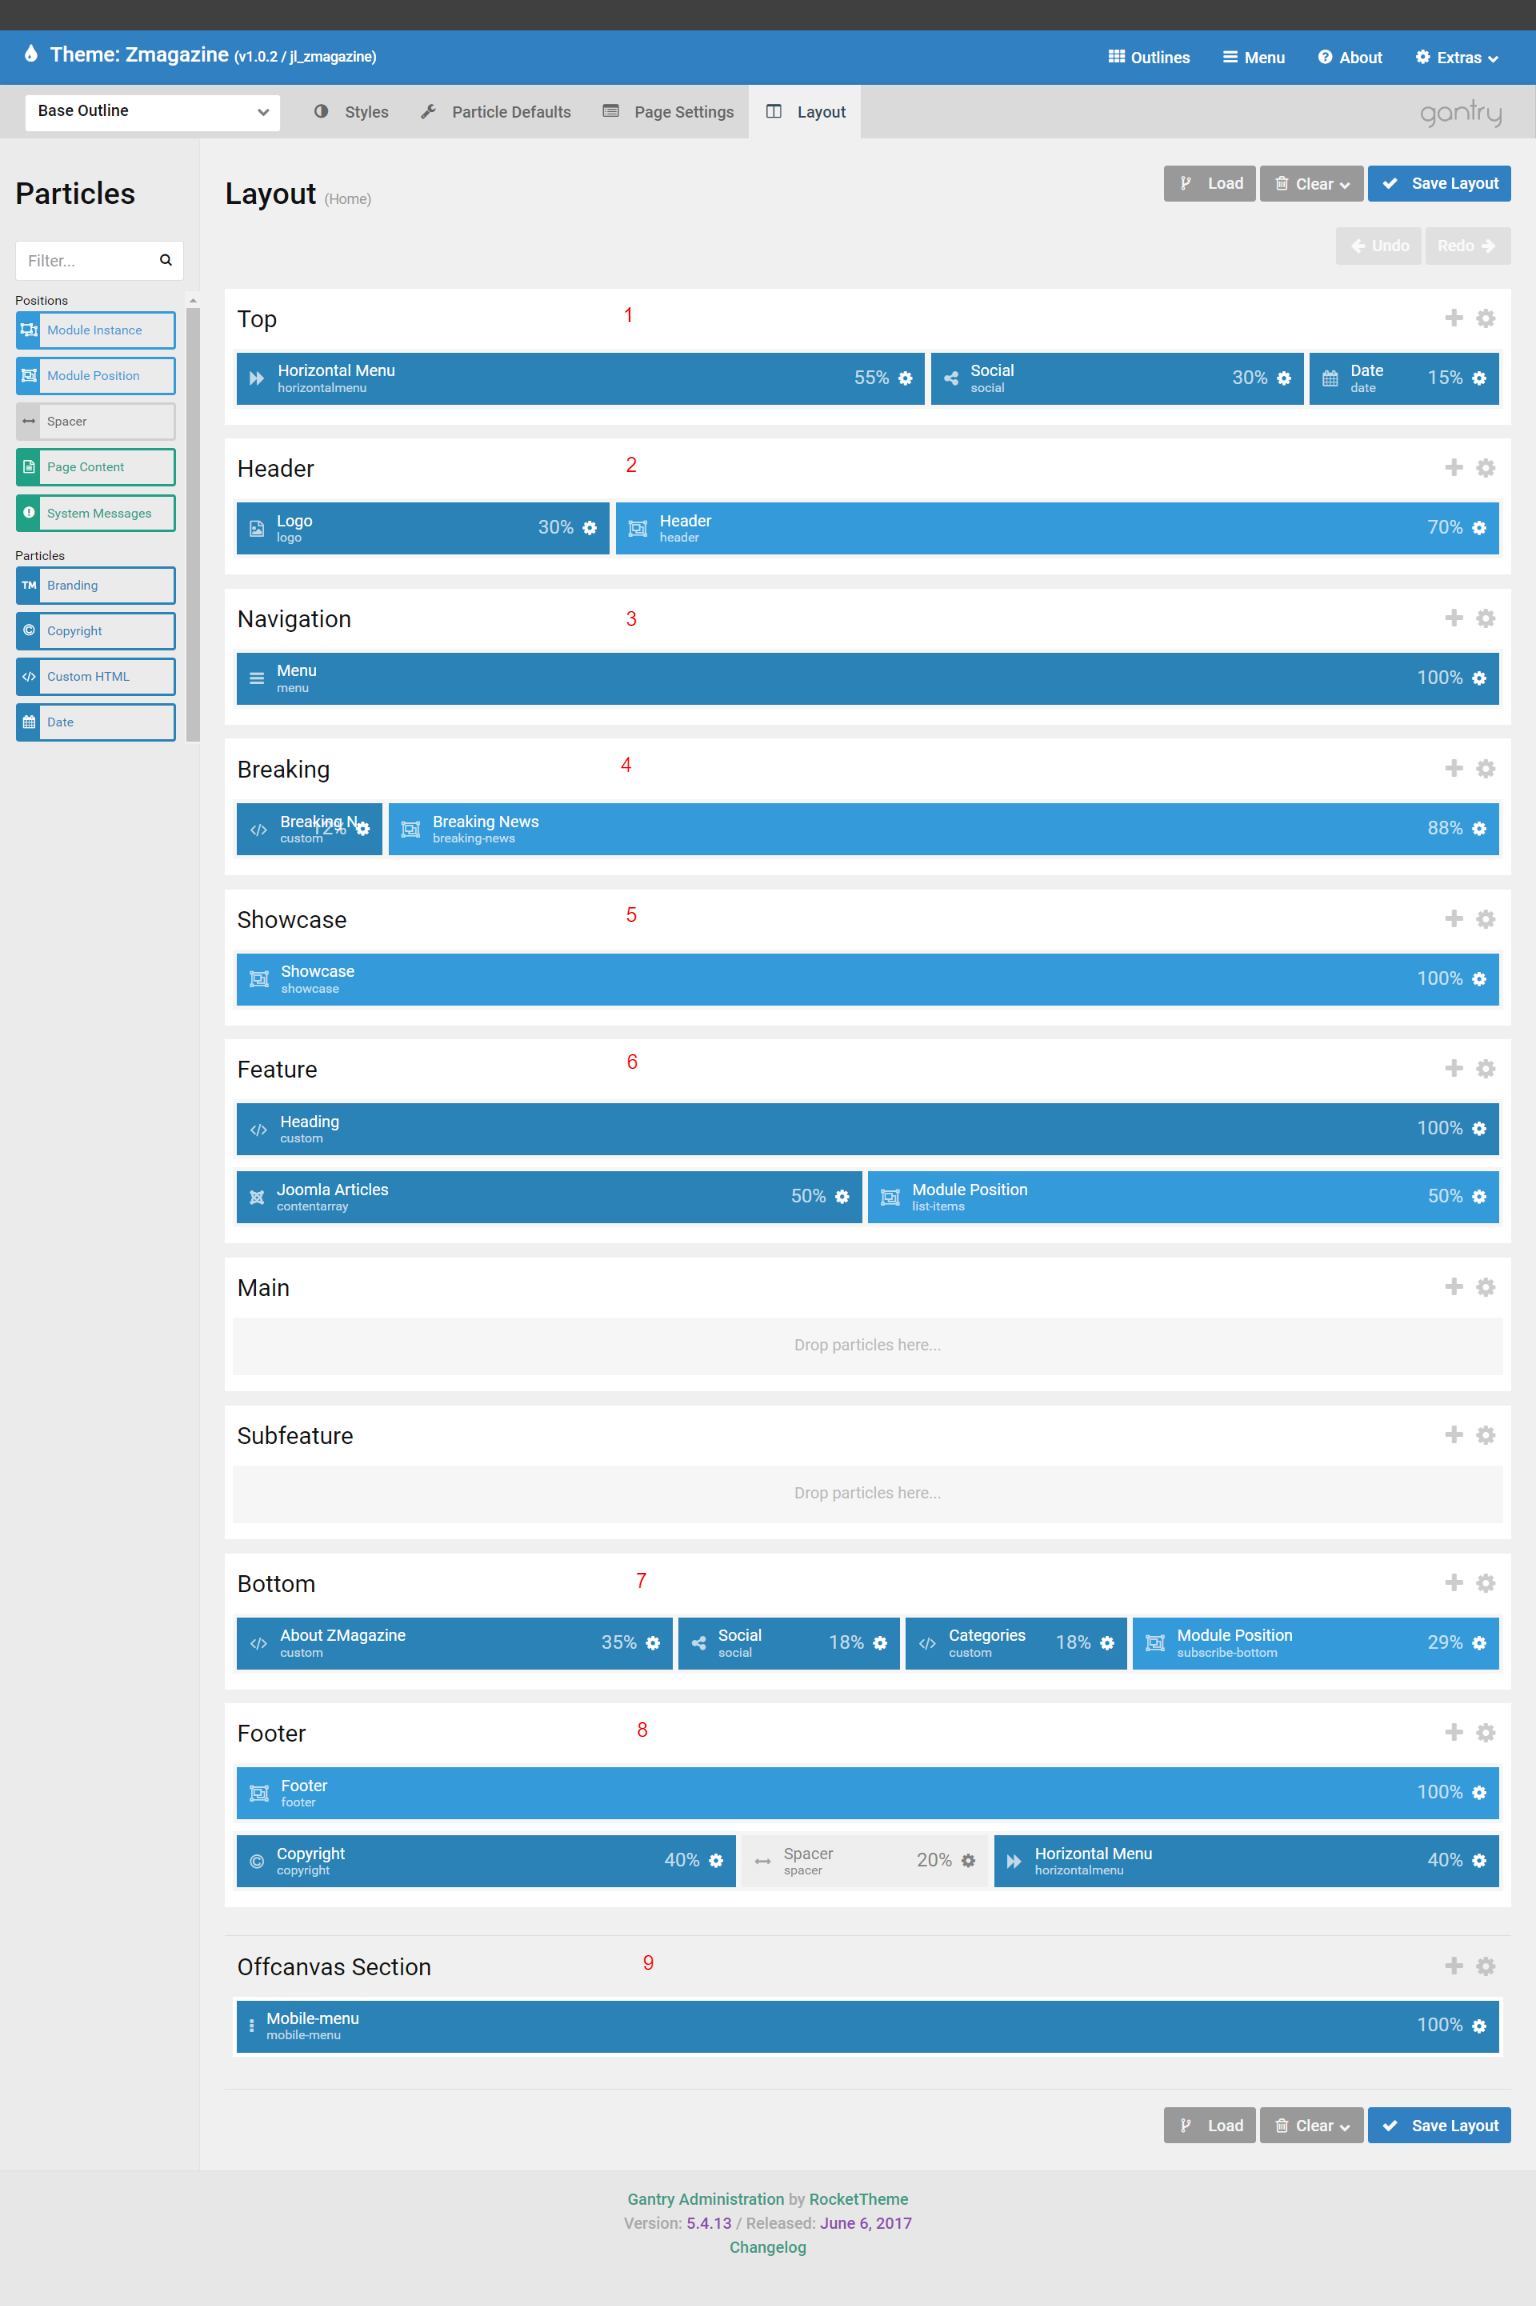
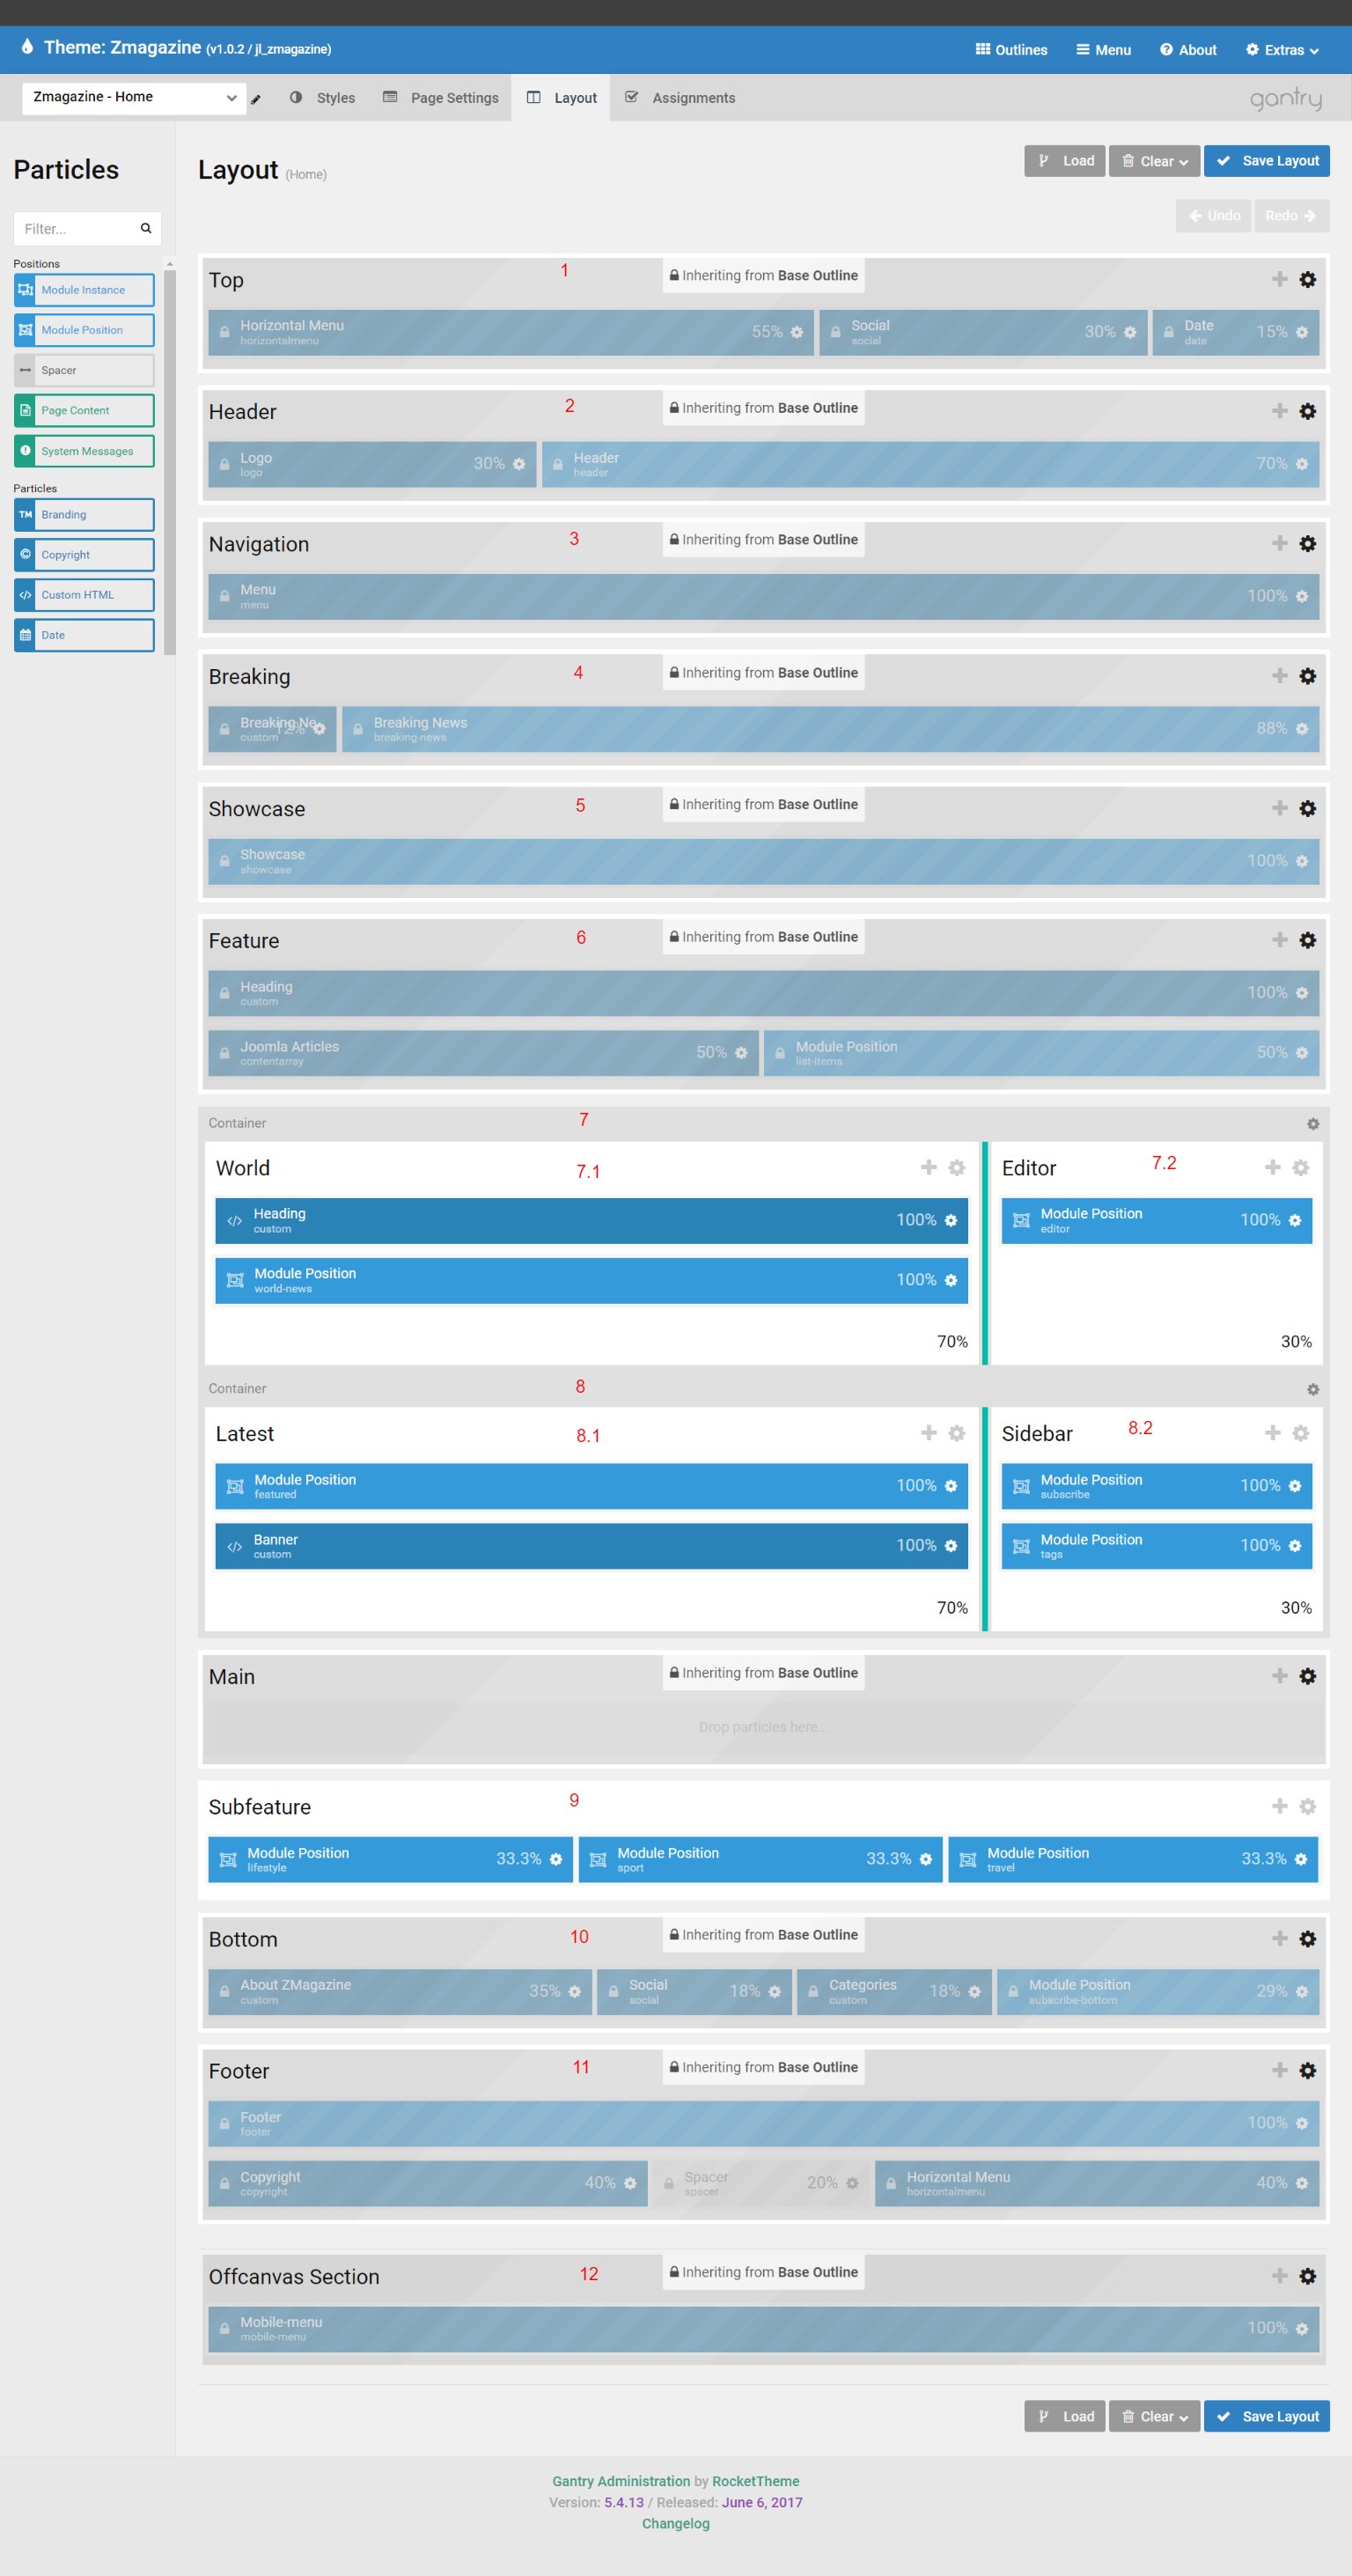
1. Changing the Top Section
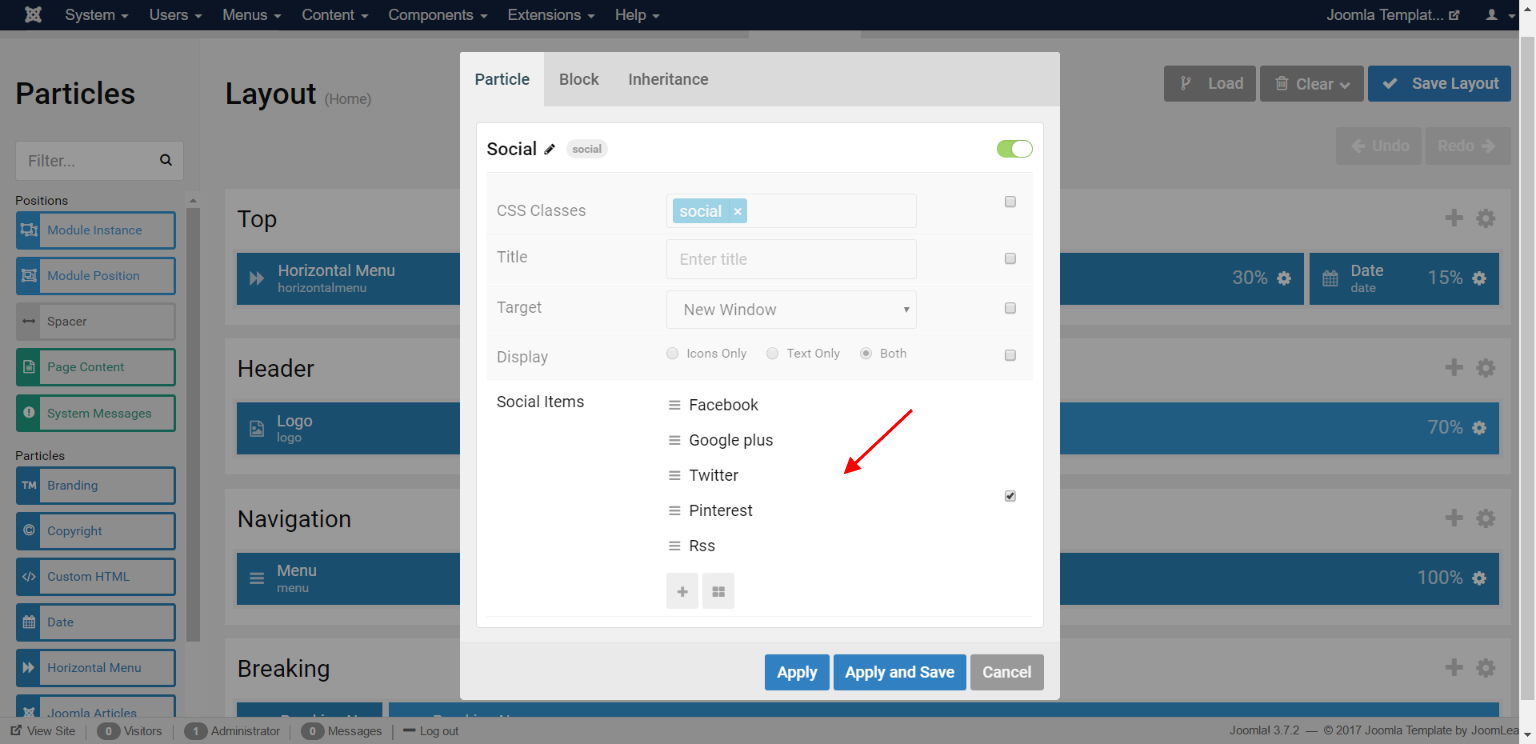
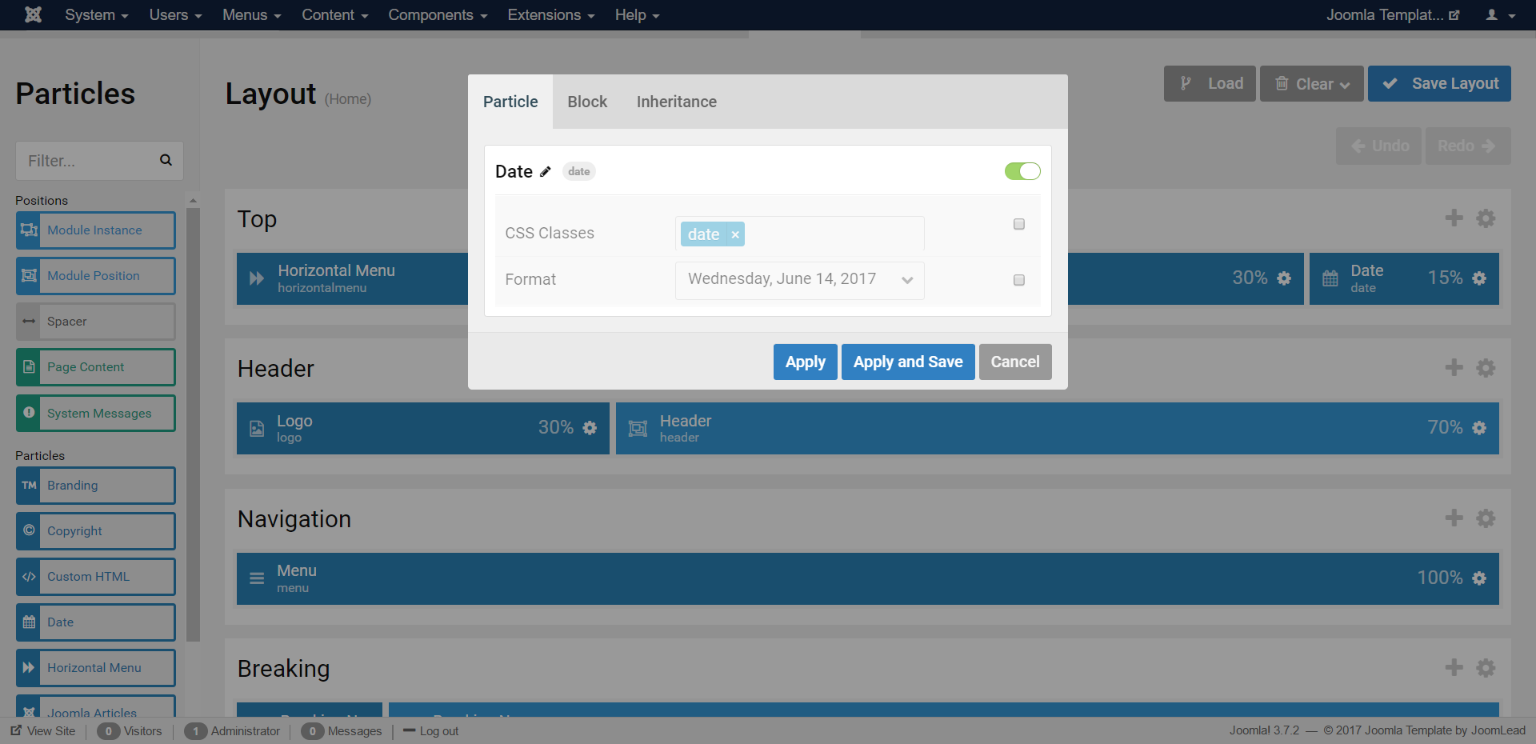
The Top Section contains Horizontal Menu Particles, Social Particles, Date Particles.
![]()

Click particle Horizontal menu settings to edit the Content

Click particle Social menu settings to edit the Content
Click particle Date menu settings to edit the Content
2. Changing the Header Section
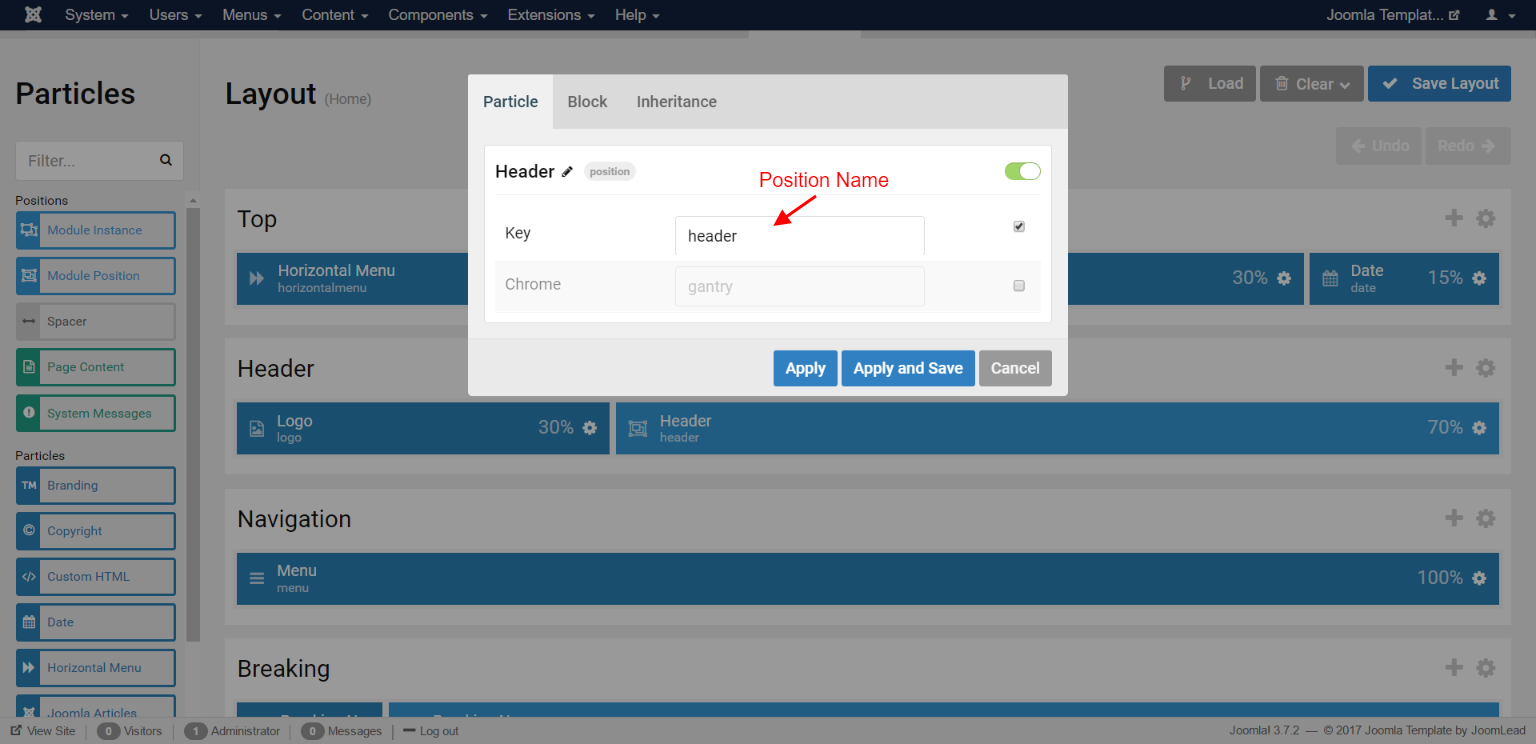
The Header Section contains Logo Particles, Module Position – Header.


You will need to change the logo, that’s for sure. You can do that easily by editting the settings of the “Logo” particle:
Click the logo particle icon settings and do following
![]()
This module position creates position header and is assigned with module “header”. To edit the position name, click the module position particle icon settings. Edit position name on the key field. For more information about Module position, please take a look at Gantry 5 positions document
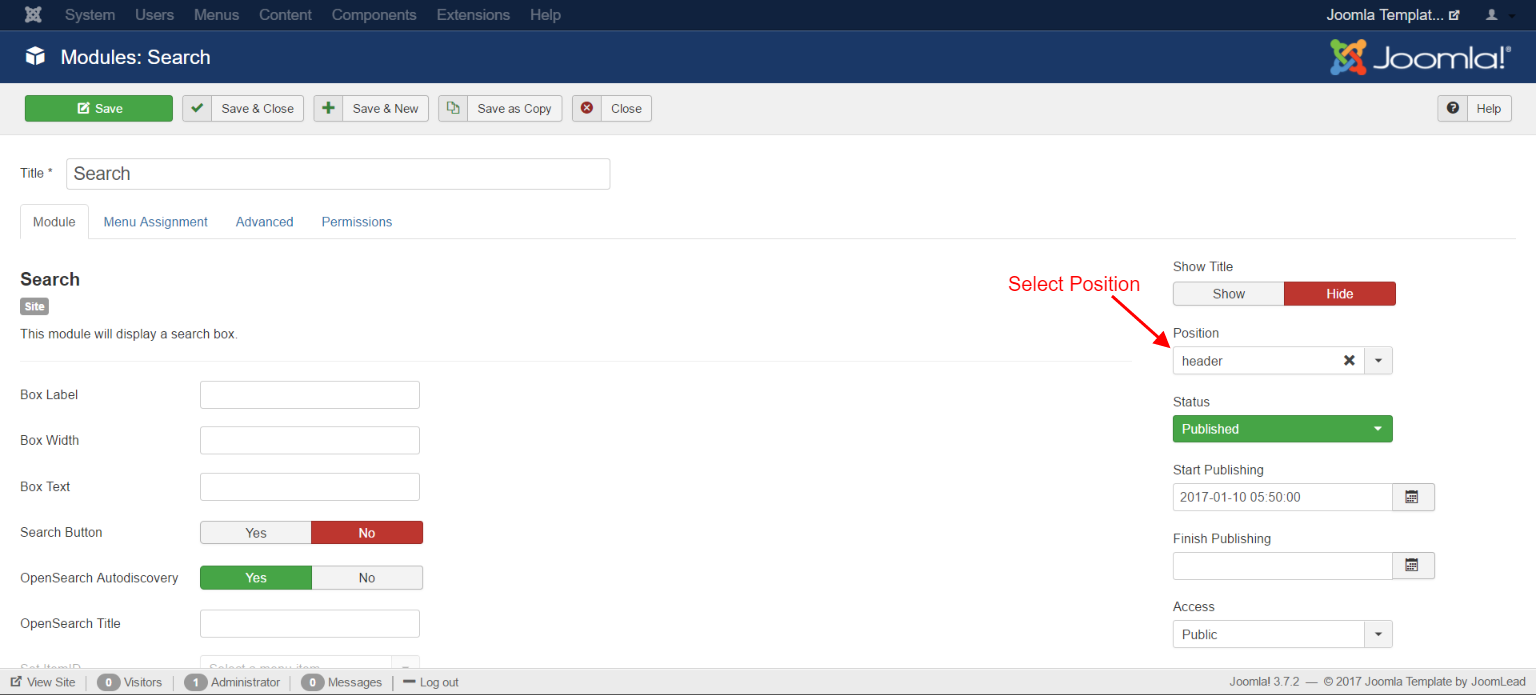
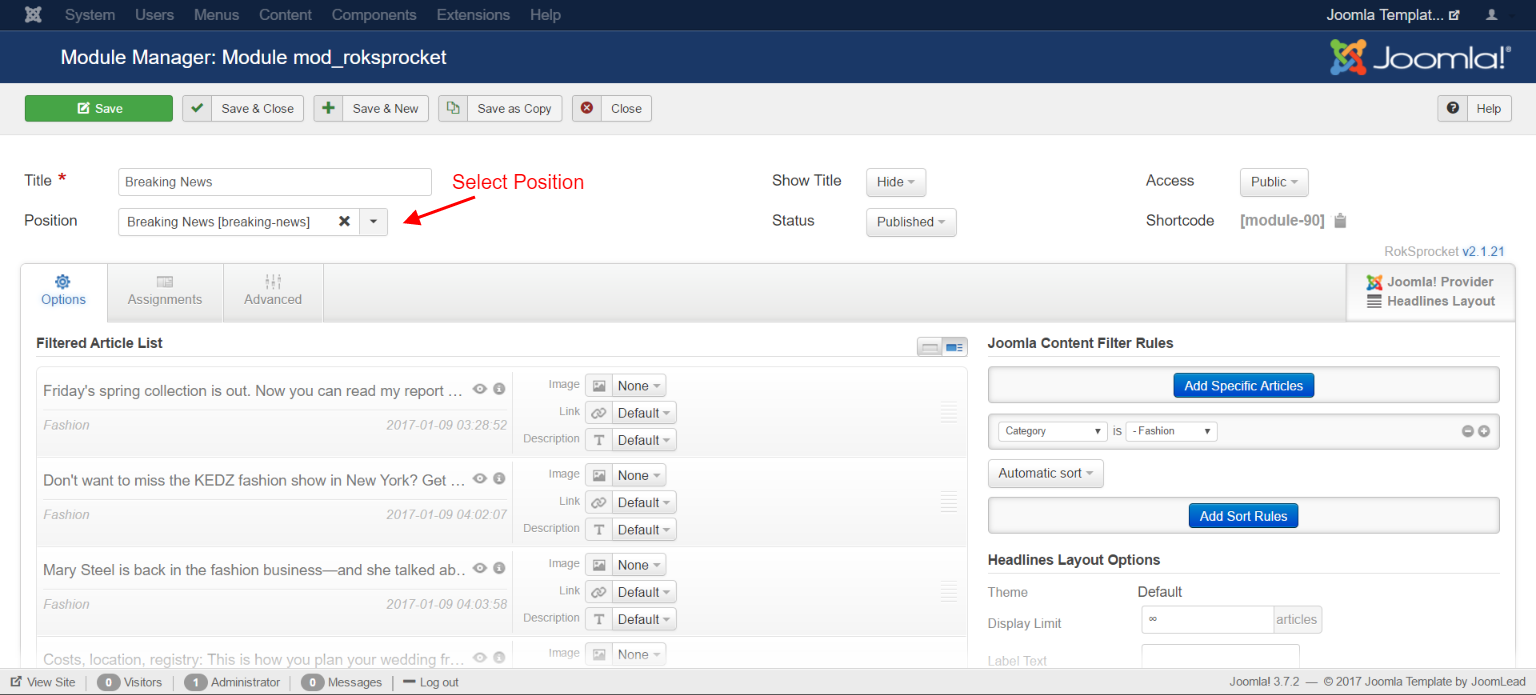
To select which module appears in this place. Go to Extensions -> Modules, select your modules you wish to display, then switch position to the name of module positions, then save it.
3. Changing the Navigation Section
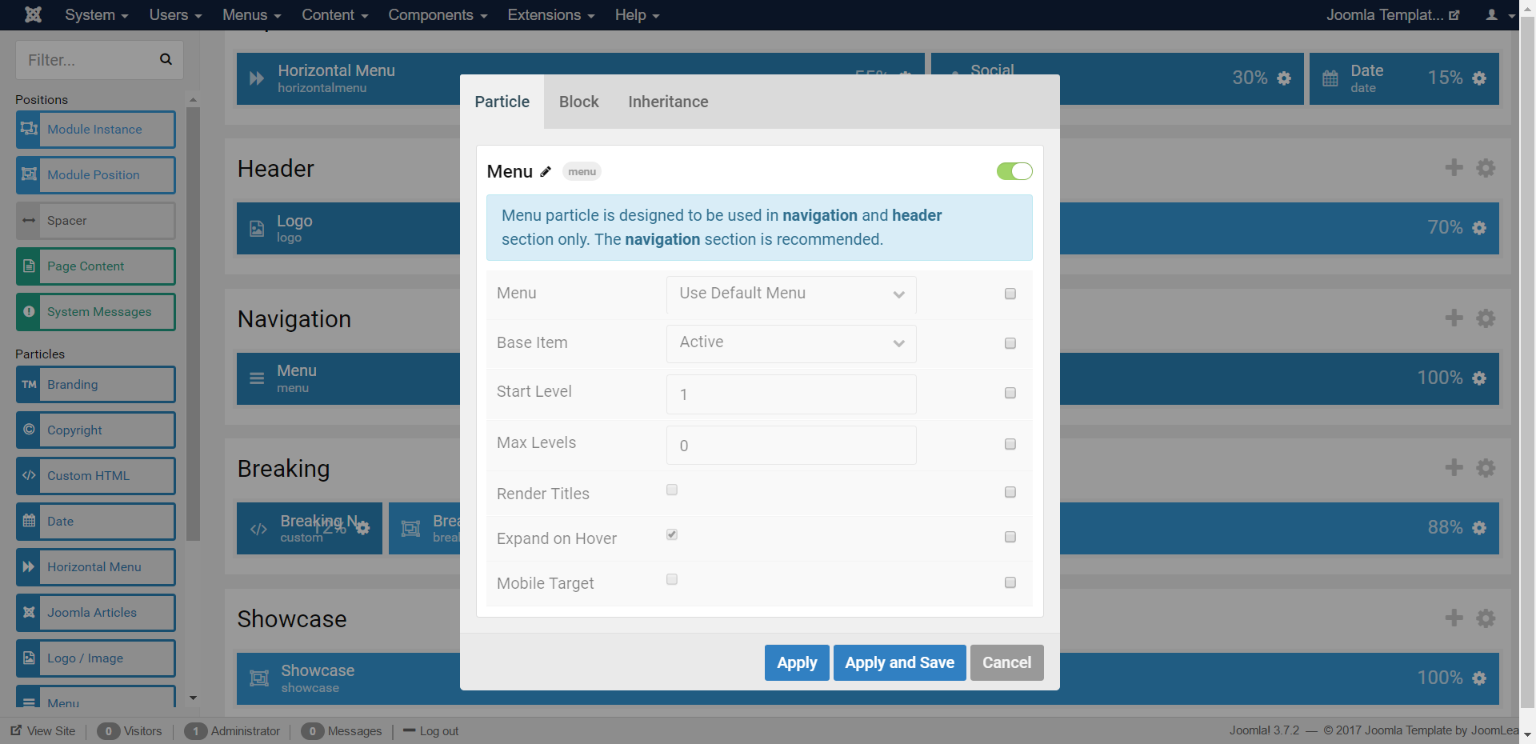
The Navigation Section contains Menu Particles.


Click particle menu settings to config the menu for joomla, for more detail about Menu particle, please take a look at this documentation
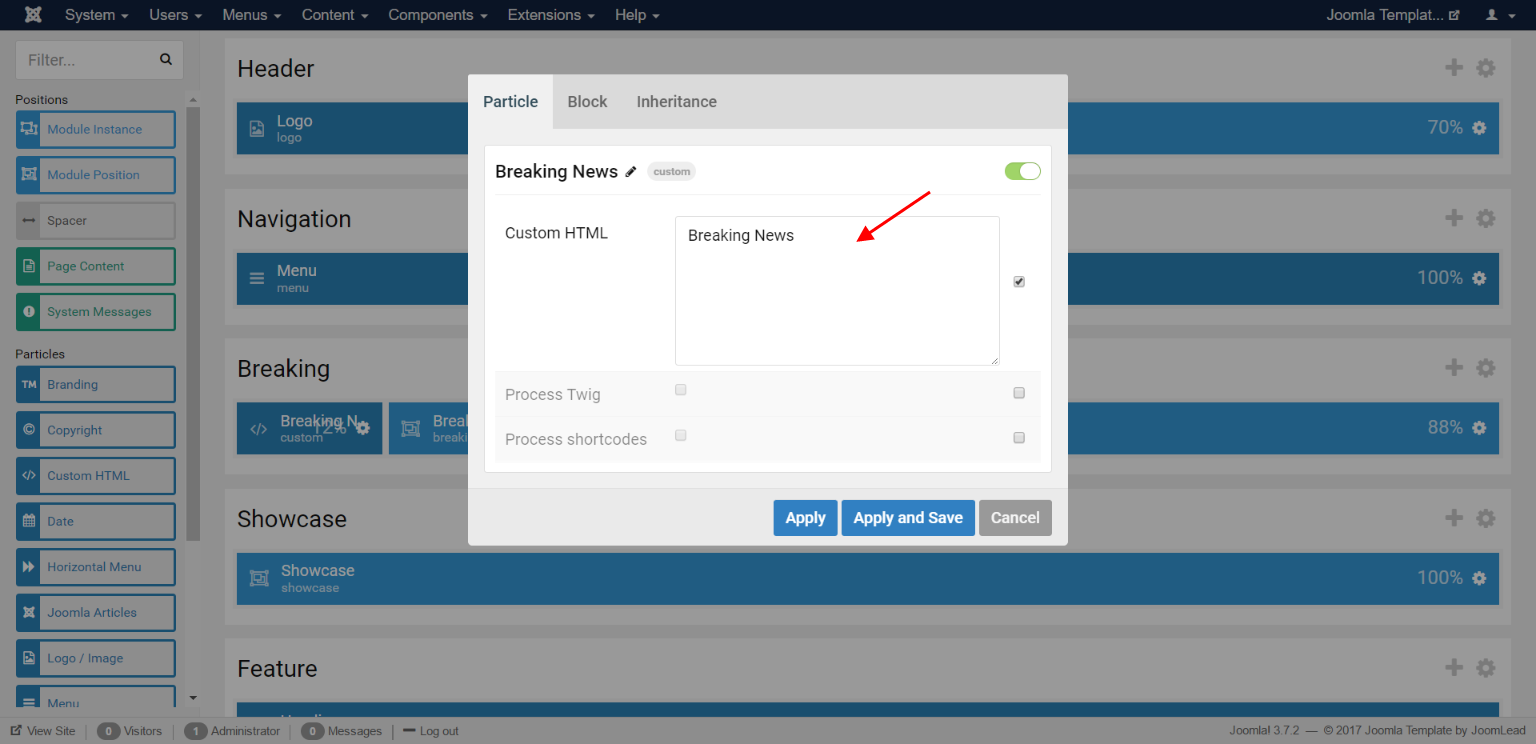
4. Changing the Breaking Section
The Breaking Section contains Breaking News (Custom HTML Particles), Module Position – Breaking News.


To edit the Custom HTML particle, click the Custom HTML particle icon settings.
This module position creates position breaking-news and is assigned with module “breaking-news”. To edit the position name, click the module position particle icon settings. Edit position name on the key field. For more information about Module position, please take a look at Gantry 5 positions document
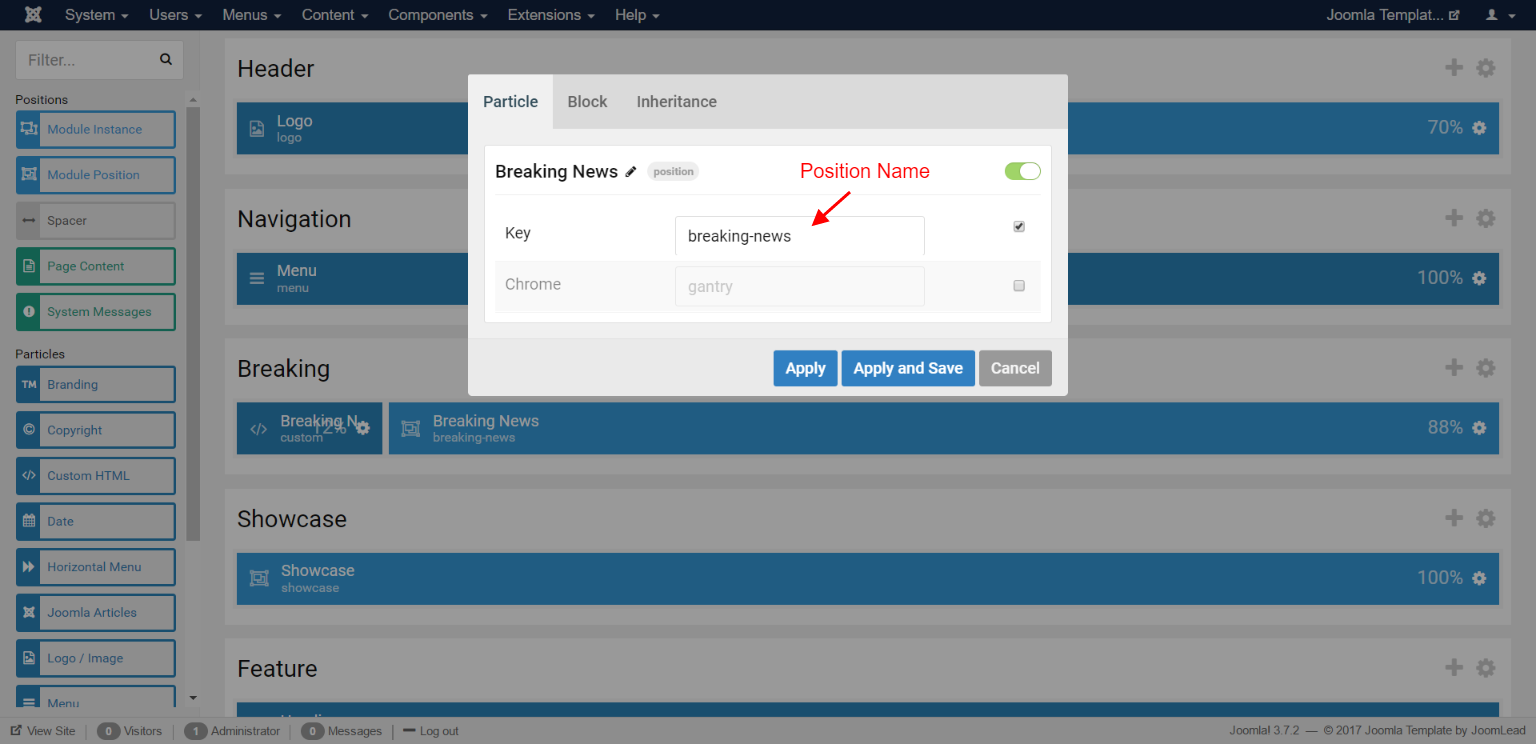
To select which module appears in this place. Go to Extensions -> Modules, select your modules you wish to display, then switch position to the name of module positions, then save it.
5. Changing the Showcase Section
The Showcase Section contains Module Position – Showcase.


This module position creates position showcase and is assigned with module “showcase”. To edit the position name, click the module position particle icon settings. Edit position name on the key field. For more information about Module position, please take a look at Gantry 5 positions document
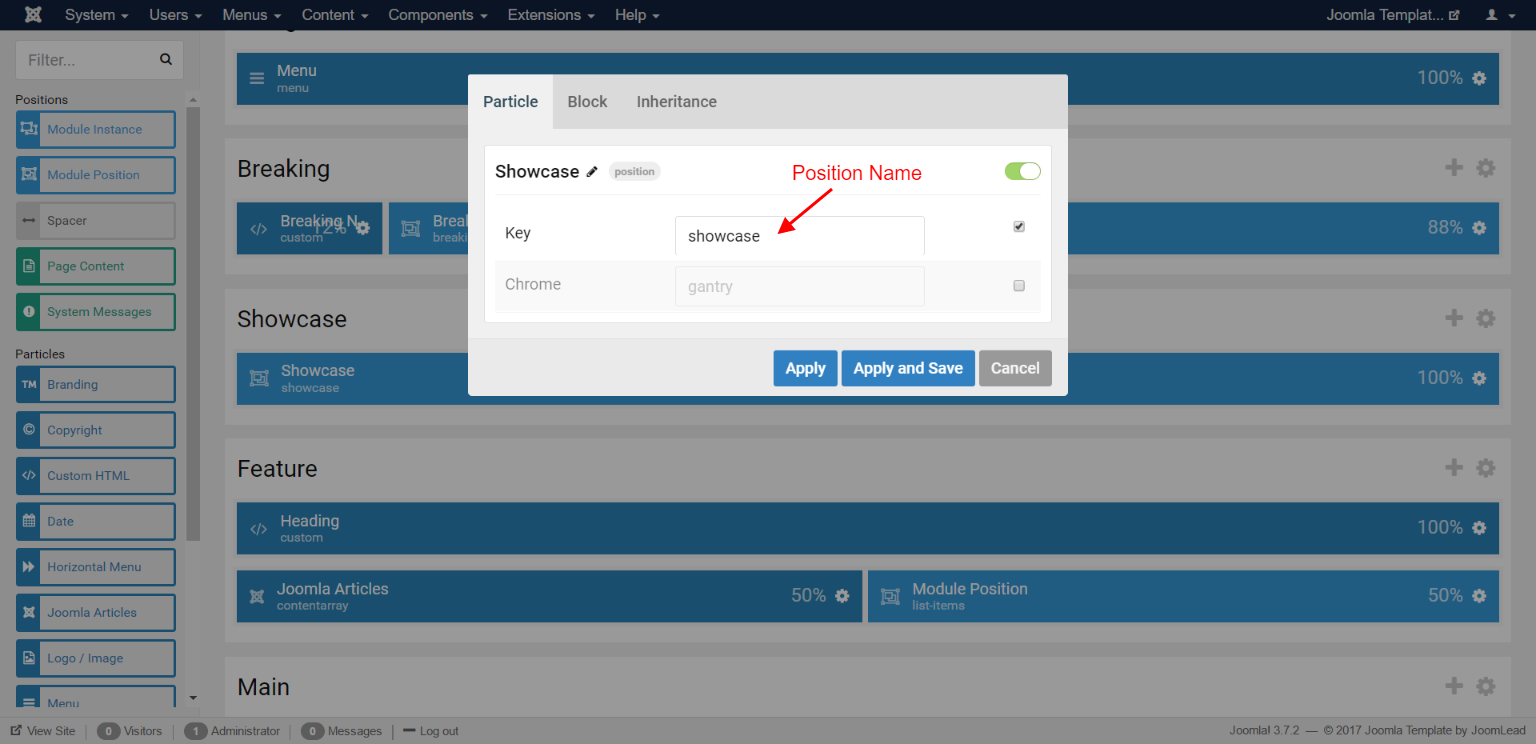
To select which module appears in this place. Go to Extensions -> Modules, select your modules you wish to display, then switch position to the name of module positions, then save it.

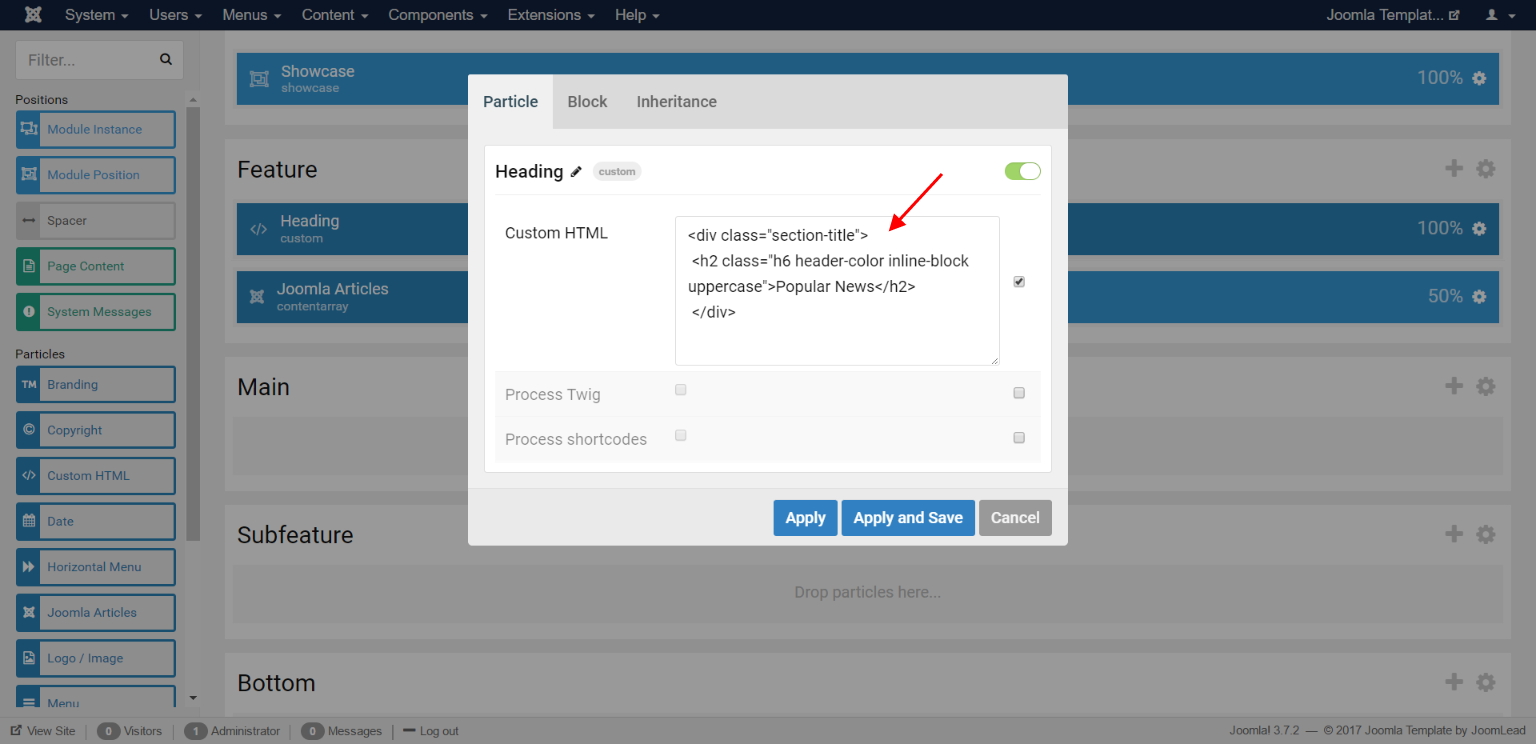
6. Changing the Feature Section
The Feature Section contains 2 rows, row 1 Heading (Custom HTML Particles), row 2 Content Array Particles and Module Position – List Items.
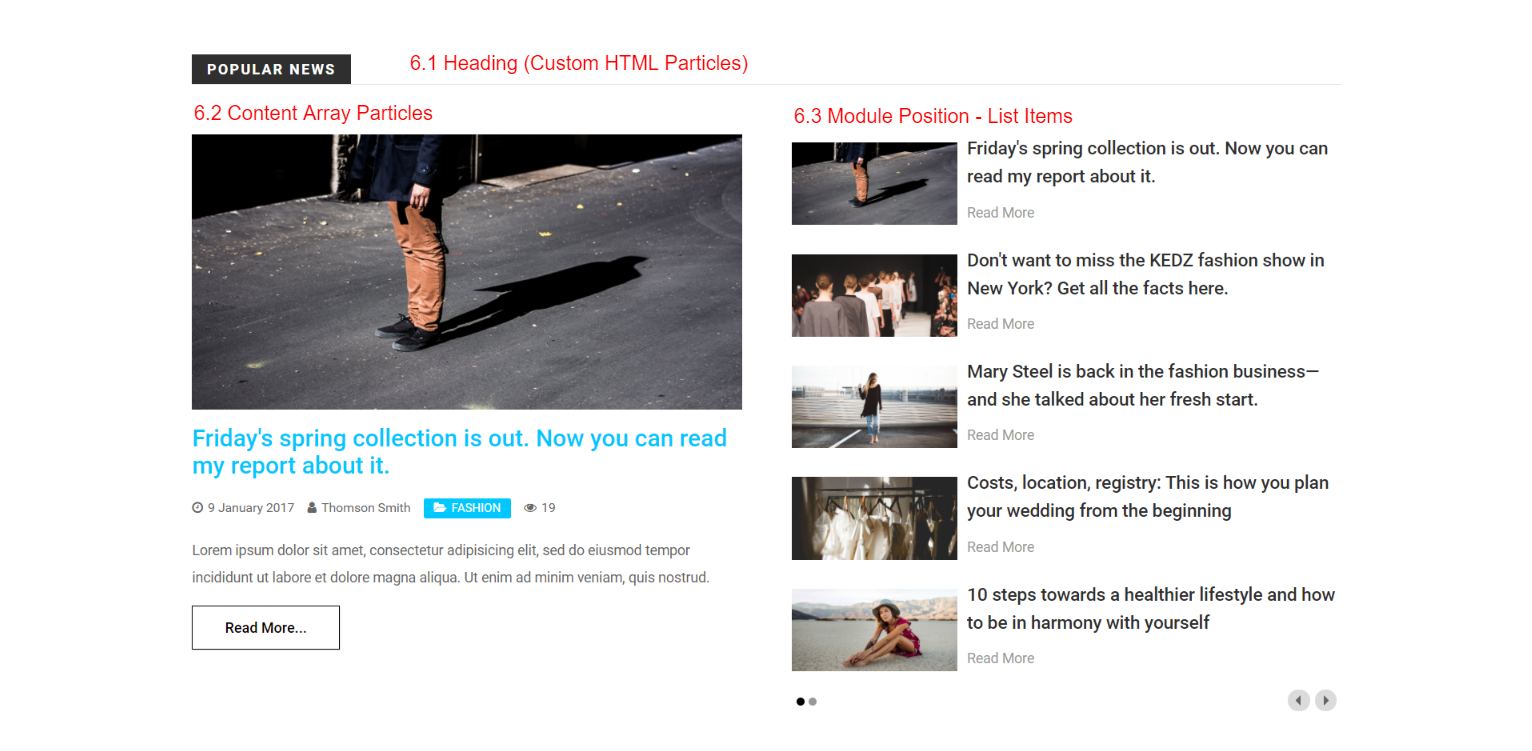

To edit the Custom HTML particle, click the Custom HTML particle icon settings.
To edit the Content Array particle, click the Content Array particle icon settings.

This module position creates position list-items and is assigned with module “list-items”. To edit the position name, click the module position particle icon settings. Edit position name on the key field. For more information about Module position, please take a look at Gantry 5 positions document
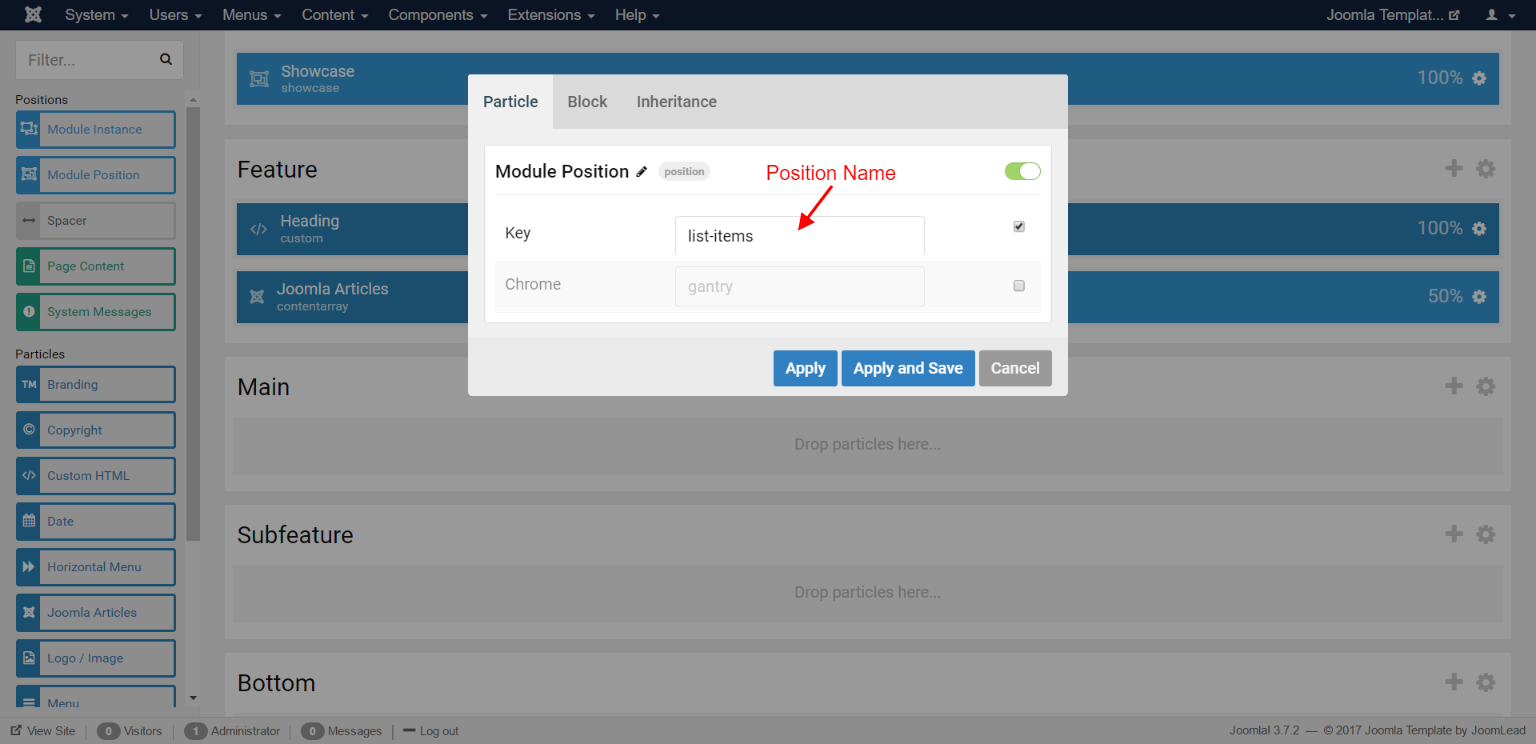
To select which module appears in this place. Go to Extensions -> Modules, select your modules you wish to display, then switch position to the name of module positions, then save it.

7. Changing the Bottom Section
The Feature Section contains Zmagazine About (Custom HTML Particles), Social Particles, Categories (Custom HTML Particles), Module Position – Subcribe Bottom.
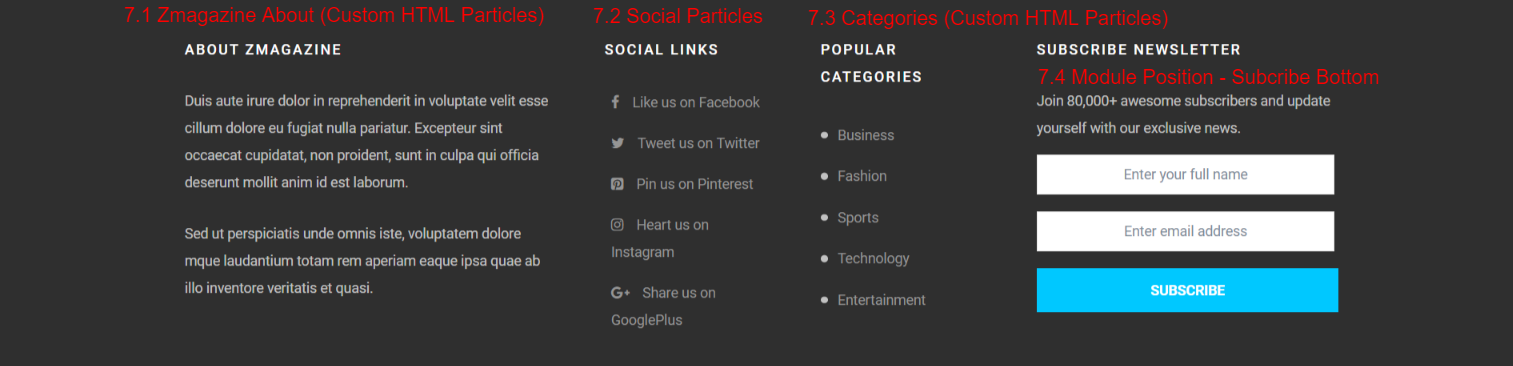

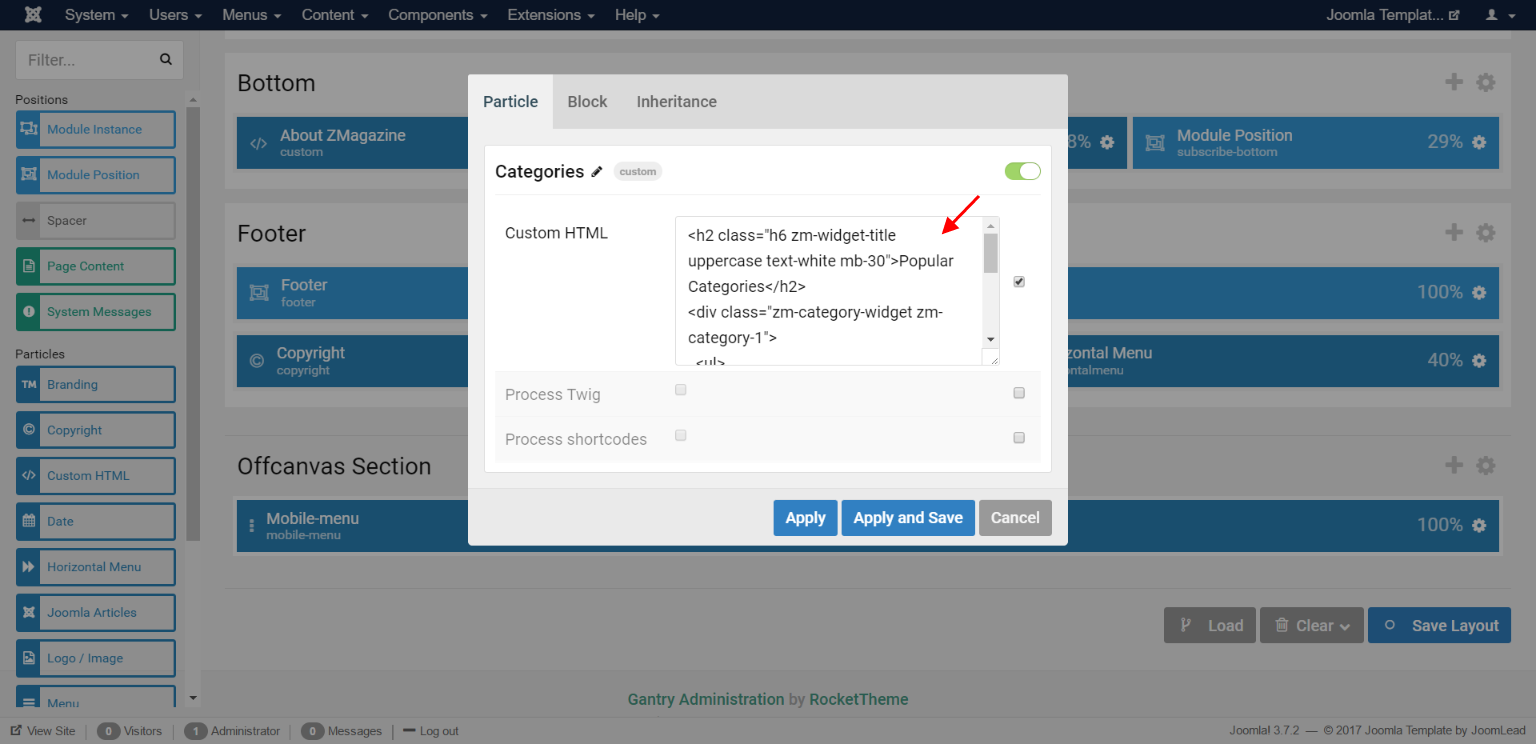
To edit the Custom HTML particle, click the Custom HTML particle icon settings.

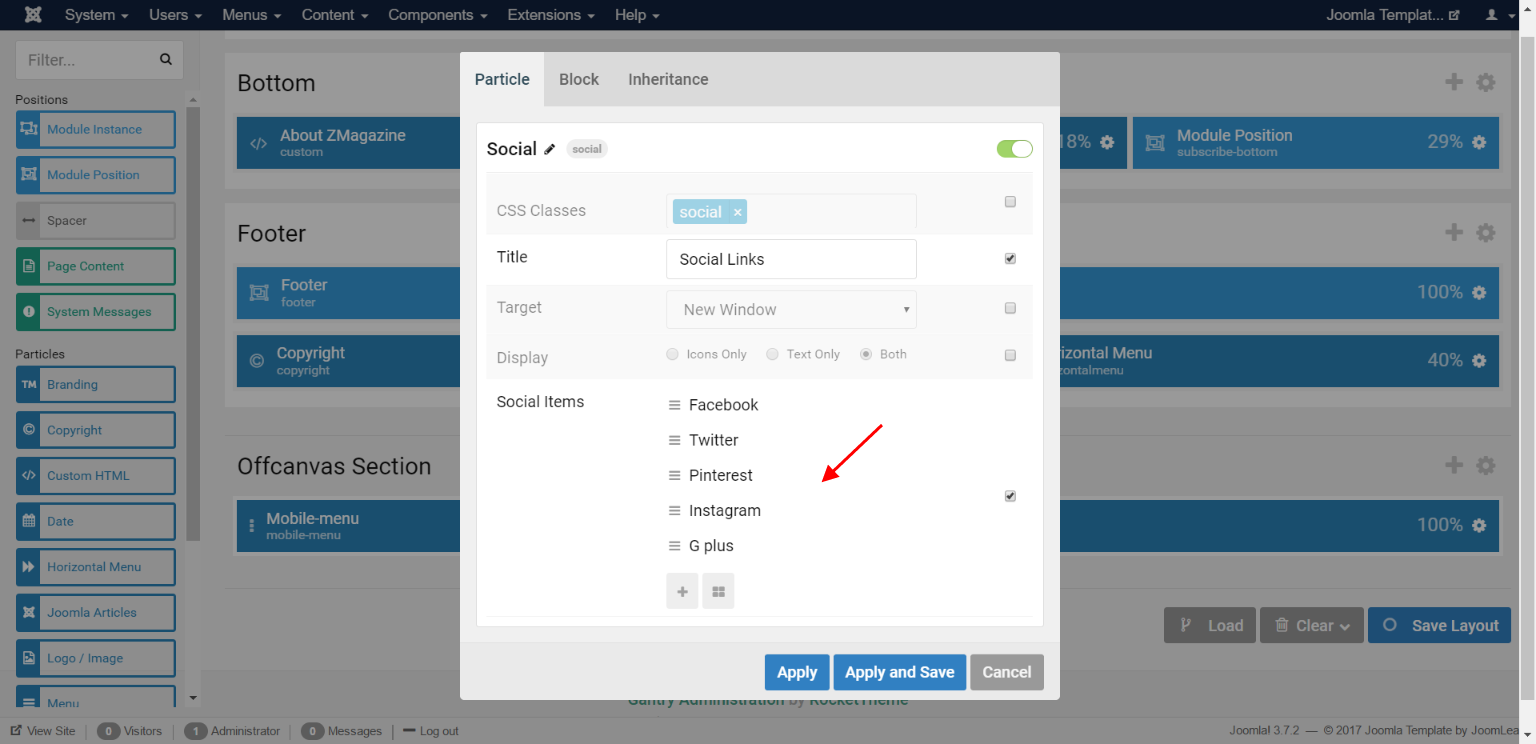
To edit the Social particle, click the Social particle icon settings.
To edit the Custom HTML particle, click the Custom HTML particle icon settings.
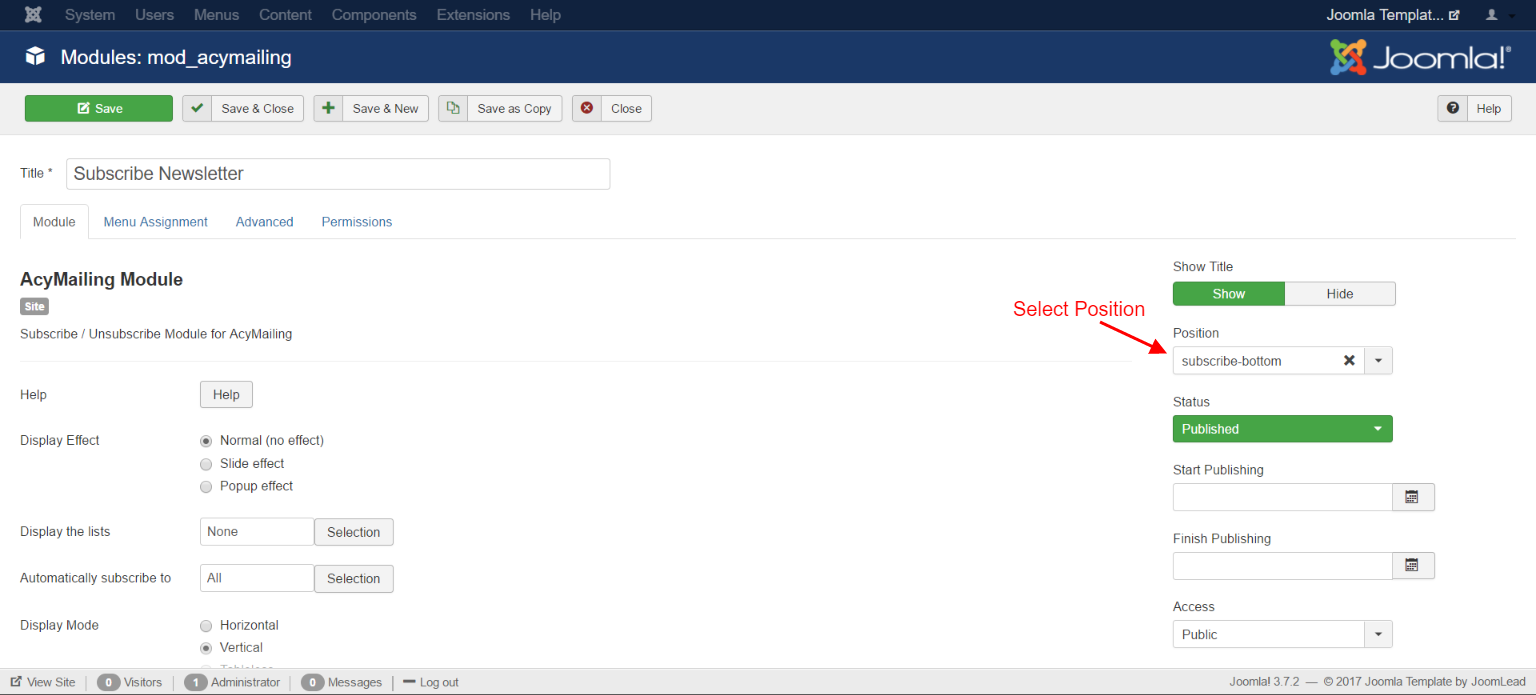
This module position creates position subcribe-bottom and is assigned with module “subcribe-bottom”. To edit the position name, click the module position particle icon settings. Edit position name on the key field. For more information about Module position, please take a look at Gantry 5 positions document

To select which module appears in this place. Go to Extensions -> Modules, select your modules you wish to display, then switch position to the name of module positions, then save it.
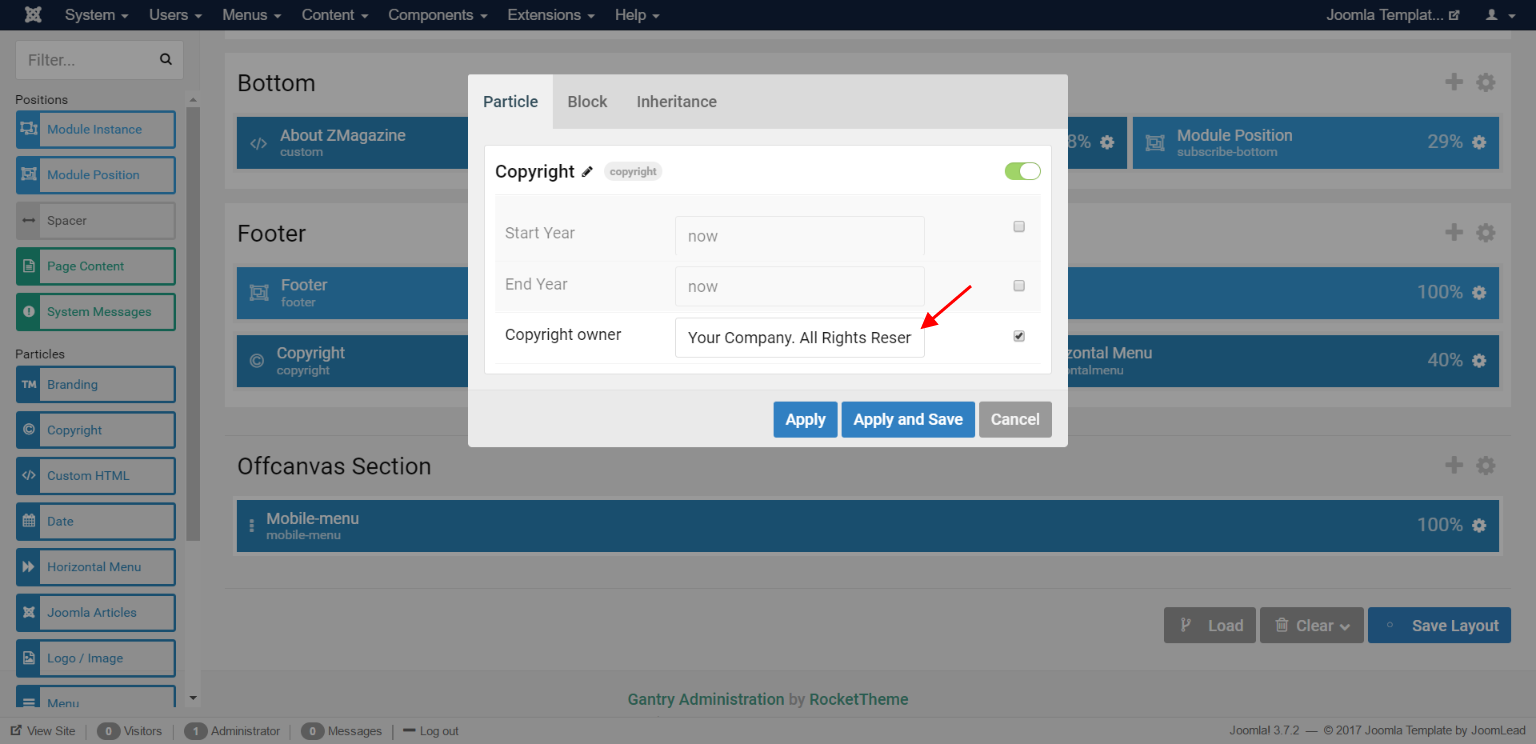
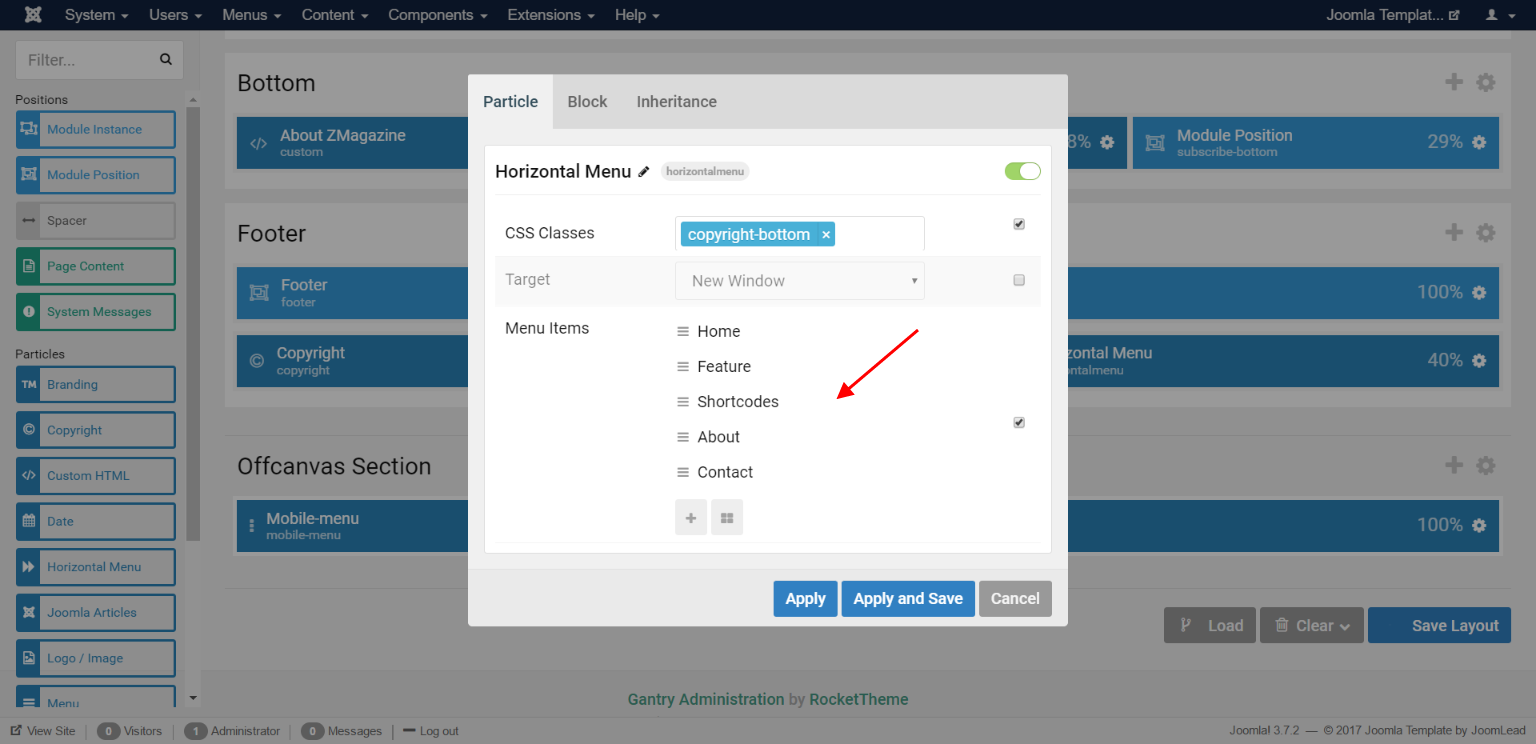
8. Changing the Footer Section
The Feature Section contains 2 rows, row 1 Module Position – Footer, row 2 Coppyright Particles and Horizontal Menu Particles.


This module position creates position footer and is assigned with module “footer”. To edit the position name, click the module position particle icon settings. Edit position name on the key field. For more information about Module position, please take a look at Gantry 5 positions document
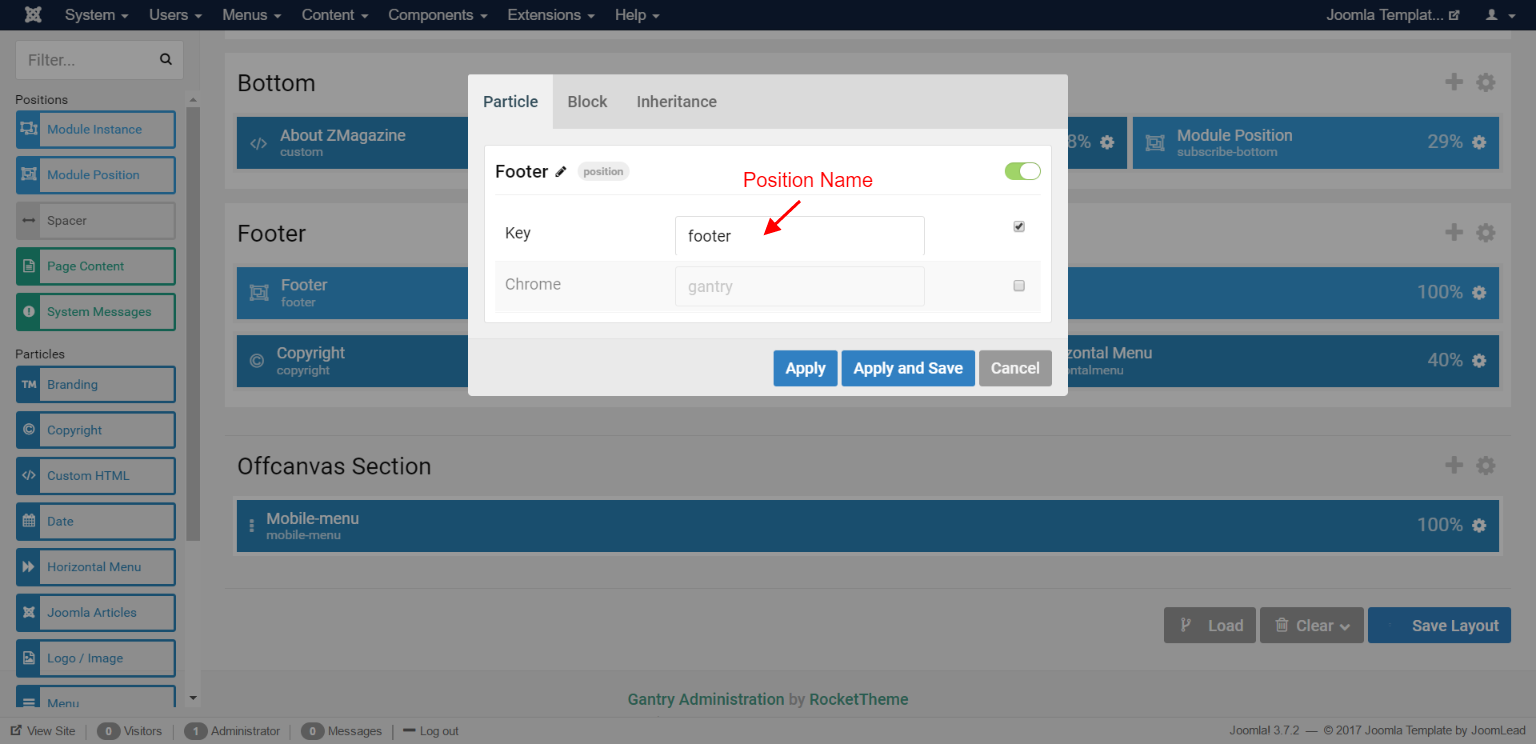
To edit the Coppyright particle, click the Coppyright particle icon settings.
To edit the Horizontal Menu particle, click the Horizontal Menu particle icon settings.
9. Changing the Offcanvas Section
The Offcanvas Section contains Mobile-menu Particles.
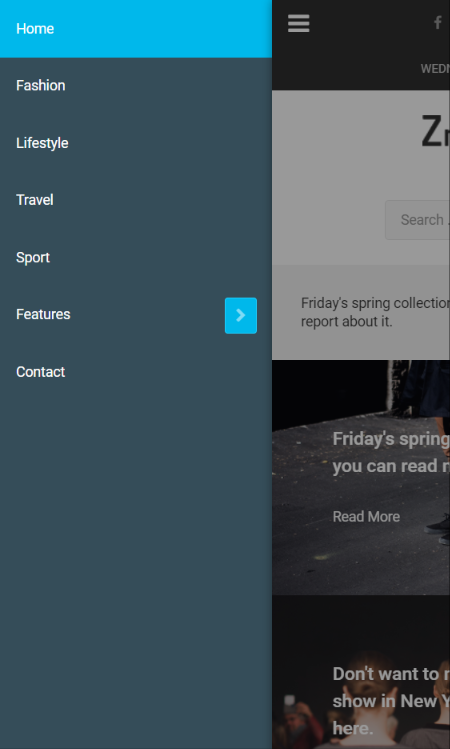

Add the Mobile-menu particles to the menu on the mobile device

Home Page
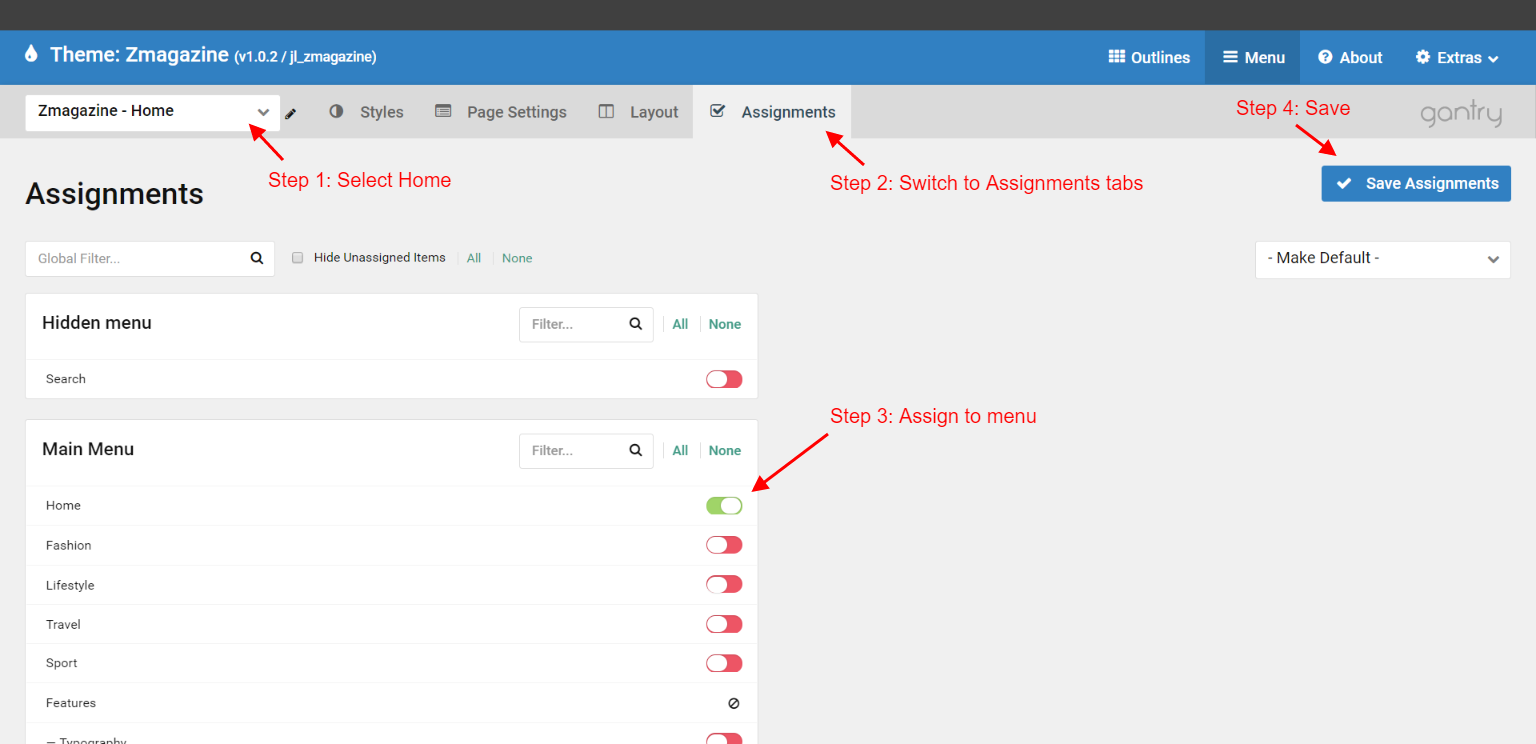
This outline is assigned to Main Menu -> Home. If you want to edit the assignments and move it to another menu, please select Home from the outline list then switch to Assignments tab. You can assign this outline to whatever menu you want, then click the save assignments button.
Home Layout
1. Changing the Top section
The Top section inherited from base outline so it copies particles and settings from base outline. If you want to edit this section for all pages, please go to Base Outline -> Section 1 above to edit the Top. If you want to edit for only Home Page, remove the inheritance then edit it like Base Outline -> Section 1 above.
2. Changing the Header section
The Header section inherited from base outline so it copies particles and settings from base outline. If you want to edit this section for all pages, please go to Base Outline -> Section 2 above to edit the Header. If you want to edit for only Home Page, remove the inheritance then edit it like Base Outline -> Section 2 above.
3. Changing the Navigation section
The Navigation section inherited from base outline so it copies particles and settings from base outline. If you want to edit this section for all pages, please go to Base Outline -> Section 3 above to edit the Navigation. If you want to edit for only Home Page, remove the inheritance then edit it like Base Outline -> Section 3 above.
4. Changing the Breaking section
The Breaking section inherited from base outline so it copies particles and settings from base outline. If you want to edit this section for all pages, please go to Base Outline -> Section 4 above to edit the Breaking. If you want to edit for only Home Page, remove the inheritance then edit it like Base Outline -> Section 4 above.
5. Changing the Showcase section
The Showcase section inherited from base outline so it copies particles and settings from base outline. If you want to edit this section for all pages, please go to Base Outline -> Section 5 above to edit the Showcase. If you want to edit for only Home Page, remove the inheritance then edit it like Base Outline -> Section 5 above.
6. Changing the Feature section
The Feature section inherited from base outline so it copies particles and settings from base outline. If you want to edit this section for all pages, please go to Base Outline -> Section 6 above to edit the Feature. If you want to edit for only Home Page, remove the inheritance then edit it like Base Outline -> Section 6 above.
7. Changing Container World section
The Container World Section contains 2 Section : World and Editor.

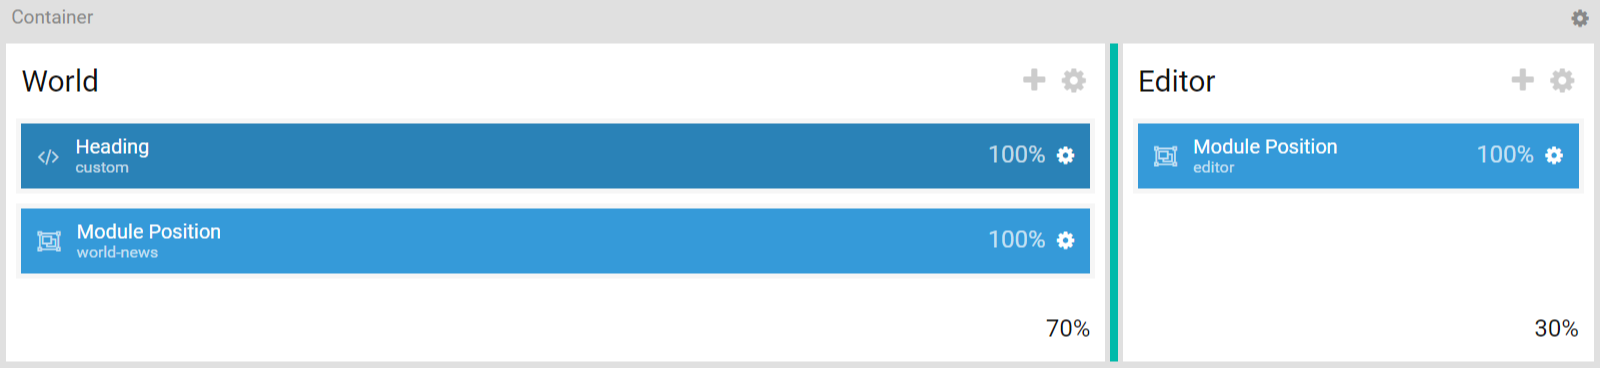
7.1 Changing World section
The World Section contains 2 rows, row 1 Heading (Custom HTML Particles), row 2 Module Position – World News.

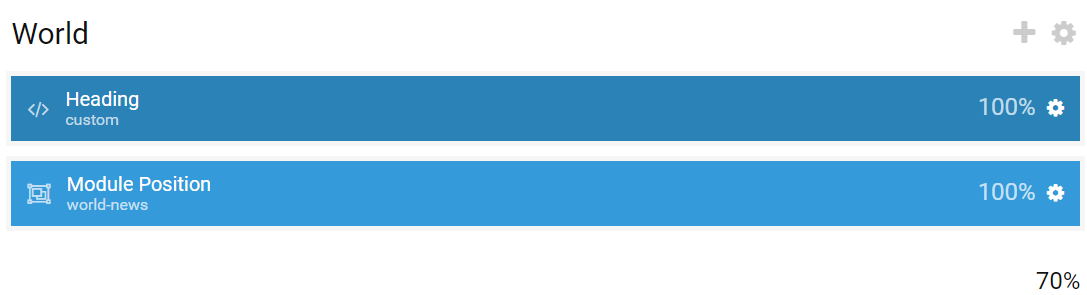
To edit the Custom HTML particle, click the Custom HTML particle icon settings.
This module position creates position world-news and is assigned with module “world-news”. To edit the position name, click the module position particle icon settings. Edit position name on the key field. For more information about Module position, please take a look at Gantry 5 positions document

To select which module appears in this place. Go to Extensions -> Modules, select your modules you wish to display, then switch position to the name of module positions, then save it.

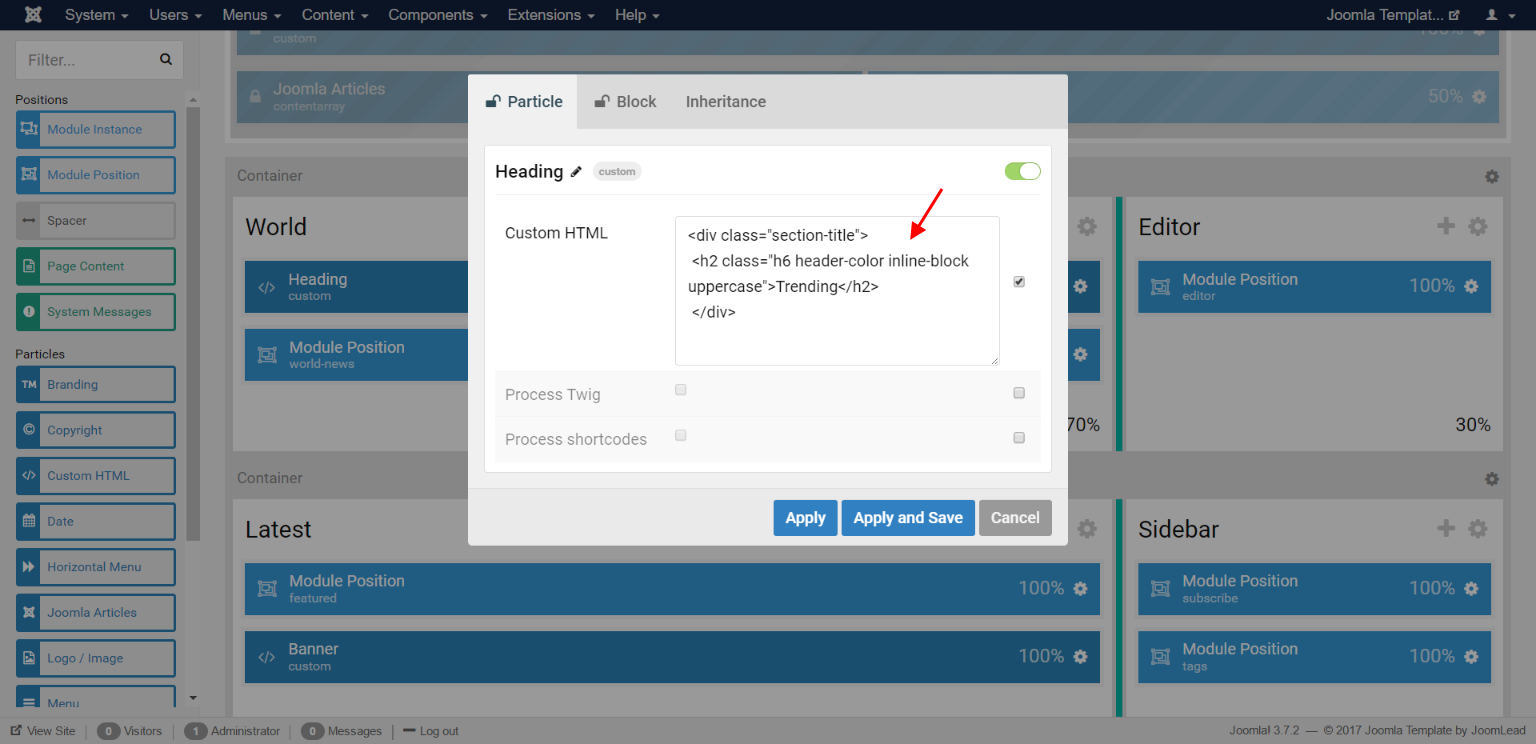
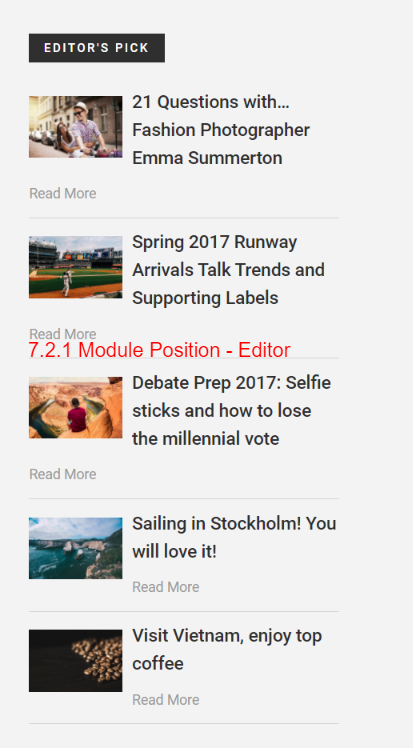
7.2 Changing Edior section
The Edior Section contains Module Position – Editor.

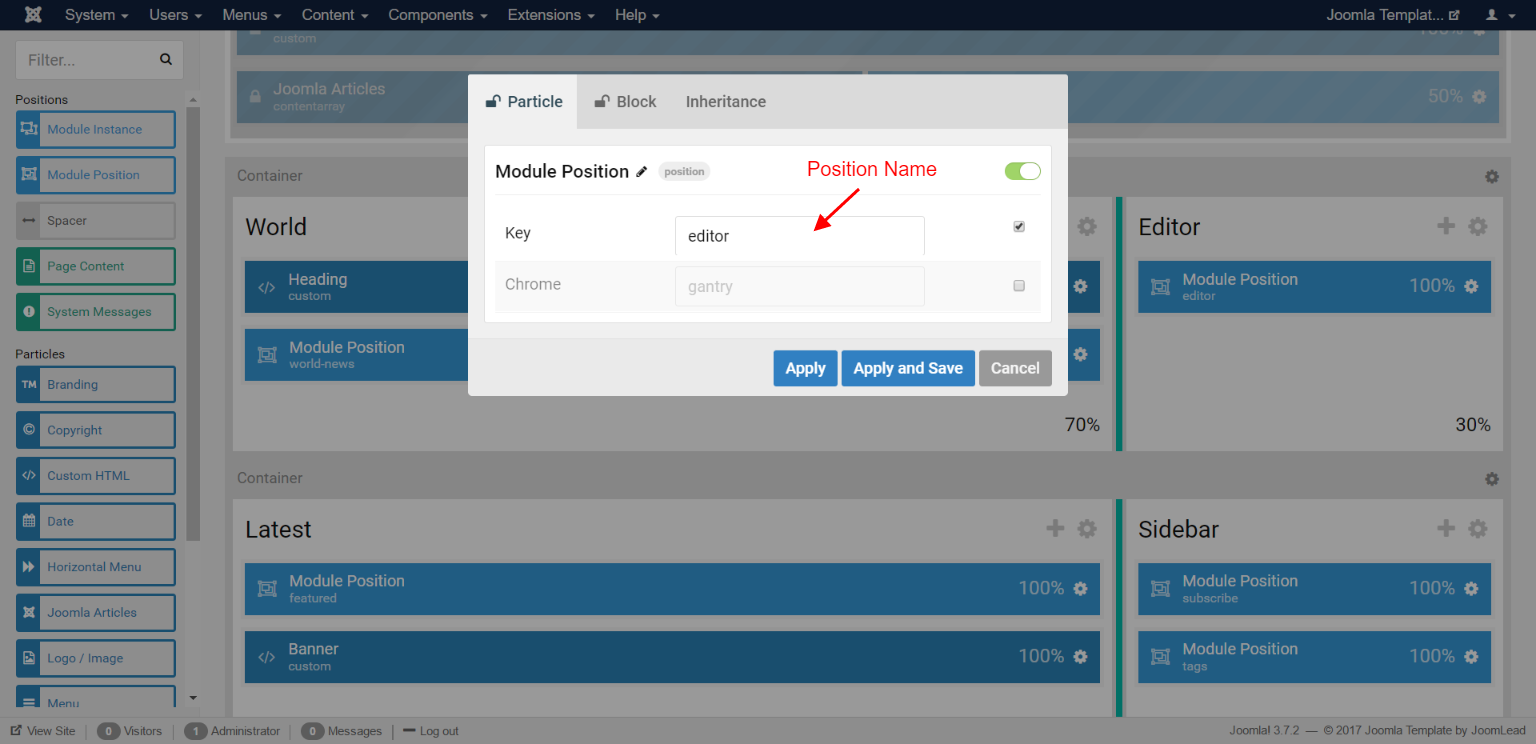
This module position creates position editor and is assigned with module “editor”. To edit the position name, click the module position particle icon settings. Edit position name on the key field. For more information about Module position, please take a look at Gantry 5 positions document
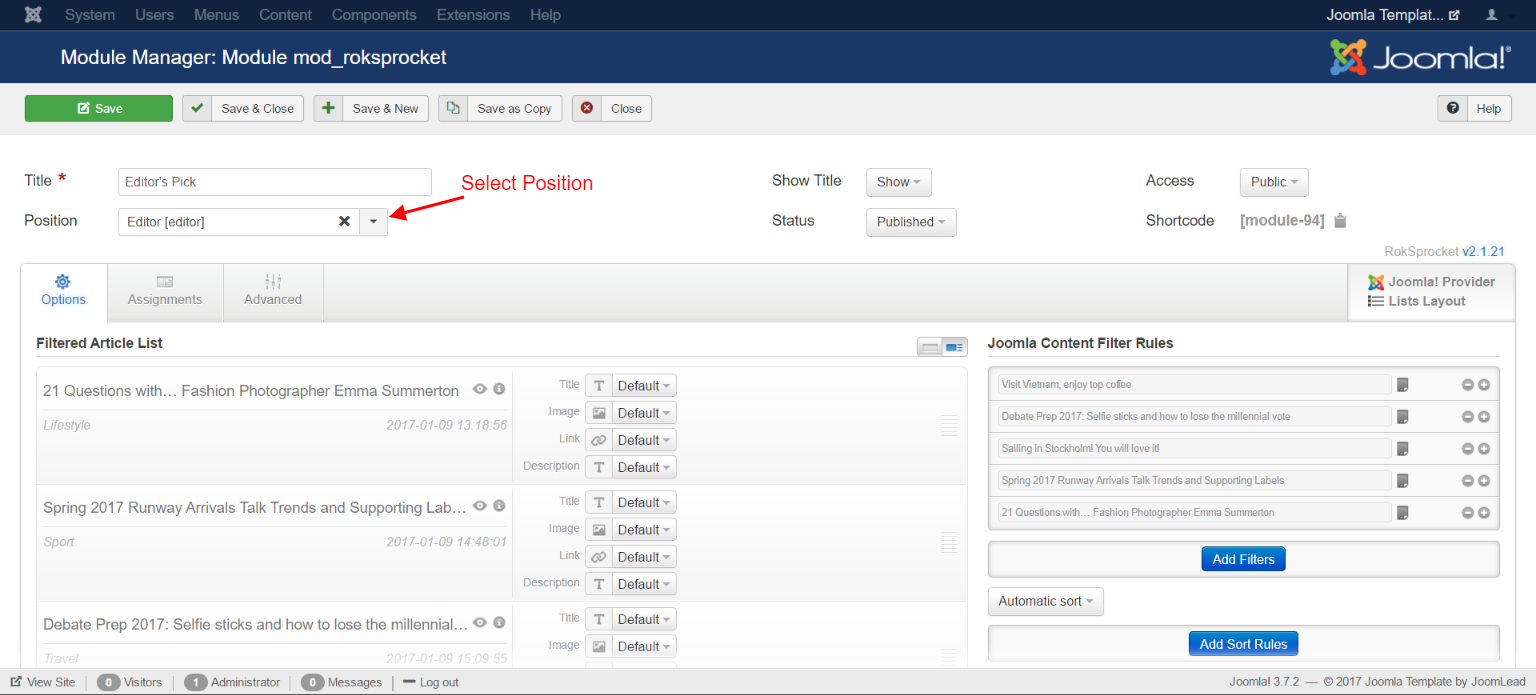
To select which module appears in this place. Go to Extensions -> Modules, select your modules you wish to display, then switch position to the name of module positions, then save it.
8. Changing the Container Latest section
The Container Latest Section contains 2 Section : Latest and Sidebar.
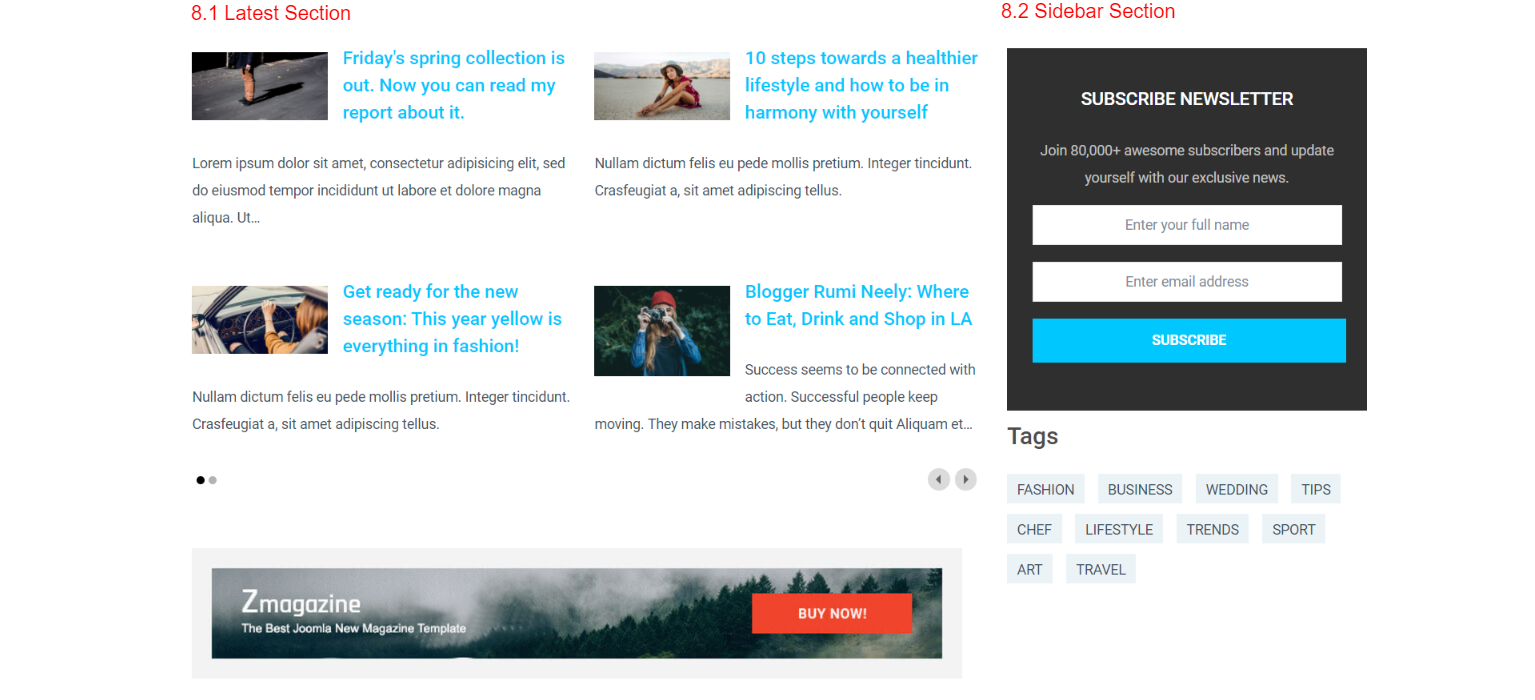
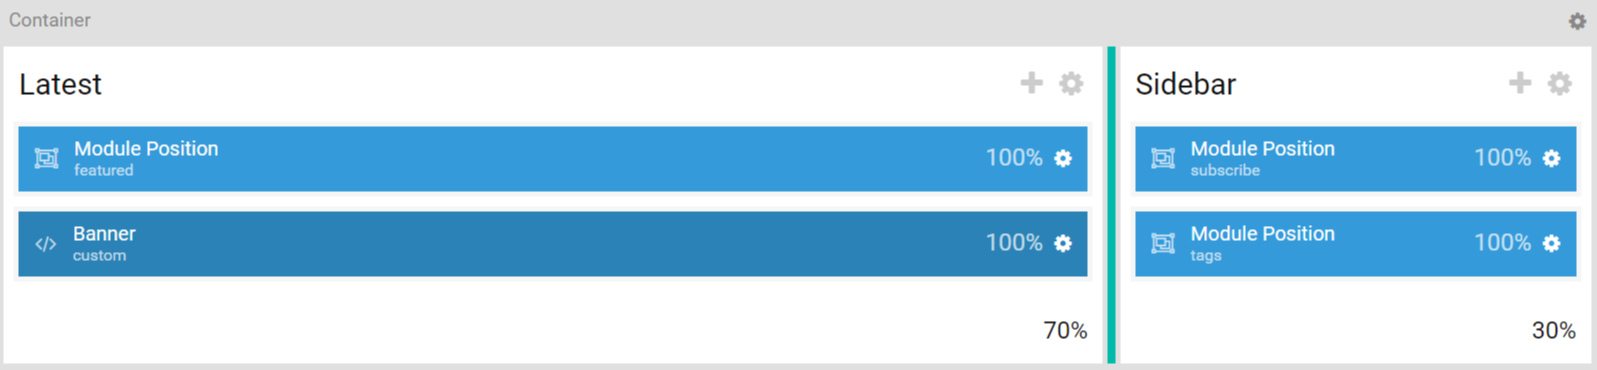
8.1 Changing the Latest section
The Latest Section contains 2 rows, row 1 Module Position – Featured, row 2 Banner (Custom HTML Particles).


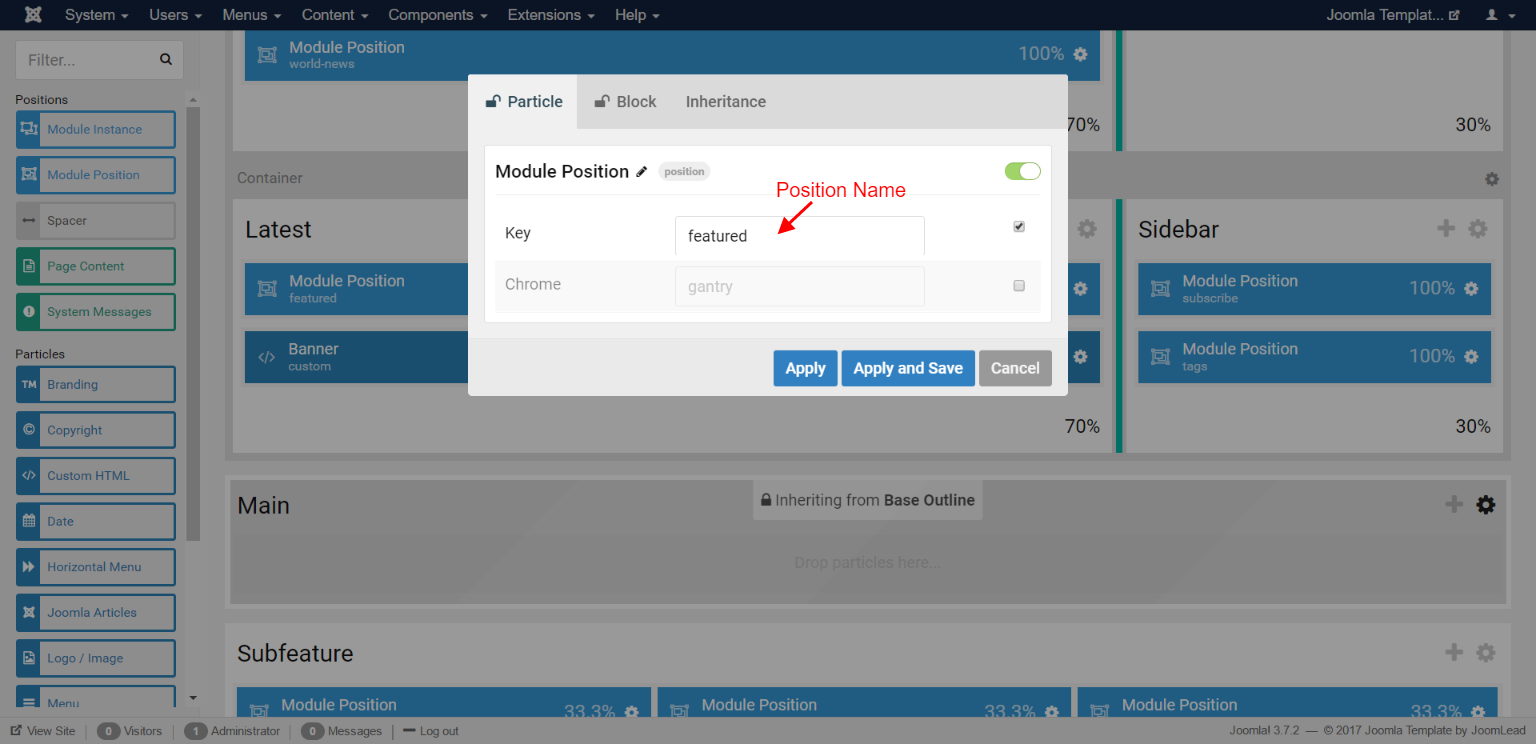
This module position creates position featured and is assigned with module “featured”. To edit the position name, click the module position particle icon settings. Edit position name on the key field. For more information about Module position, please take a look at Gantry 5 positions document
To select which module appears in this place. Go to Extensions -> Modules, select your modules you wish to display, then switch position to the name of module positions, then save it.

To edit the Custom HTML particle, click the Custom HTML particle icon settings.

8.2 Changing the Sidebar section
The Sidebar Section contains 2 rows, row 1 Module Position – Subscribe, row 2 Module Position – Tags.
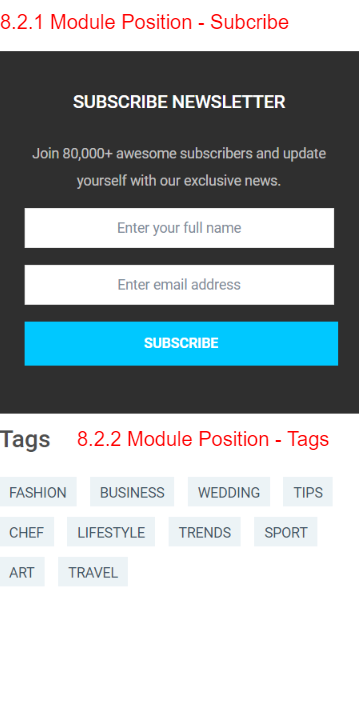

This module position creates position subscribe and is assigned with module “subscribe”. To edit the position name, click the module position particle icon settings. Edit position name on the key field. For more information about Module position, please take a look at Gantry 5 positions document

To select which module appears in this place. Go to Extensions -> Modules, select your modules you wish to display, then switch position to the name of module positions, then save it.

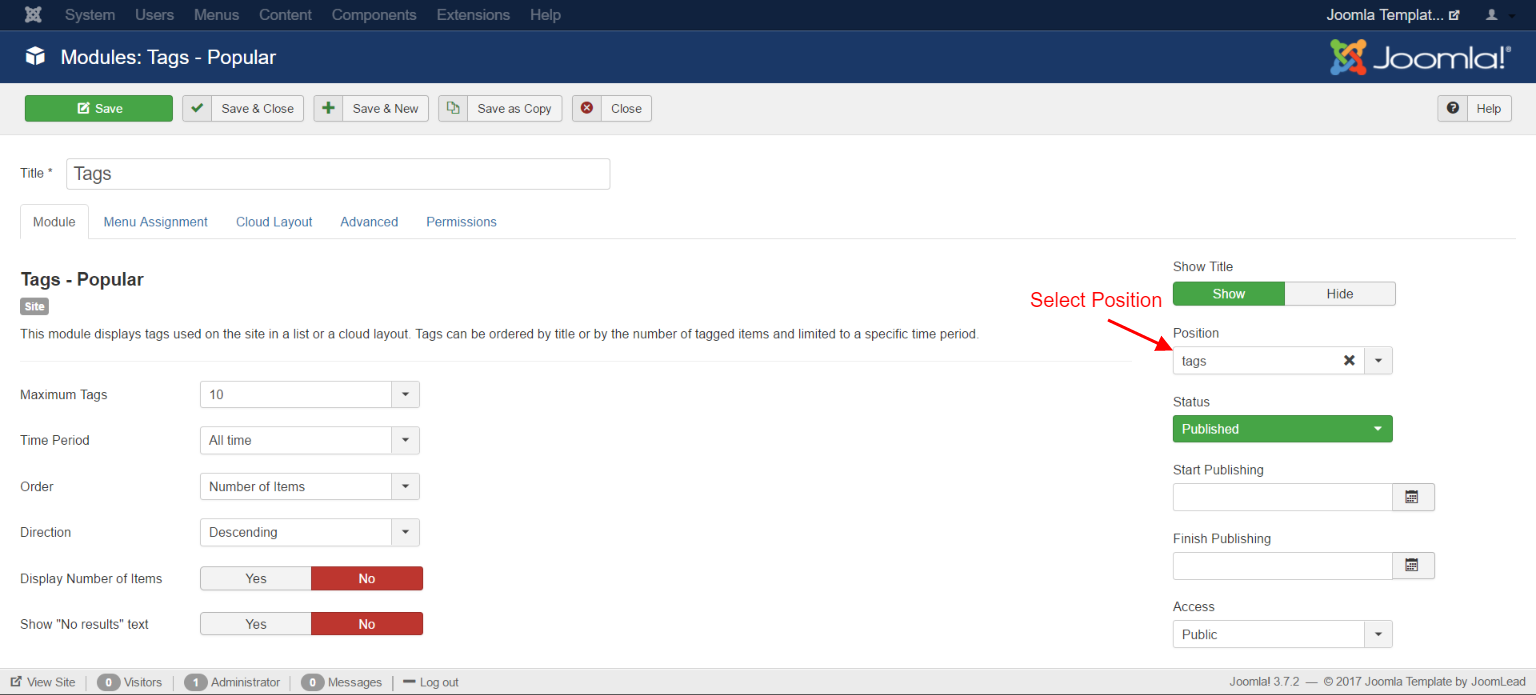
This module position creates position tags and is assigned with module “tags”. To edit the position name, click the module position particle icon settings. Edit position name on the key field. For more information about Module position, please take a look at Gantry 5 positions document

To select which module appears in this place. Go to Extensions -> Modules, select your modules you wish to display, then switch position to the name of module positions, then save it.
9. Changing the Subfeature section
The Sidebar Section contains Module Position – Lifestyle, Module Position – Sport, Module Position – travel.


This module position creates position lifestyle and is assigned with module “lifestyle”. To edit the position name, click the module position particle icon settings. Edit position name on the key field. For more information about Module position, please take a look at Gantry 5 positions document

To select which module appears in this place. Go to Extensions -> Modules, select your modules you wish to display, then switch position to the name of module positions, then save it.

This module position creates position sport and is assigned with module “sport”. To edit the position name, click the module position particle icon settings. Edit position name on the key field. For more information about Module position, please take a look at Gantry 5 positions document
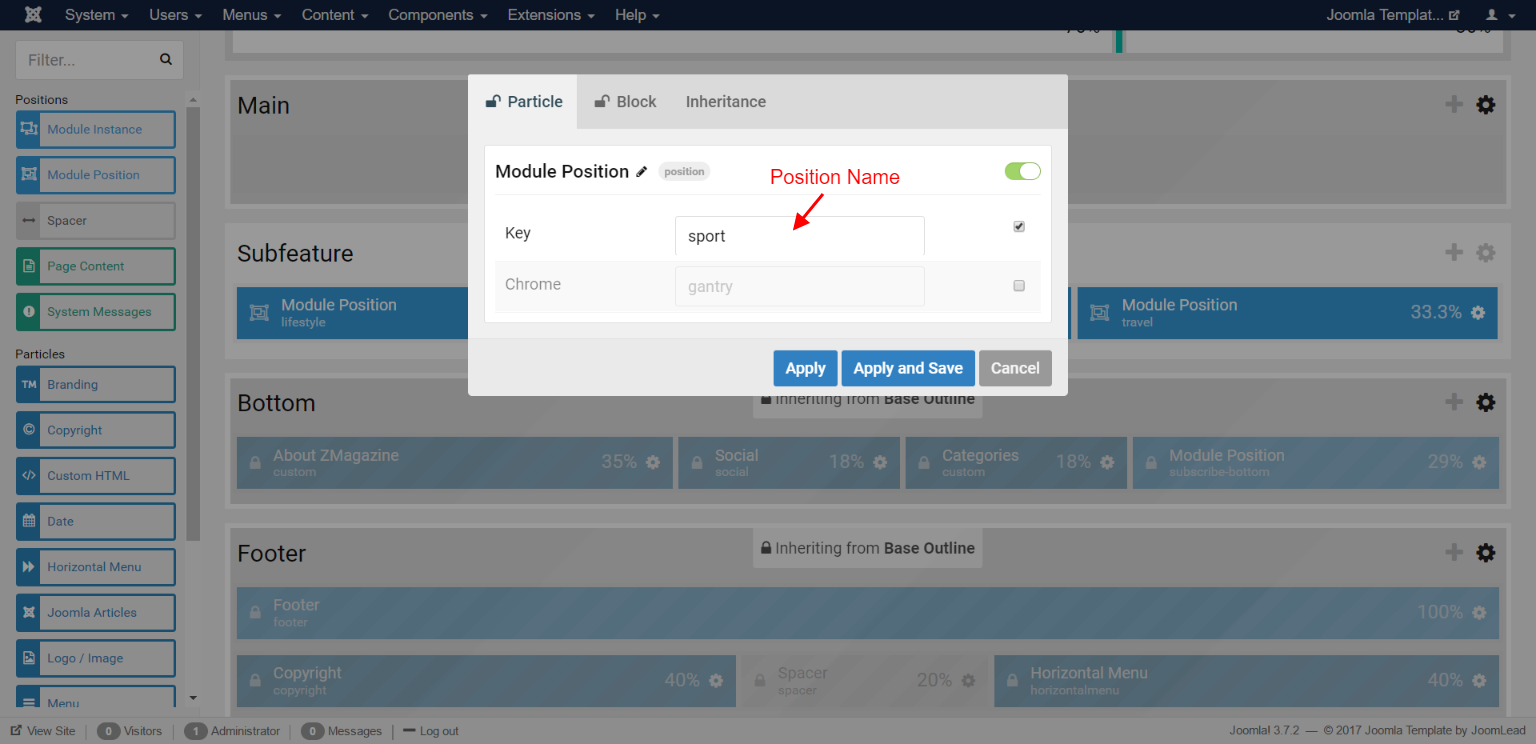
To select which module appears in this place. Go to Extensions -> Modules, select your modules you wish to display, then switch position to the name of module positions, then save it.

This module position creates position travel and is assigned with module “travel”. To edit the position name, click the module position particle icon settings. Edit position name on the key field. For more information about Module position, please take a look at Gantry 5 positions document

To select which module appears in this place. Go to Extensions -> Modules, select your modules you wish to display, then switch position to the name of module positions, then save it.

10. Changing the Bottom section
The Bottom section inherited from base outline so it copies particles and settings from base outline. If you want to edit this section for all pages, please go to Base Outline -> Section 7 above to edit the Bottom. If you want to edit for only Home Page, remove the inheritance then edit it like Base Outline -> Section 7 above.
11. Changing the Footer section
The Footer section inherited from base outline so it copies particles and settings from base outline. If you want to edit this section for all pages, please go to Base Outline -> Section 8 above to edit the Footer. If you want to edit for only Home Page, remove the inheritance then edit it like Base Outline -> Section 8 above.
12. Changing the Offcanvas section
The Offcanvas section inherited from base outline so it copies particles and settings from base outline. If you want to edit this section for all pages, please go to Base Outline -> Section 9 above to edit the Offcanvas. If you want to edit for only Home Page, remove the inheritance then edit it like Base Outline -> Section 9 above.
Contact Page
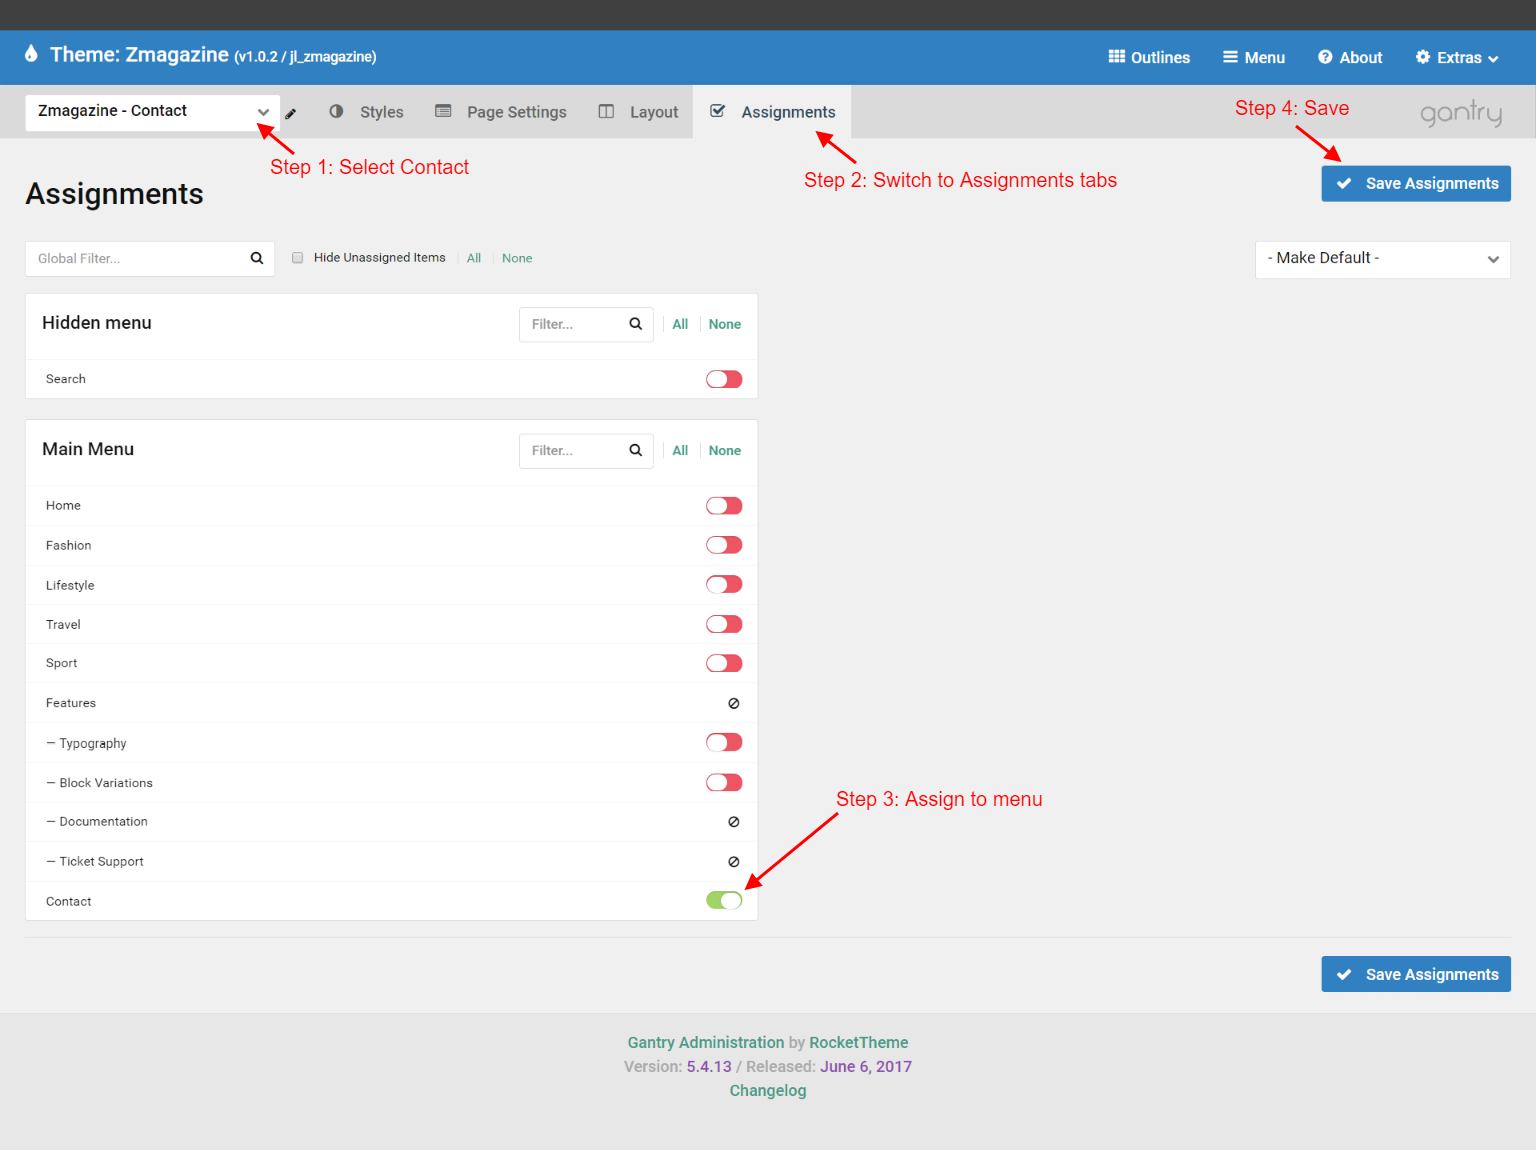
This outline is assigned to Main Menu -> Contact. If you want to edit the assignments and move it to another menu, please select Contact from the outline list then switch to Assignments tab. You can assign this outline to whatever menu you want, then click the save assignments button.
Contact Layout

1. Changing the Top section
The Top section inherited from base outline so it copies particles and settings from base outline. If you want to edit this section for all pages, please go to Base Outline -> Section 1 above to edit the Top. If you want to edit for only Contact Page, remove the inheritance then edit it like Base Outline -> Section 1 above.
2. Changing the Header section
The Header section inherited from base outline so it copies particles and settings from base outline. If you want to edit this section for all pages, please go to Base Outline -> Section 2 above to edit the Header. If you want to edit for only Contact Page, remove the inheritance then edit it like Base Outline -> Section 2 above.
3. Changing the Navigation section
The Navigation section inherited from base outline so it copies particles and settings from base outline. If you want to edit this section for all pages, please go to Base Outline -> Section 3 above to edit the Navigation. If you want to edit for only Contact Page, remove the inheritance then edit it like Base Outline -> Section 3 above.
4. Changing the Showcase section
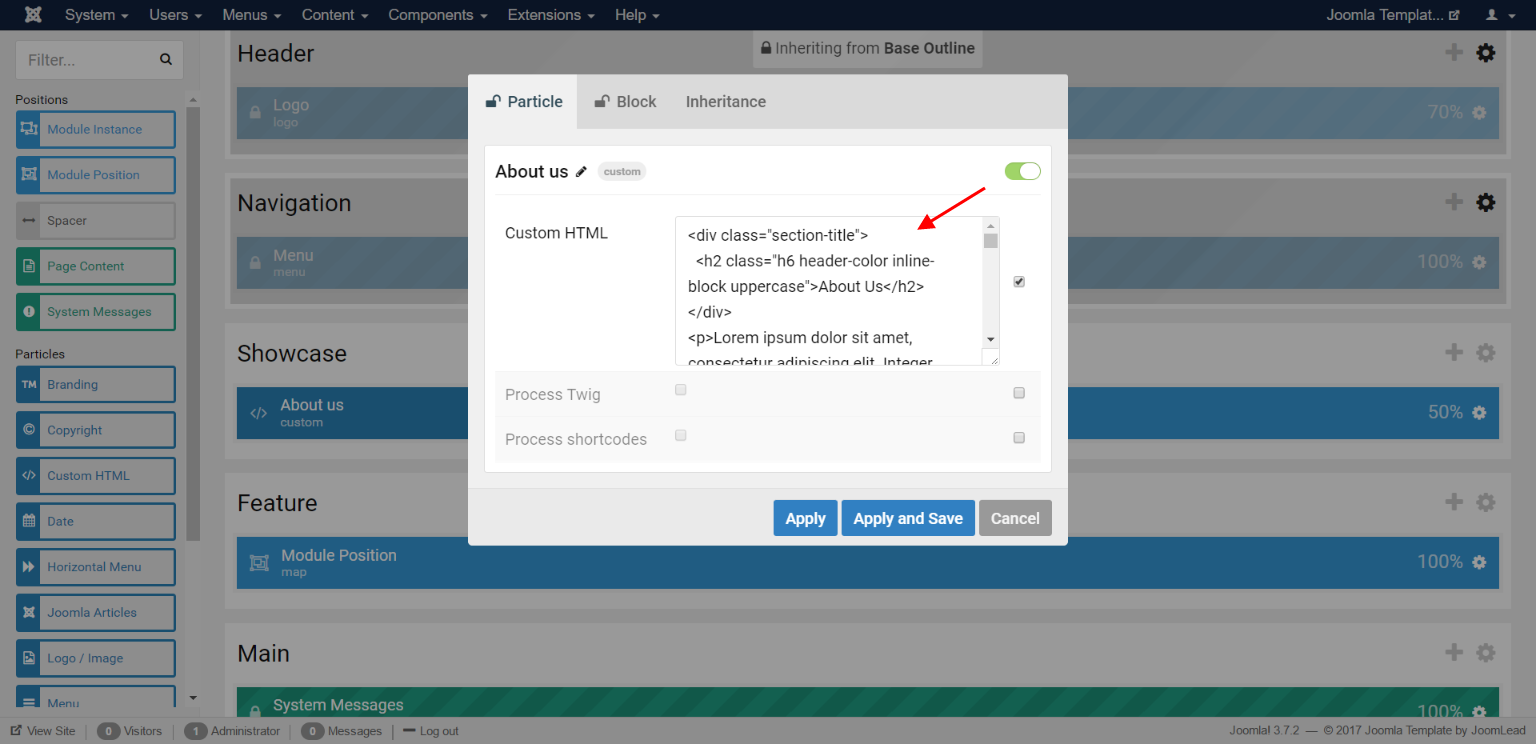
The Showcase Section contains About us (Custom HTML Particles) and Module Position – Contact Form.
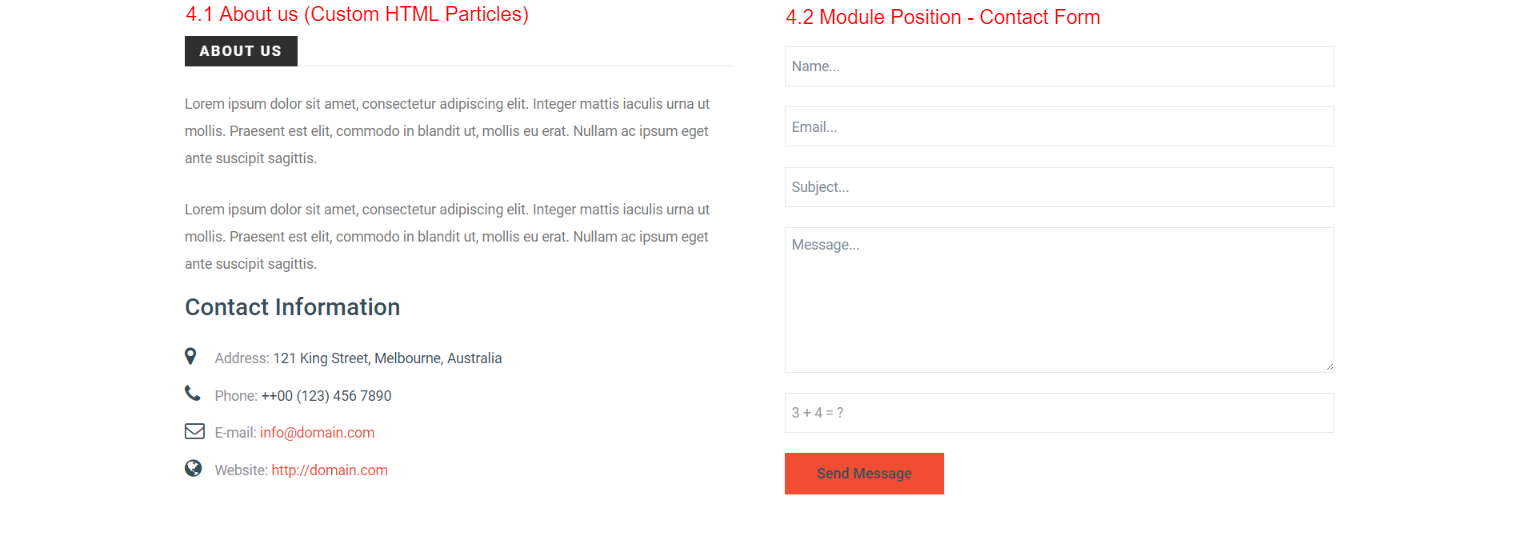

To edit the Custom HTML particle, click the Custom HTML particle icon settings.
This module position creates position contact-form and is assigned with module contact-form. To edit the position name, click the module position particle icon settings. Edit position name on the key field. For more information about Module position, please take a look at Gantry 5 positions document
To select which module appears in this place. Go to Extensions -> Modules, select your modules you wish to display, then switch position to the name of module positions, then save it.

5. Changing the Feature section
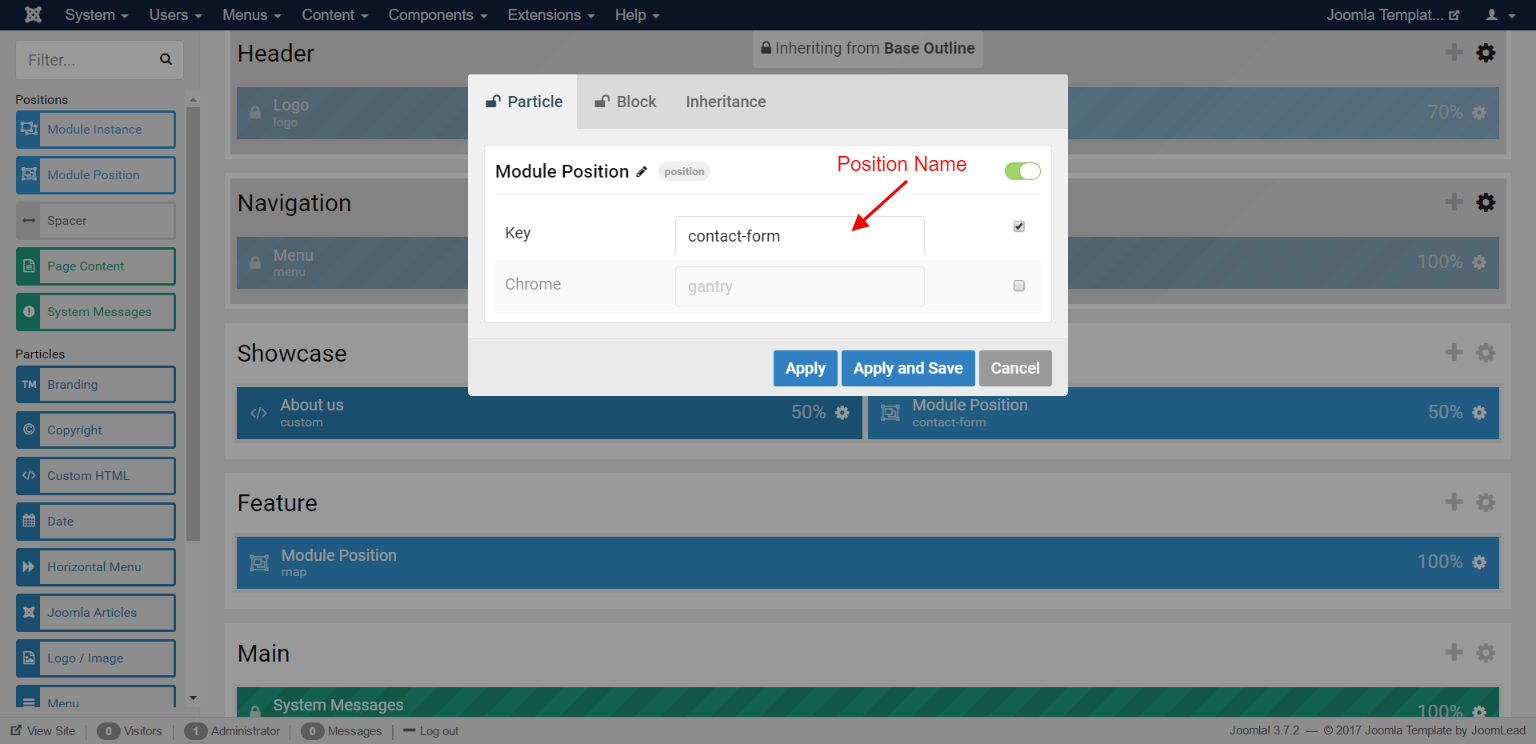
The Feature Section contains Module Position – Map.


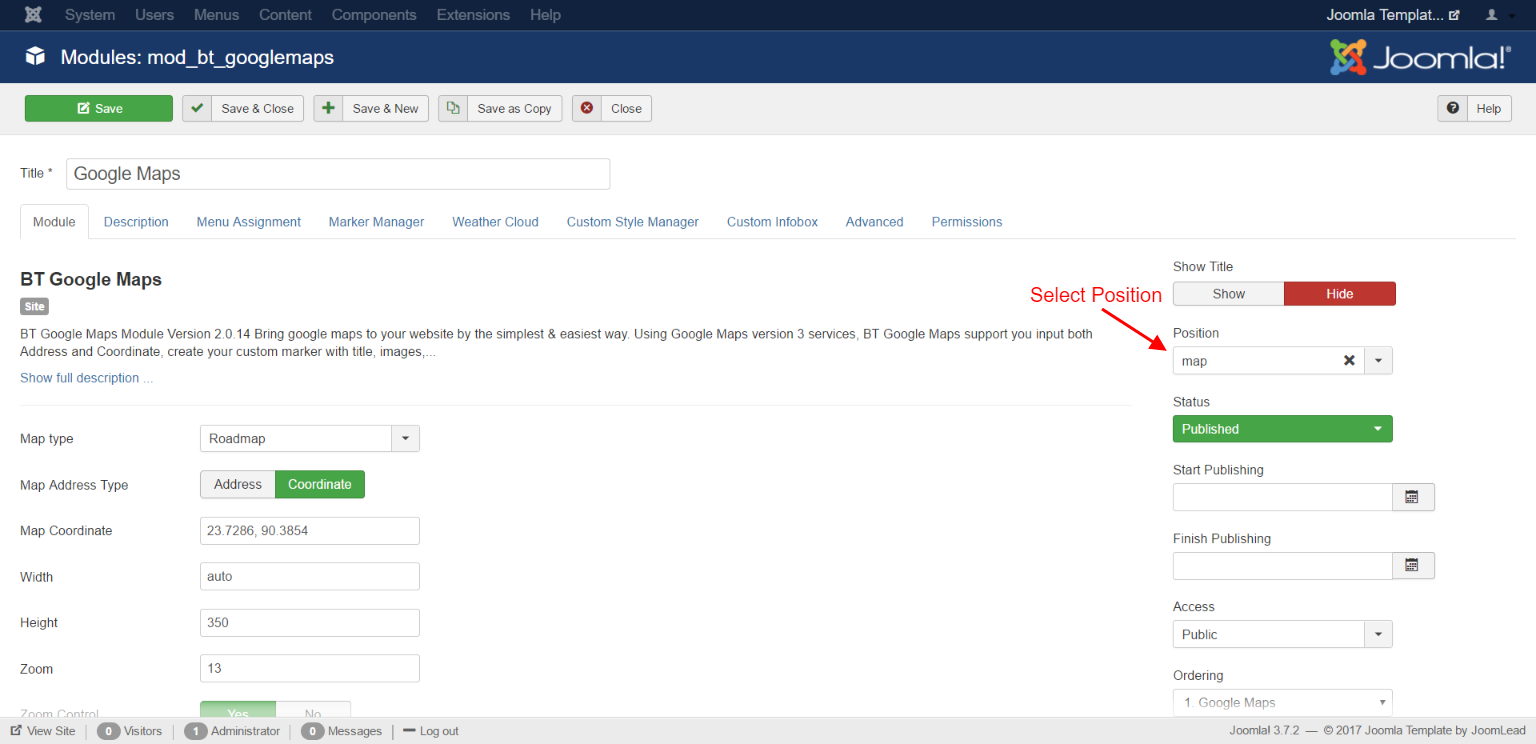
This module position creates position map and is assigned with module “map”. To edit the position name, click the module position particle icon settings. Edit position name on the key field. For more information about Module position, please take a look at Gantry 5 positions document

To select which module appears in this place. Go to Extensions -> Modules, select your modules you wish to display, then switch position to the name of module positions, then save it.
6. Changing the Bottom section
The Bottom section inherited from base outline so it copies particles and settings from base outline. If you want to edit this section for all pages, please go to Base Outline -> Section 7 above to edit the Bottom. If you want to edit for only Contact Page, remove the inheritance then edit it like Base Outline -> Section 7 above.
7. Changing the Footer section
The Footer section inherited from base outline so it copies particles and settings from base outline. If you want to edit this section for all pages, please go to Base Outline -> Section 8 above to edit the Footer. If you want to edit for only Contact Page, remove the inheritance then edit it like Base Outline -> Section 8 above.
8. Changing the Offcanvas section
The Offcanvas section inherited from base outline so it copies particles and settings from base outline. If you want to edit this section for all pages, please go to Base Outline -> Section 9 above to edit the Offcanvas. If you want to edit for only Contact Page, remove the inheritance then edit it like Base Outline -> Section 9 above.
Positions
JL Zmagazine comes with unlimited module positions. Thanks to the awesome Gantry 5 framework you can now easily create as many module positions as you want. You just need to go to the Layout Manager, drag and drop the “Module Position” particle wherever you want it to be and set the module position name.
Learn how to create any positions quickly without coding here.
Customization
All your customization (custom code) should be placed in your “Custom Style Sheet” file. This is the custom.scss file. By default, the custom.scss file does not exists, so you will need to create it. You need to create
this file in root/templates/TEMPLATE_NAME/custom/scss. You will find all details in the Gantry5 Documentation, in the “Adding a Custom Style Sheet” chapter.
Extensions
The Web is full of all kinds of different Joomla extensions. Throughout the years we had the chance to work with many extensions from many different providers which helped us to filter the best of best ones. The extensions that we use in our templates have the cleanest code, the best functionality and they’ve been very well supported by their developers.
Below you will find the Download link and the Documentation for each extension (Component, Module, Plugin) that we have used in this template.
- AcyMailing – Download | Documentation
- SP Quick Contact – Download
- Unite Slider (already included in quickstart package) – Purchase | Documentation
- Our Gantry 5 Particles
If you have any specific request or feedback as well as suggestions, feel free to drop us a line in Ticket System. We’ll try to cover them all.

Comments