You need to login first by using this link or click to login menu item(Menu bar).
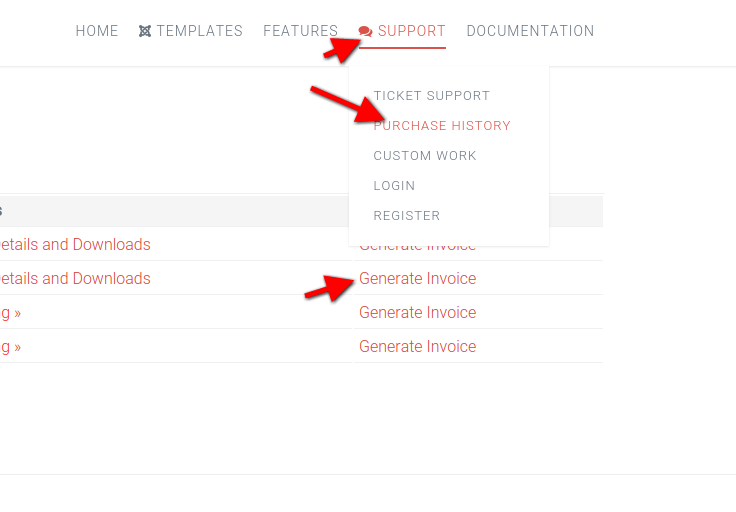
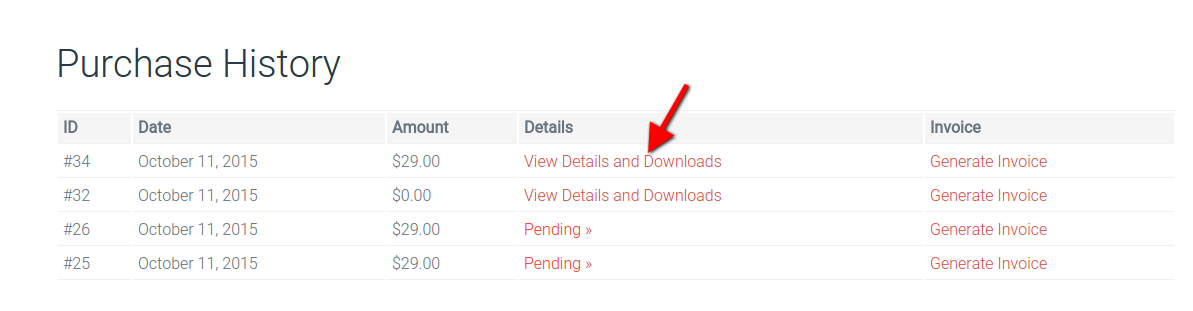
Clicking “Purchase History” menu item -> “Generate Invoice” to get an invoice for your order.
Clicking “Purchase History” menu item -> “Generate Invoice” to get an invoice for your order.
Free for download, limited features and support. You can use it for Unlimited Website License, personal or commercial project.
What you are actually purchasing is a Pro Version. The Pro Version offers significantly more features than the free-for-use version (see Pro Version for details). Each Pro version has its duration and specifics. See our pricing table for details of each plan. Once your order expired, Our template will continue to work indefinitely. However, you will not be able to access our Members Area anymore(Pro standard Edition only) to get updates and support.
This area of settings allows you to enable some appearance elements (icons in posts) as much a social comments and social share buttons.
Each Joomla article can have option to use Post formats it means use addcional illustration icon, which can show about what type of article (post) is that content.
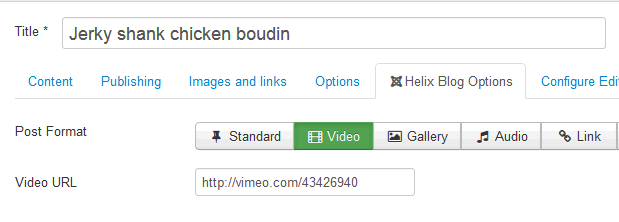
Of course those icons from Post Format settings are based on FontAwesome typography.
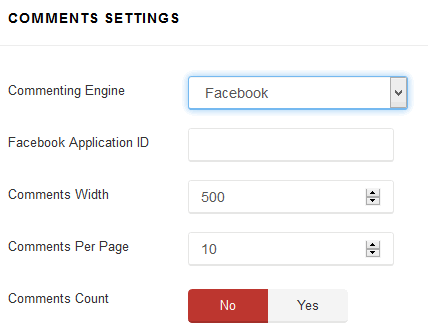
This build-in option adds IntenseDebate Comments system, Facebook comments and / or Disqus Comments to your site. All in one tool. You don’t have to install any addcional plugin anymore to get this feature. Social allows your readers to log in via a preferred social network and add comment under article. All you have to do is choose and set correct Facebook Application ID, IntenseDebate Account or Disqus Username/Subdomain. Sorry, but right now you can use only one selected social comments system or disable it for all content.
You can also enable Social Share buttons under each article. Current version have improved social share alignment. In future (upcoming) version we will add more social share buttons.
This section of JoomLead template settings allows you to reduce size of loaded template files. By speeding up template, you offer a better experience for your customers, improve your page speed (and therefore, possibly, your search engine ranking) and make your CMS appear more stable and professional.
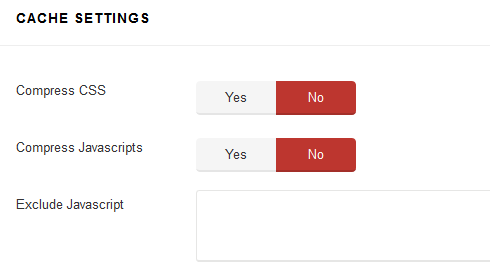
After you will decided that you have finished last works on template customization we suggest you to turn on some Cache options.
In order to reduce the number of requests from a browser to the server to render a page, and to take advantage of browser caching, this tag also does some advanced processing of the stylesheets. It generates uniquely named css file which are then returned to the browser, and allowed to cache on the browser.

Note Custom CSS field is not compressed when you’re using this option. It will help you to keep control about small changes.
Also optimize JavaScript is to improve your site performance by compress JS files into one – so that the total size and number of requests will be decreased.
When the optimization option is enabled, the optimized JS file package will be auto generated when a page is viewed in the first time. After enabling this option please check whole website. In some cases it may generate conflicts between this compress option and some third-party extensions, so then leave this one off or use third, following option if you know which file shouldn’t be compressed.
You may want to exclude some JavaScript files and folders from compression by using this option. To exclude JS files that you don’t want to optimize, just add the file name, if you have many files, please separate them with comma.
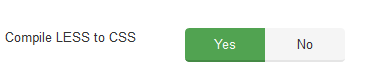
Compile LESS to CSS option – Helix 3 is developed with LESS system built-in. When customize your site, we suggest you to work with LESS files. All your changes in the LESS files will be compiled into the final CSS files. It will override previus changes
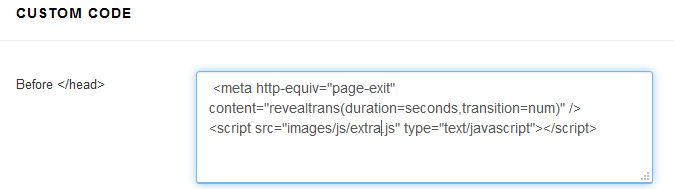
You can easily customize JoomLead Templates built for Joomla 3.4 with your own custom code, for example: CSS, JS, metatags, links and verification code by using the custom fields in that section of settings.
Any code you place here will appear in the head section of every page of your site. This is useful when you need to add verification code, javascript or css links to all pages. Check following example how you can use it.

Final result on front-end HTML5 code generated by browser engine. That line you can see on image below was put by Helix3 engine before ending section and before
will start, it means it’s fully W3C correctly solution.
You can use there any kinds of meta tags you want, also the refresh meta tag to redirect a page to a specific destination. Where is the best place to put JavaScript? If you want a script to execute early, before the page is displayed, then the HEAD section is a good place (it means use that field). Putting scripts into HEAD is a common and easy practice, but highly optimized sites use another method.
But remember all code you put here may harm your code quality or/and W3C verification tests, especially if it’s not HTML5 compatible. You can also use this solution to add addcional js libraries. By the way, CSS styles must be declared in the HEAD according to the HTML standard. Only javascripts are allowed to be placed anywhere.
Any code you place here will appear in bottom of body section of all pages of your site. For example javascript code can also be at the bottom of page body. In this case it executes after the page is shown.
This is useful if you need to input a tracking code for a statistics counter (web analytics) such as Google Analytics(GA), Piwik, Woopra or Clicky. This tracking code will be available on every page of your Joomla 3.4 web site.
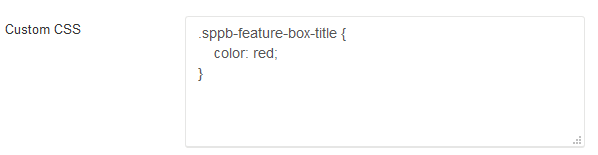
This field allows you to custom CSS code directly into template code without using any external file link. Just paste your styles for class’es or ID’s or HTML tags to override dafault style based on template. Custom CSS
This field allows you to custom CSS code directly into template code without using any external file link. Just paste your styles for class’es or ID’s or HTML tags to override dafault style based on template.
We always recommend inspecting a web page with a tool like FireBug or the inspector built into Chrome/IE/Firefox browser when looking to customize CSS. When you inspect the code output directly with one of this tools it will show you exactly what CSS is affecting the HTML element you want to change. You can also test out what CSS changes will affect the element as well live in the browser.
Using Custom CSS gives you the power to create your unique design and allow you customize the appearance of selected elements (colors, size etc.). If this field is too small for your advanced changes you can use “hidden” feature. You don’t have to edit the template.css, legacy.css any other css files. The reason being that if you edit the framework files then when you update the template you will lose all of your code, because all of your changes will then be overwritten by the new version of the files included in the update. Instead, you can use custom.css file that will override the default CSS code.
So if you need custom code please create a new custom.css file in insert inside css folder of your current active JoomLead template.

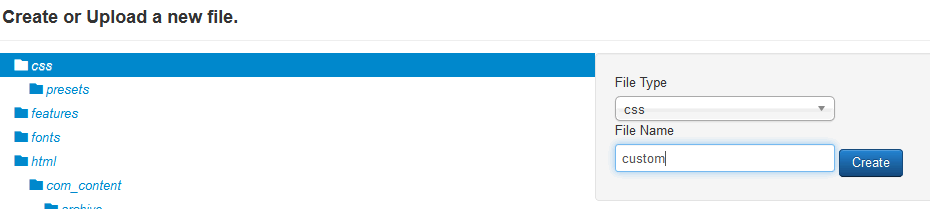
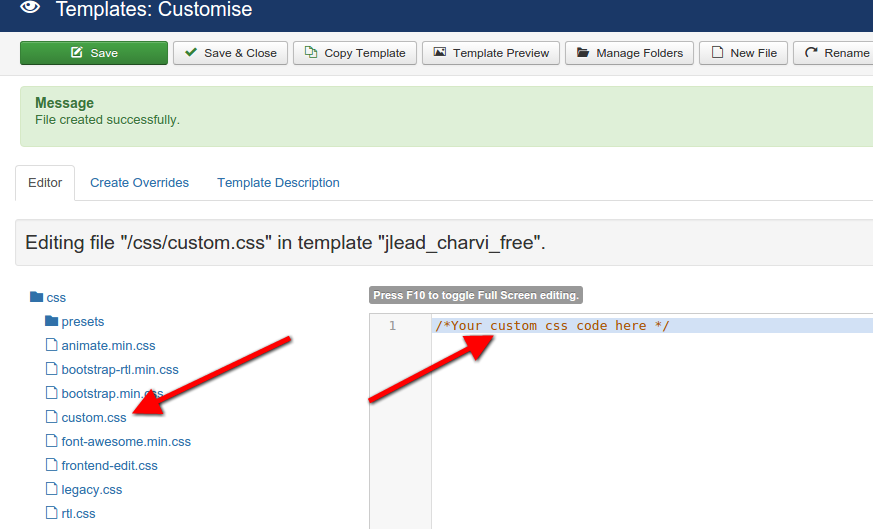
An alternative solution is putting custom.css into the helix3 directory: templates/jlead_charvi_free/css/
If the custom file will be found in the above directory then it will be loaded and applied.
Note! custom.css file is loaded before custom css code from template settings, it means that second one may override everything, also that file with styles.
The procedure of adding JavaScript code is same as above mentioned adding CSS code.
Right now using Google Font is much easier we also want to introduce a “Update Font List” feature. It allows you to refresh the list of available Google fonts. So if there are any new ones, this button allows you to quickly update fonts with just one click, and they will be automatically added in to JoomLead Template. Which allows you to use them quick.
Typography settings allows you to choose font and its settings for popular HTML tags: body, h1, h2, h3, h4, h5, h6 and navigation. Subsets (like Latin Extended, Vietnamese are also no problem – just choose the character sets you want. Of course if they are available for selected font set. All settings are from template settings, so you have got now a simple and efficient way to embed Google fonts of your choosing to your website with a few clicks of your mouse.
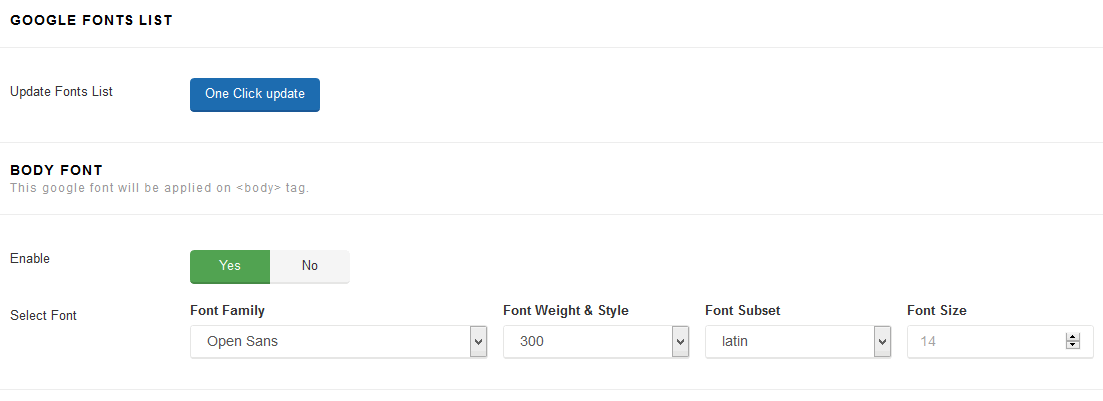
Google has been supplying the community with a large collection of web-based fonts for quite a few years. One of unique Helix3 feature is Live Font Preview during choosing from list 670+ of available fonts. Remeber integrating good looking font(s) into a Joomla website can improve the appearance, increases trust for your website.

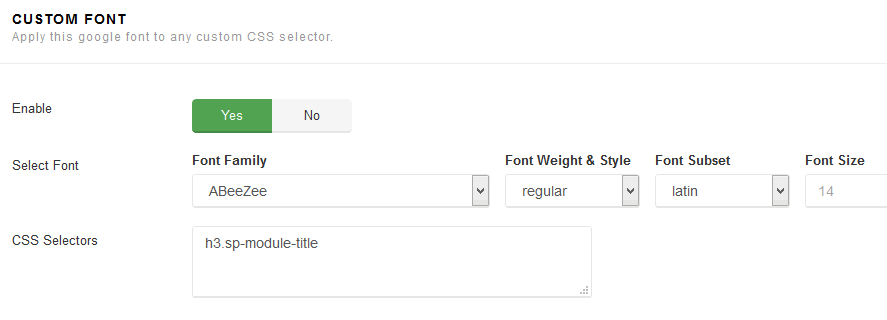
This section allows you also to use Custom Google Font for selected CSS selector. Just enable option, choose font settings and in empty field below insert name of classes separated by comma.
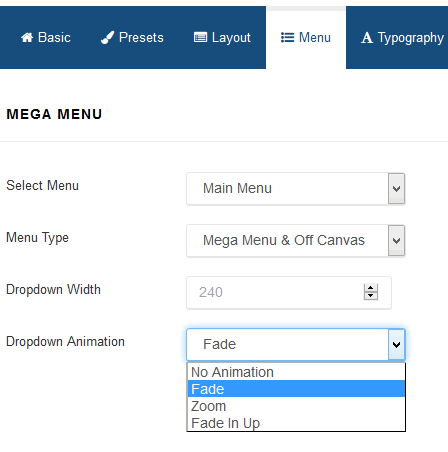
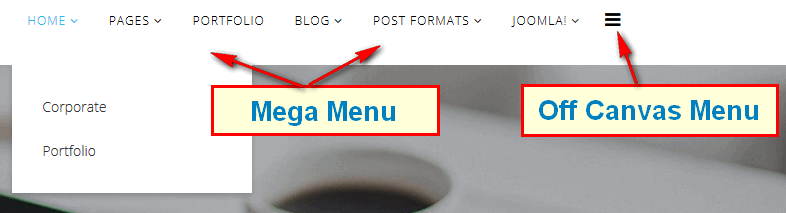
Mega Menu is an easy to use menu tool for creating beautiful, customized menus for your site, also with modules inside. That also boosts SEO and user engagement. Here in template settings you have access to 4 options only, more advanced settings are “hidden” in Menu Manager inside each menu item – so please check also there.
It allows you to choose menu from available in your system. If you’re planning to build multilingual site in Joomla 3.4 – you have to create clone of current template for each addcional language and choose here a Main Menu for each of them.
By default there are enabled two separate menus: Mega Menu and Off Canvas Menu. You can use both or only of of them – as you want or need.
Off Canvas is indeed a external menu module – so if you want to use this area you have to create a menu module, set it properly.
Remember to choose offcanvas module position for them.

What is more important in this sidebar menu you can also publish not only menu modules but also for example Search module, it also have to had a offcanvas position chosen in Module Manager.

Dropdown Menu Width value would be to set it to the width of your submenu size content area. By default 240px.
MegaMenu offer four transition options for your dropdown submenus:
This is the transition that occurs when the submenu is opened. To have the submenu appear with no transition, set this to None (No Animation).
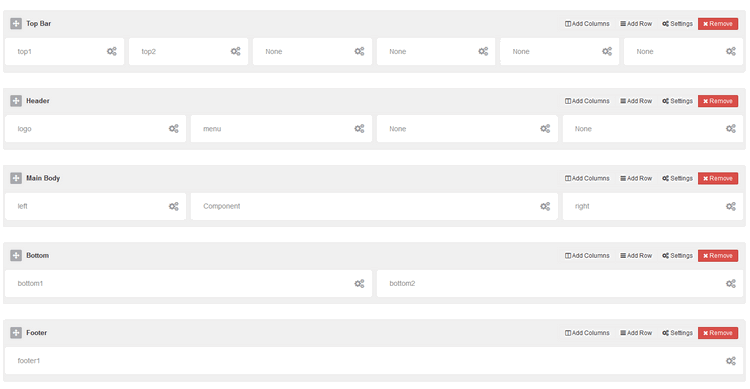
Allowing you to build flexible and beautiful layout based on module positions. Layout Builder is one of the unique features of Helix Framework which allows anyone to customize the existing template in any shape without having any programming language! In the layout builder we used 6 columns. Those 6 columns covered the whole width of our layout. If you want to create 4 columns then have to use wider blocks for every column.
Using Layout Manager is easy to master, learn. Following icons legend should help you understand which icons are responsible for what feature/setting. We suggest to make a copy of current layout to keep it for later in case if you would delete all rows and you forget how they were placed at the beginning.
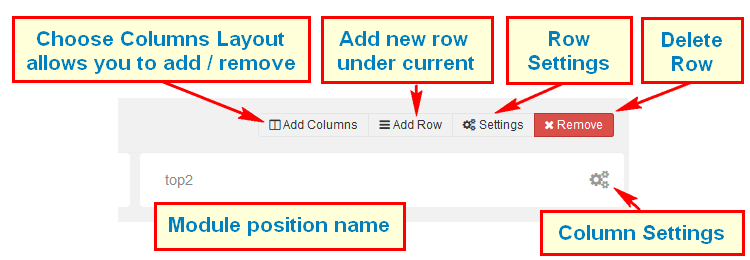
Note Each layout which you create can be saved and used later for example in template copy.
Note Do not forget to save column settings on popup window – save button is at the bottom, also general template must be saved after changes.
Please make sure that you’re using that version of CMS(latest version of Joomla 3.4). Changing your template lets you explore a variety of design styles and color combinations, which can completely change the look and feel of your website. In this tutorial we will teach you how to install a JoomLa template and set it as default for your website.
Our template including FREE and Premium template, that you can use for your private, noprofit and commercial projects.1. Download the latest JoomLead template via your customer area to your local disc.
2. If your Joomla site have content already you can install template and modules only. Quickstart is good only for new websites because it contain Joomla package itself.
3. Before installation, check the compatibility whether the downloaded version of template is compatible with your version of Joomla. Must be Joomla 3.4+.
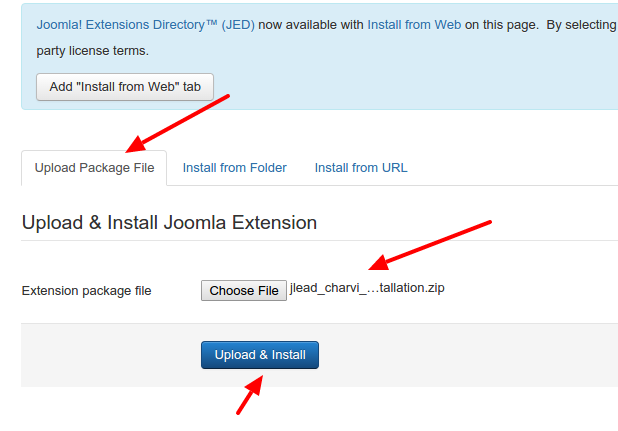
4. Once you have your Joomla template downloaded on your computer, login to the administrative area of your Joomla website and upload the template through the Extension Manager (Extensions -> Extension Manager).
5. Click on Browse button and select the template bundle archive you downloaded earlier. Finally, click on upload & install.
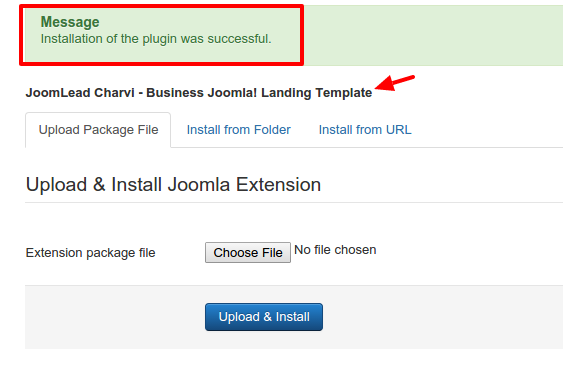
6. After installing the template, you should receive a message “Installing template was successful!”. At this point, you have successfully installed a JoomLead template. Please note that this has not activated your new template, you still need to do this if you want to use this design.
7. Once the template is installed in your Joomla 3 system, you need to make it default for your website so your pages get the new design. First, you need to go to Extensions -> Template Manager. Now select the template checkbox near its name and click on Make Default.
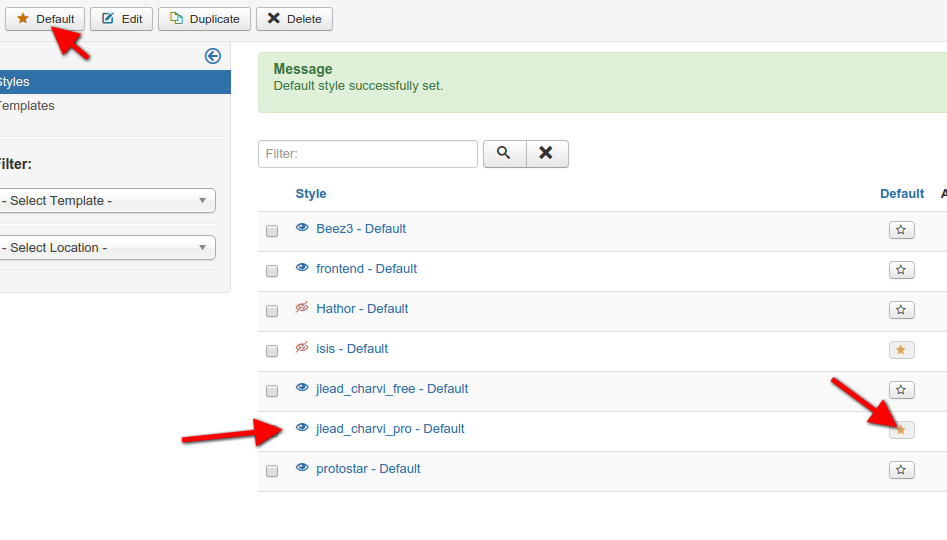
8. Make sure that only “jlead_charvi_pro” is assigned to all menu items if you want to use them fully as a default template in your next project.
9. That’s all JoomLead should be now your main and default template in Joomla 3.4+ system.